

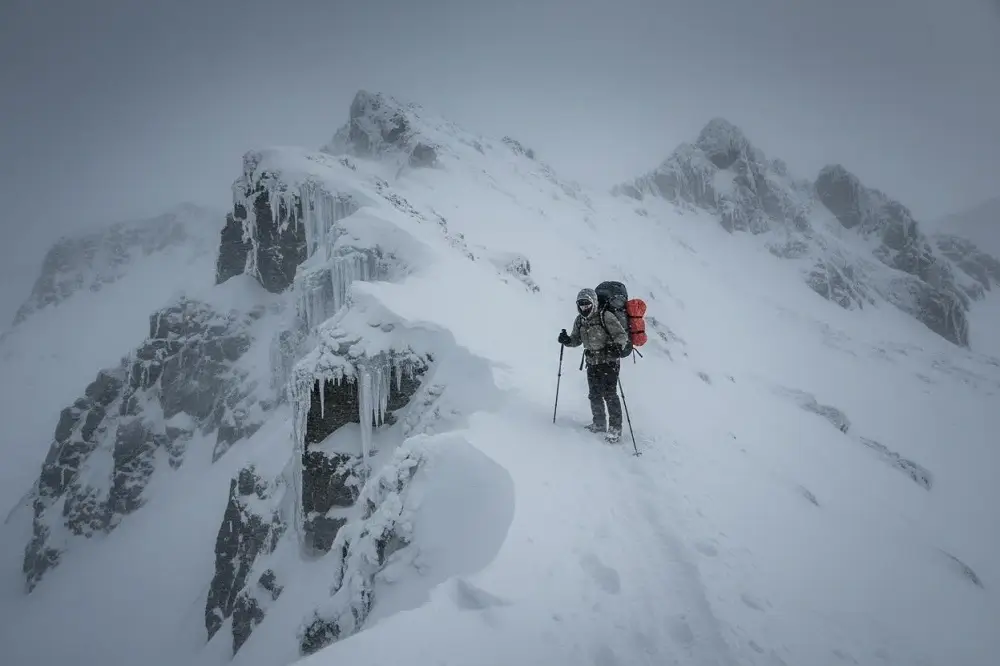
Winter transforms familiar landscapes into deadly environments where small mistakes cascade into life-threatening emergencies. Each year, experienced outdoorsmen and novices alike succumb to winter conditions, not because they lacked gear or knowledge, but because they made preventable errors under pressure. Understanding these critical mistakes before you need to could mean the difference between a challenging experience and a fatal one.
This guide examines ten winter survival mistakes that kill unprepared adventurers. More importantly, it provides the practical solutions you need to avoid them. Whether you’re planning a winter camping trip, hunting in cold conditions, or simply want to be prepared for vehicle emergencies, mastering outdoor survival skills specific to winter conditions isn’t optional – it’s essential.
Mistake #1: Underestimating Hypothermia’s Speed in “Moderate” Cold
Most people think you need sub-zero temperatures for hypothermia to kill. This misconception proves fatal every winter. Hypothermia can develop in temperatures as high as 50°F when wind and moisture combine. The “umbles” signal danger: stumbling, mumbling, fumbling, and grumbling indicate your core temperature has already dropped dangerously low.
Wet clothing accelerates heat loss by up to 25 times compared to dry fabric. A light rain at 40°F with 15 mph winds creates conditions more dangerous than -10°F in calm, dry air. Your body loses heat through five mechanisms: radiation, conduction, convection, evaporation, and respiration. Winter amplifies all five simultaneously.
The solution: Layer strategically using the proven three-layer system. Your base layer (merino wool or synthetic) wicks moisture away from skin. The insulation layer (fleece or down) traps warm air. The shell layer blocks wind and precipitation. Carry a complete change of dry clothes in a waterproof bag. If you get wet, change immediately – don’t wait until you “feel cold.” By then, you’re already in trouble.
Mistake #2: Building Fire AFTER You’re Already Cold
Here’s a truth that shocks most people: your fine motor skills deteriorate significantly once your core temperature drops just 2-3 degrees. Numb fingers can’t operate a lighter effectively. Shaking hands can’t strike ferro rods with precision. Cold makes fire-starting exponentially harder exactly when you need it most.
I’ve watched experienced survivalists struggle for 30 minutes trying to spark tinder with frozen hands while their body temperature plummeted. The irony? They could have built that same fire in 90 seconds before they got cold. Prevention always beats desperation.
The solution: Build your fire while you’re still warm and comfortable. Gather three times more firewood than you think you need before you start. Create a substantial tinder bundle using birch bark, fatwood shavings, or dry grass. Have kindling arranged by size. Stack enough larger fuel to maintain the fire for hours. Build a reflector wall with logs or rocks to direct heat toward your shelter. Only after everything’s prepared should you strike your first spark.
Practice primitive fire methods in summer. When winter arrives, you’ll have muscle memory to fall back on even with reduced dexterity. Always carry redundant ignition sources: waterproof matches, butane lighters, and a ferro rod as backup.
Mistake #3: Sweating Through Your Layers During Exertion
“Cotton kills” has become a survival cliche, but the principle extends beyond fabric choice. Any moisture against your skin (whether from rain, snow, or your own sweat) dramatically increases heat loss. Sweat-soaked synthetic clothing still wicks heat away from your body. In winter, staying dry trumps staying warm.
Overexertion while hiking, setting up camp, or gathering firewood causes profuse sweating. That moisture saturates your base layer. When you stop moving, evaporative cooling combined with reduced heat production from lower activity creates a perfect storm for rapid hypothermia.
The solution: Regulate your temperature actively through the “be cold when you start” principle. Begin your hike feeling slightly chilly. Your body will warm up quickly once you start moving. Shed layers before you start sweating, not after. Unzip your jacket. Remove your hat. Roll up sleeves. Seems counterintuitive, but staying slightly cool during exertion keeps you dry – and dry keeps you alive.
Take frequent breaks to cool down before you sweat. Adjust layers continuously as conditions and activity levels change. Carry a small pack towel to wipe away any moisture that does accumulate. Consider a vapor barrier layer for extreme cold – it prevents sweat from reaching outer layers entirely.
Mistake #4: Ignoring Wind Chill When Selecting Shelter Location
Temperature alone tells half the story. A 20°F night with 20 mph winds feels like -4°F on exposed skin. Your shelter location matters as much as the shelter itself. Yet countless winter campers pitch tents in exposed locations simply because they offer nice views or flat ground.
Wind strips away the warm air layer surrounding your body and shelter. It penetrates gaps in clothing and shelter walls. A properly sited shelter can be 20-30°F warmer than the ambient temperature. A poorly sited shelter might be colder than open air due to wind tunneling effects.
The solution: Scout your location before committing. Look for natural windbreaks: dense evergreen groves, rock formations, ridgeline backslopes, or dry streambeds below ground level. Avoid hilltops, open fields, and lake shores where wind accelerates. Position your shelter opening away from prevailing winds.
Create artificial windbreaks if natural ones don’t exist. Pile snow into walls on the windward side. Stack deadfall logs. Build a rock wall. These simple improvements can reduce wind speed by 70% around your immediate shelter area. Remember: cold air sinks. Camping on slopes positions you above the coldest air that pools in valleys overnight.
Mistake #5: Consuming Snow Without Melting It First
Eating snow seems like an obvious solution to dehydration in winter. It’s abundant, clean, and requires no container. This mistake kills slowly rather than quickly, making it insidious. Your body must expend significant energy melting that snow internally – energy your metabolism desperately needs for warmth production.
Eating one pound of snow to create one pint of water burns approximately 150 calories and lowers your core temperature measurably. Over a day, eating snow to meet hydration needs could require 1,200+ extra calories and accelerate hypothermia development. The math doesn’t work in winter survival.
The solution: Always melt snow before consuming it. Use any metal container – pot, cup, or improvised tin can. Melt snow in small batches, adding more as it liquefies to prevent scorching. Add a small amount of water first if available to prevent burning. Place your water container inside your sleeping bag at night to prevent refreezing and provide a warming effect.
For emergency situations without fire capability, warm snow against your body in a sealed water bottle or bladder. It melts slowly but doesn’t tax your internal furnace. Better yet, collect water during day when ice melts naturally on sunny surfaces. Rock faces, metal surfaces, and dark-colored objects all weep water on sunny winter days.
Mistake #6: Inadequate Insulation From Ground Contact
Ground conduction steals body heat faster than any other mechanism. Frozen earth wicks away warmth continuously all night. Even a premium sleeping bag rated to -20°F provides almost no insulation when compressed beneath your body weight. People focus on staying warm from above while the ground silently kills them from below.
I’ve met winter campers using $500 sleeping bags who shivered all night because they skimped on ground insulation. They’ll spend a fortune on the latest down-filled bag but use a cheap foam pad. Your sleeping pad’s R-value matters more than your bag’s temperature rating in winter conditions.
The solution: Stack insulation beneath you. Use multiple sleeping pads with combined R-values exceeding 5.0 for winter camping. Closed-cell foam pads provide R-value around 2.0. Insulated air pads add 4.0-6.0 or more. Together, they create a thermal barrier the ground cannot penetrate.
Natural materials work too. Pine boughs, dry leaves, or grass create insulation layers. Build these at least six inches thick – compression reduces effectiveness significantly. Dry spruce or fir boughs arranged shingle-style provide excellent insulation and a comfortable sleeping surface. In snow, dig down to ground level or build up a platform to escape the coldest air layer.
Mistake #7: Over-Relying on High-Tech Gear Without Skills
Modern survival gear is remarkable. GPS units, satellite communicators, chemical heat packs, and advanced fabrics enhance safety tremendously. But batteries die. Electronics fail. Gear breaks. When technology fails in winter conditions, skills determine who lives and who dies.
The preparedness community sees this pattern repeatedly: someone ventures into winter backcountry loaded with expensive equipment but lacking fundamental skills. Their GPS battery dies. Their stove malfunctions. Their fancy lighter fails. They cannot start fire with primitive methods, cannot navigate by map and compass, cannot build shelter from natural materials. Technology becomes a crutch that weakens rather than strengthens survival capability.
The solution: Master low-tech skills before you rely on high-tech tools. Learn bow drill fire starting even if you carry lighters. Practice dead reckoning navigation even though you have GPS. Build debris huts even with a four-season tent in your pack. Skills weigh nothing, never break, and work when everything else fails.
Carry redundant systems spanning multiple technology levels. Your fire kit should include waterproof matches, multiple lighters, ferro rod, and natural tinder. Your navigation should include GPS with extra batteries, compass with map, and celestial navigation knowledge. Gear enhances survival – skills ensure it.
Mistake #8: Inadequate Caloric Intake for Cold Weather Metabolism
Your body is a furnace that requires fuel. In cold weather, that furnace must burn hotter and longer to maintain core temperature. Cold weather survival demands 4,000-6,000 calories daily – double your normal intake. Underfueling compromises everything: heat production, decision-making, physical capability, and immune function.
Low blood sugar makes you feel colder regardless of actual temperature. It impairs judgment precisely when clear thinking matters most. Many hypothermia deaths involve victims who had adequate shelter and clothing but insufficient calories to fuel their internal furnace through the night.
The solution: Pack calorie-dense foods emphasizing fats and complex carbohydrates. Nuts, nut butters, cheese, chocolate, and fatty meats provide concentrated energy. Avoid foods high in simple sugars – they spike blood sugar briefly then crash, leaving you colder than before. Eat small amounts frequently rather than large meals spaced widely apart.
Consume hot food and beverages whenever possible. The thermal energy contributes directly to core warming while the calories fuel internal heat production. Eat a high-fat snack before bed – your body metabolizes it slowly throughout the night, maintaining warmth. Wake up cold at 3 AM? Eat something immediately. Don’t ration food in survival situations – your body needs maximum fuel.
Mistake #9: Waiting Too Long to Signal for Help
Pride kills. Many winter emergencies escalate from manageable to fatal because people delay signaling for rescue. They think “I can handle this” or “I don’t want to waste resources” or “It’s embarrassing.” By the time they finally call for help, darkness has fallen, weather has deteriorated, and their condition has declined beyond self-rescue.
Search and rescue teams would rather respond to ten false alarms than arrive too late once. They don’t judge you for signaling early. They respect the decision to recognize when you’re in over your head. A helicopter evacuation at 2 PM in clear weather succeeds. A midnight search in a blizzard for a hypothermic victim might not.
The solution: Establish hard decision points before you depart. If X happens, I signal for help immediately. These might include: injury preventing self-rescue, lost for more than two hours, wet clothing with no fire capability, or illness/hypothermia symptoms. Carry multiple signaling devices: PLB (Personal Locator Beacon), satellite messenger, signal mirror, whistle, and brightly colored marking panel.
Practice signaling techniques before you need them. Three of anything signals distress universally: three whistle blasts, three fires, three bright objects arranged in triangle. Orange or bright pink marking panels are visible from aircraft miles away. Signal mirrors work in sunshine up to 10 miles distance. Sound carries differently in cold air – factor this into whistle use.
Mistake #10: Neglecting to Protect Extremities and Face
Frostbite strikes faster than most people realize. Exposed skin can freeze in minutes at temperatures below 0°F with wind. Once tissue freezes, damage is permanent. Frostbitten fingers cannot operate gear. Frostbitten feet cannot walk out. Facial frostbite can cause permanent nerve damage and tissue loss.
The progression is deceptive. First comes tingling, then numbness. By the time you notice the problem, damage has already begun. Rewarming frostbitten tissue incorrectly causes additional injury. Many winter survival situations involve people who protected their core while their extremities suffered irreversible damage.
The solution: Protect your extremities as aggressively as your core. Wear mittens over gloves for maximum warmth – mittens keep fingers together, sharing heat. Carry chemical hand warmers for emergency use. Wiggle toes and fingers regularly to maintain circulation. At first sign of numbness, warm the area immediately.
Your head radiates up to 40% of body heat when uncovered. Wear a quality winter hat that covers your ears. Use a balaclava or neck gaiter to protect your face in extreme cold. Goggles prevent eye damage from wind and snow glare. Pack extra socks and gloves – having dry backups can save digits. Never wear tight footwear that restricts circulation. Slightly loose boots with room for wiggling toes and thick socks work better than tight, “warm” boots that cut off blood flow.
Putting It All Together: Your Winter Survival Protocol
These mistakes share a common thread: they’re all preventable through preparation, knowledge, and disciplined decision-making. Winter survival isn’t about being tough or lucky – it’s about avoiding errors that create emergencies in the first place.
Before every winter outing, conduct a thorough gear check. Test your fire-starting methods with cold hands. Review your caloric needs and pack accordingly. Study the forecast and understand wind chill. Share your detailed itinerary with someone reliable. These simple steps eliminate most emergencies before they develop.
During your outing, remain hypervigilant about the signs of trouble. Monitor your body’s signals: shivering, loss of dexterity, confusion, or fatigue all indicate developing problems. Check companions for symptoms they might not notice in themselves. Make conservative decisions early rather than desperate decisions late.
Most importantly, practice these skills before you need them. Master fire-starting in your backyard. Test your shelter setup in controlled conditions. Learn to recognize early hypothermia symptoms. The middle of a winter emergency is too late to learn – preparation and practice now determine survival outcomes later.
Essential Winter Survival Gear Checklist
While skills trump gear, the right equipment significantly improves your margin of safety. Pack these essentials for any winter outing:
- Fire starting: Waterproof matches, butane lighter, ferro rod, natural tinder, fire starter cubes
- Insulation: Three-layer clothing system, spare base layer, extra socks and gloves, emergency bivvy
- Shelter: Four-season tent or tarp, sleeping bag rated 10°F below expected low, high R-value sleeping pads (stacked)
- Hydration: Metal water bottle, water treatment, insulated bottle sleeve, thermos for hot beverages
- Navigation: Map, compass, GPS with spare batteries, satellite communicator
- Signaling: Whistle, signal mirror, bright marking panel, headlamp with extra batteries
- Food: Calorie-dense items totaling 4,000-6,000 calories per day, plus emergency backup
- Tools: Fixed-blade knife, folding saw, multitool, duct tape, 550 cord
- Protection: Sunglasses/goggles, sunscreen, lip balm, hand warmers, first aid kit
- Emergency: Space blanket, chemical heat packs, backup fire kit, emergency shelter
Final Thoughts: Respect Winter, Don’t Fear It
Winter wilderness offers experiences unavailable any other season. The profound silence of snow-covered forests. The crystalline beauty of ice formations. The satisfaction of mastering harsh conditions through skill and preparation. These rewards await those who approach winter with respect rather than fear.
Every mistake discussed in this article has killed people. But every mistake is also completely avoidable through education and practice. The preparedness mindset that serves you in winter (anticipating problems, maintaining margins of safety, making conservative decisions) applies to all survival situations year-round.
Study these lessons. Practice these skills. Share this knowledge with others in the outdoor community. The difference between adventure and tragedy often comes down to small decisions made before problems develop. Choose wisely, prepare thoroughly, and winter becomes a season to embrace rather than endure.
What winter survival mistakes have you experienced or witnessed? Share your lessons learned in the comments below – your experience might save someone’s life this winter season.