

MAKE AND USE AIR-POWERED FIRE PISTONS FROM COMMON MATERIALS.
One day, I received a note out of the blue from Tom Grover of Idaho.
He’d read some articles I’d written; and, after sharing his comments, he asked if I’d like to have some fire pistons he’d made. I’ve never been a fan of fire pistons, because after having tried them hundreds of times, they were close to the bottom of my choices for making a fire without a match. However, I couldn’t resist the offer.
“Sure,” I told him. “Send the fire pistons. I’ll give them a try.”
My view of the fire piston changed with the arrival of Grover’s fire piston.
Within a few weeks, I received a box of various artifacts, including four complete fire pistons he’d made, along with various other fire-making artifacts, such as his sulfur sticks and homemade char cloth.
At the next opportunity, I met with one of my fellow primitive skills experimenters, Angelo Cervera, to spend a few hours trying out Grover’s homemade fire pistons.
My first reaction was that these were beautiful tools—far more appealing than fire pistons I’d purchased before from ads in outdoor magazines. These were clearly one-of-a-kind items.
Still, external beauty doesn’t necessarily equate to the ability to create a fire.
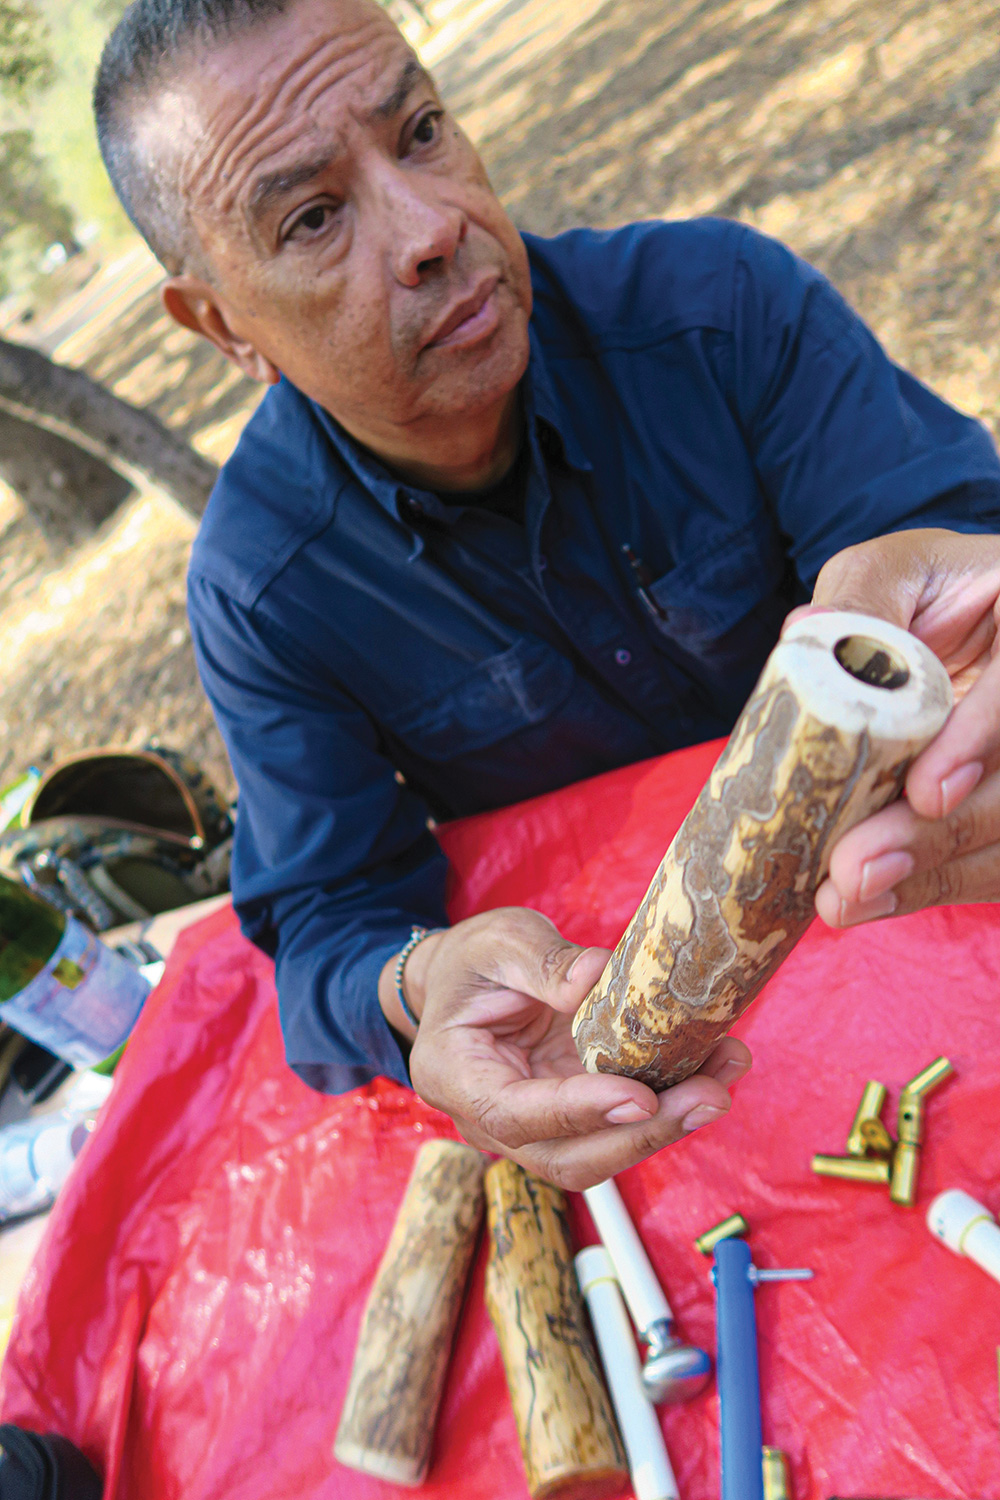
We laid everything out on the table and investigated what Grover had created. I played with the motion of the piston into the cylinder to see how easily it slid, and I examined it carefully to see precisely how Grover had made it.
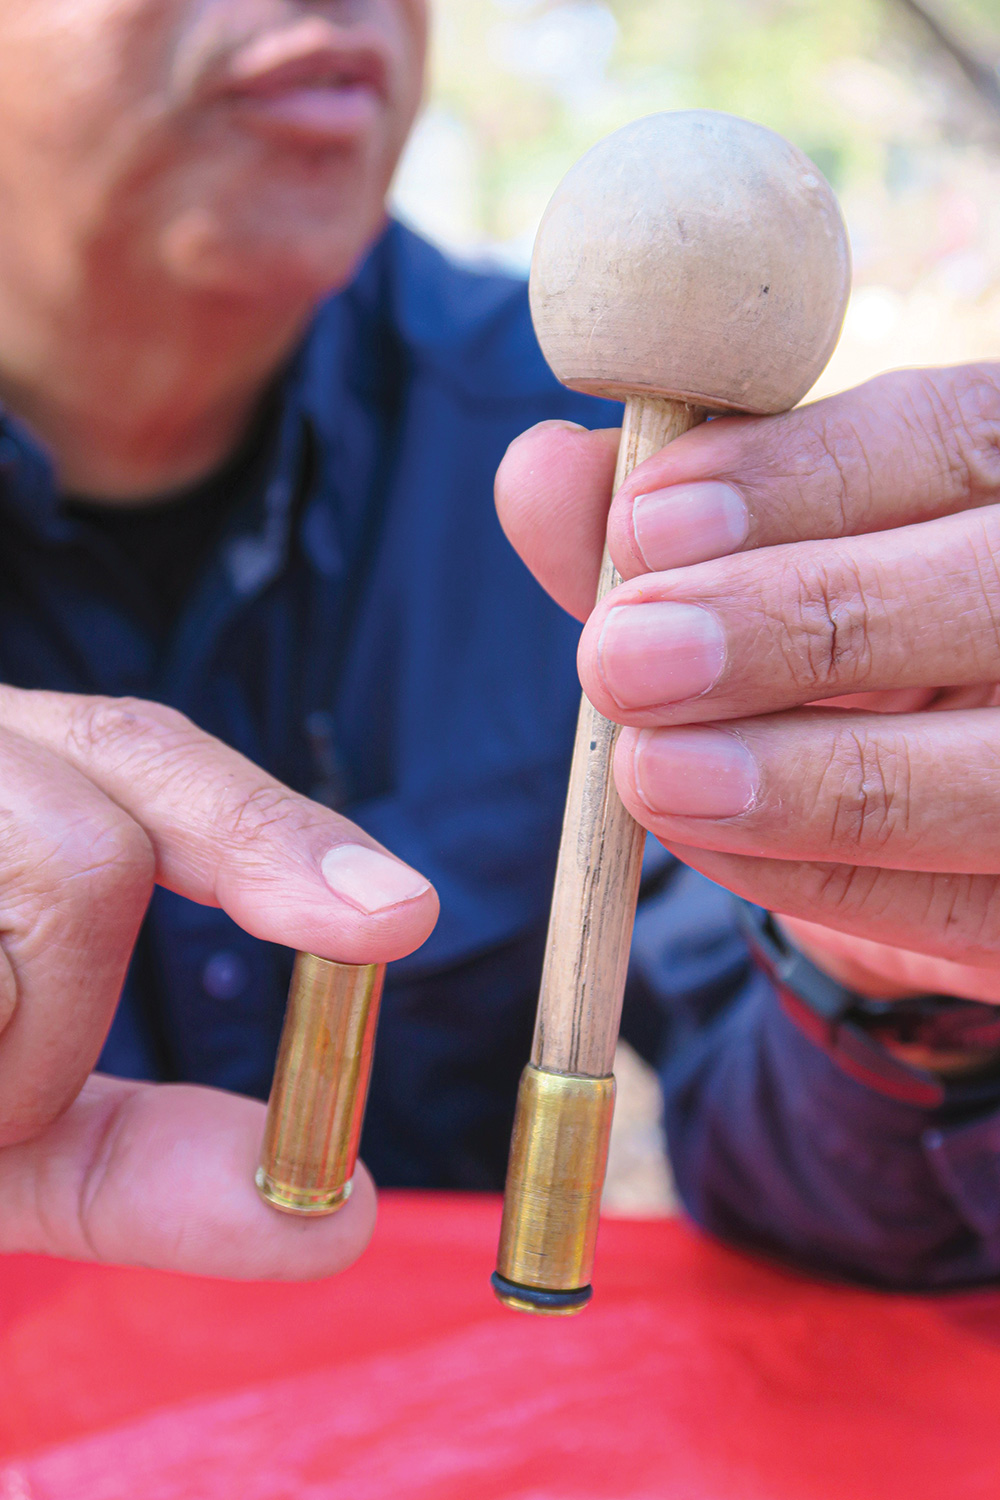
The tip of each piston was an old, brass cartridge casing—something I’d never seen used before. I inserted a bit of the char cloth that Grover had sent me into the cartridge casing’s primer pocket.
Grover had explained to me that as the result of many years of experimentation, he makes his char cloth from the four-ply cotton of a floor mop. It had very good cohesiveness as I inserted it into the opening. Then, I whacked the piston into the cylinder, rapidly pulled it out, and—bingo—I had a burning ember. I repeated this a few times and, after a few initial duds, I was getting an ember with each whack.
Cervera tried another Grover fire piston. Not only had he never tried a fire piston before, he’d never even seen one. After putting some char cloth carefully into the hole, he put the piston into the cylinder and whacked it. He quickly pulled out the piston … and we both were amazed that he had an ember on his first try. He did it a second time and created another ember. He added some tinder to the ember and blew it into a flame.
FIRE PISTON ANATOMY
Exactly what is a fire piston?
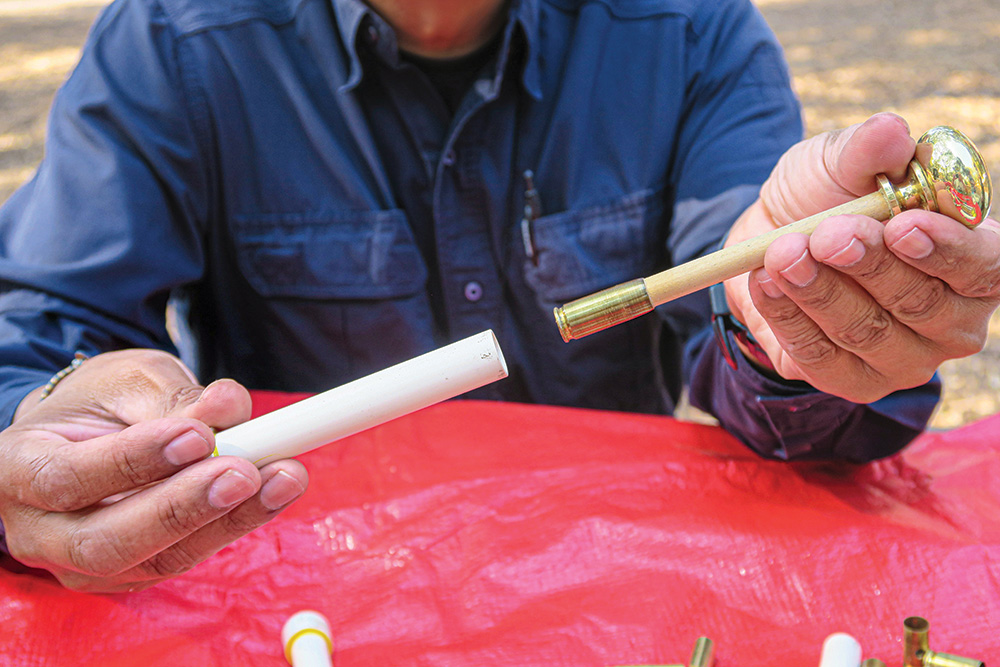
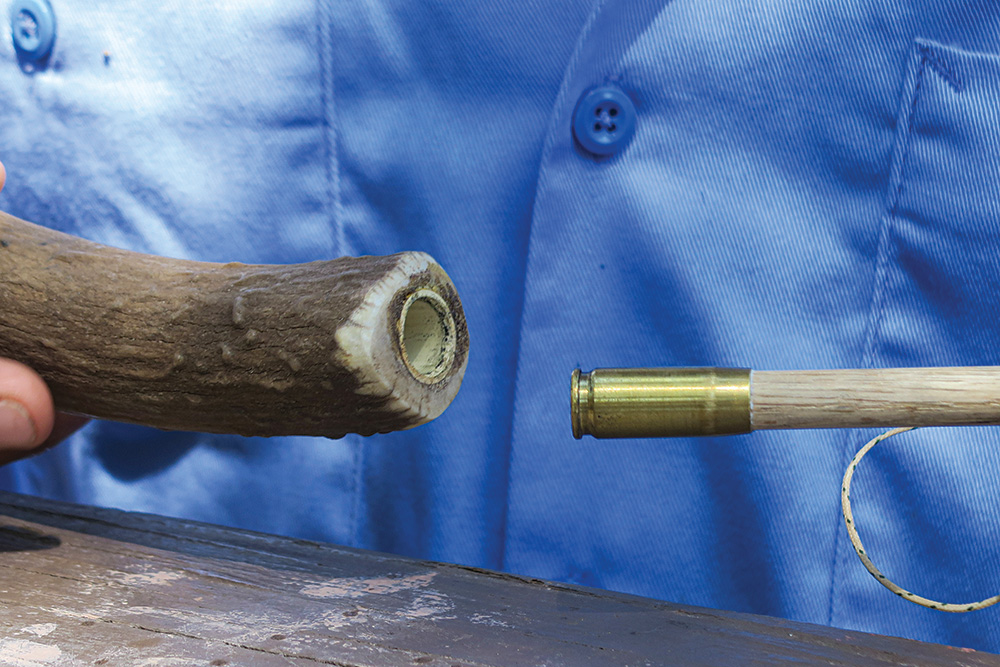
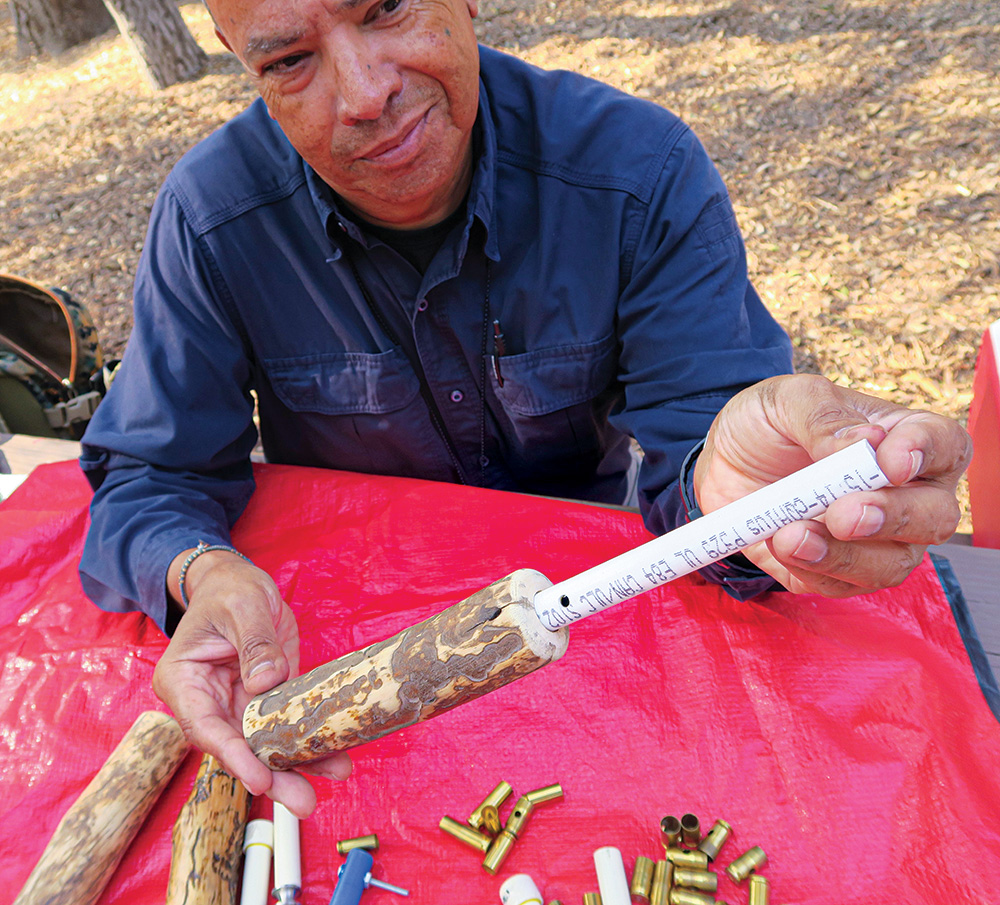
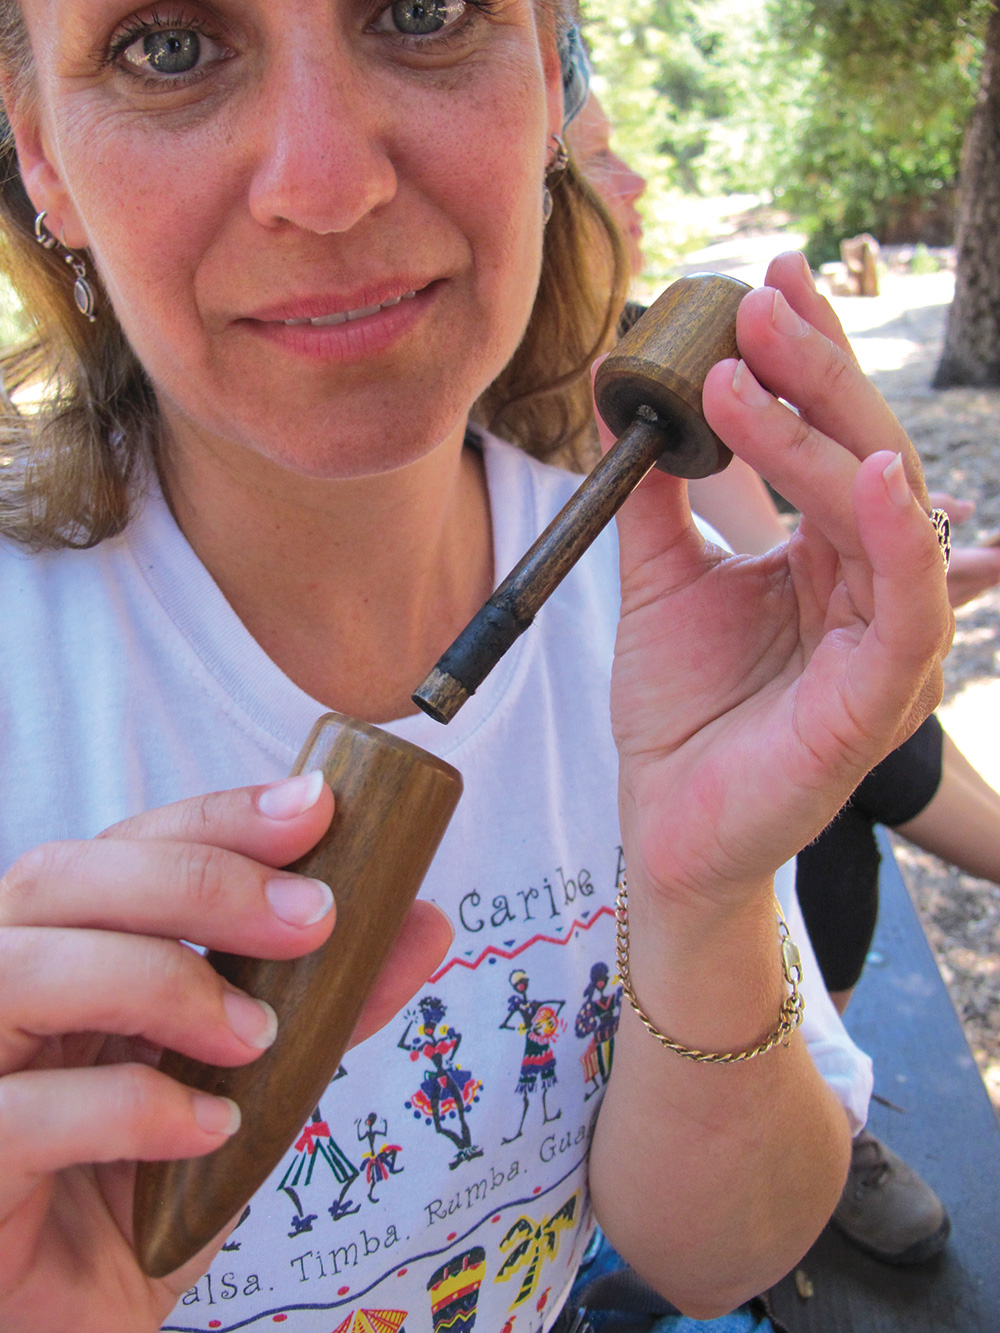
It’s a hollow cylinder that’s usually hollowed out of wood. The hollow must be uniform and typically goes about 4 inches into the wood. A piston or rod is made to fit precisely into the hollow cylinder. The tip of the rod has a small hollow in which you insert char cloth.
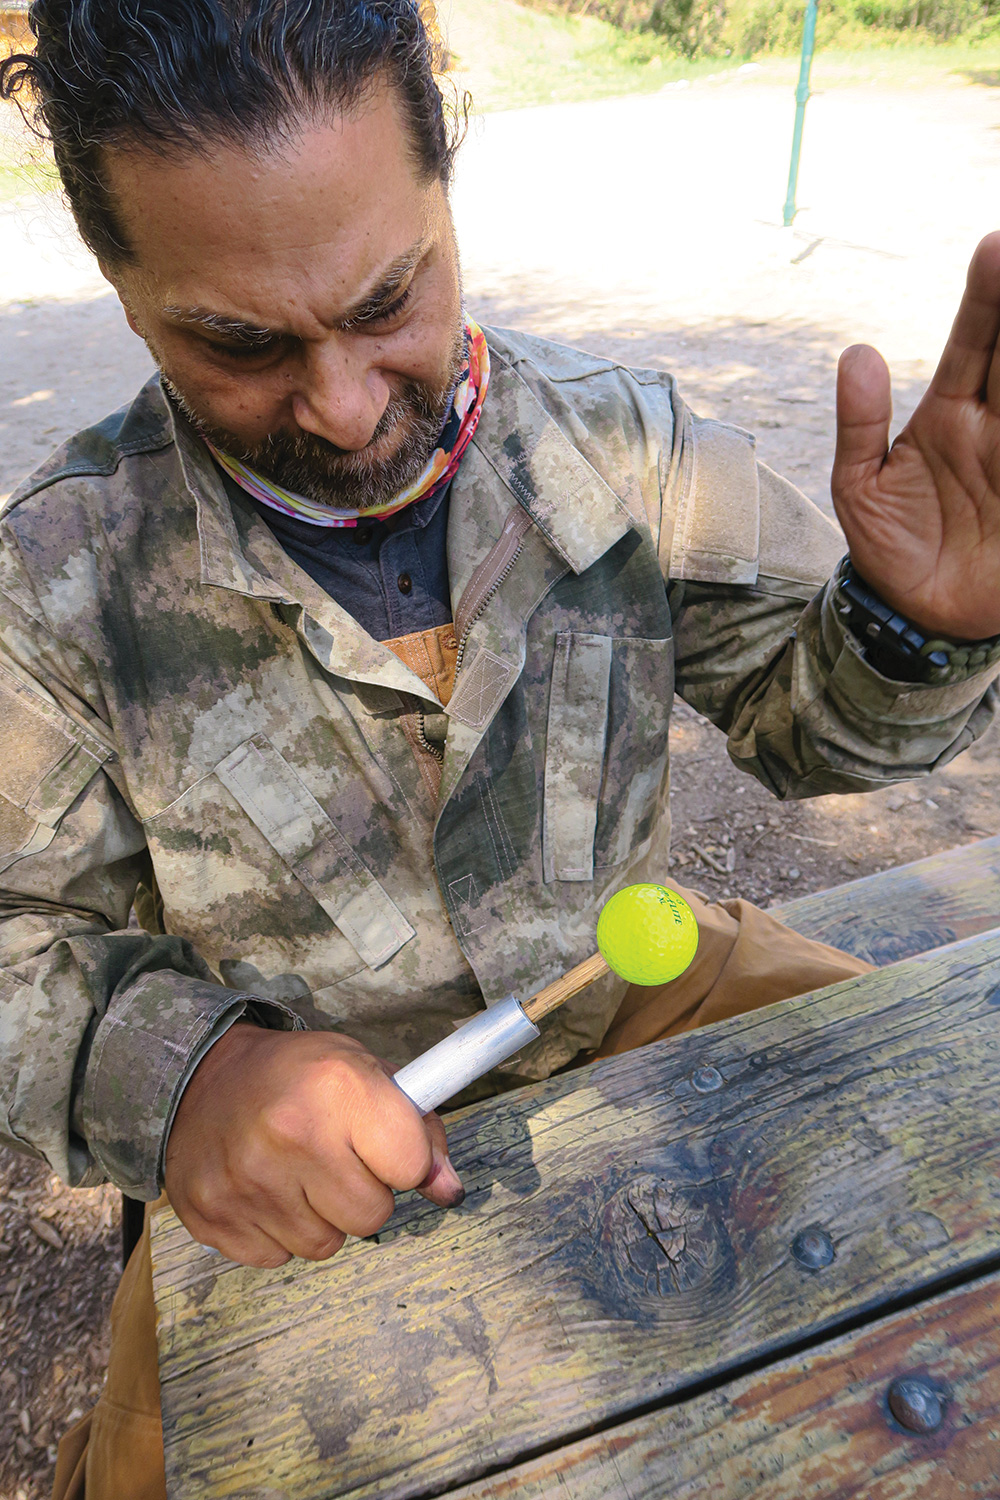
You then carefully place the rod into the cylinder, whack it hard with the palm of your hand and rapidly remove the rod. If everything goes just right, you see glowing char cloth from the ember you just created in the cylinder—the result of the compression of oxygen.
Walter Hough, author of Fire-Making Apparatus in the United States National Museum (1928, U.S. Government Printing Office), describes this method as one of the “fire-making curiosities” and refers to it as “the fire syringe.”

According to Hough, “The fire syringe, as it is called, consists of a piston and plunger. Generally, the piston is a smooth, circular canal drilled in hardwood or horn. The plunger fits the cavity with exactness. In practice, a bit of tinder is placed in a slight cavity at the end of the plunger; the latter is set in the orifice and driven down with a sharp blow. Quickly withdrawing the plunger, the tinder is found alight.
“The principle is that in being compressed to a smaller volume, air gives up heat. In the case of the fire syringe, this is enough to ignite tinder. This is a method which has been employed by many tribes of men in Malaysia, and it appears to be a native invention.”
When I first experimented with fire pistons, I did get a few embers when the tool was new and clean. However, it would soon become impossible. I’d repeatedly smack it down … but the only result was that my hand hurt.
I’d even take a few fire pistons to my outdoor fire workshops and let students try them. In the past 40-plus years “PTG” (“Pre-Tom Grover”), there might have been just one student who got an ember in all the hundreds of attempted tries. So, I eventually stopped bringing the fire pistons to my classes.
Clearly, Grover’s innovations and methods of manufacture have resulted in a fire piston that actually works and is actually worth carrying.
Let’s look at his construction methods, as well as the important considerations for making sure your fire piston produces an ember.
CONSTRUCTION METHODS
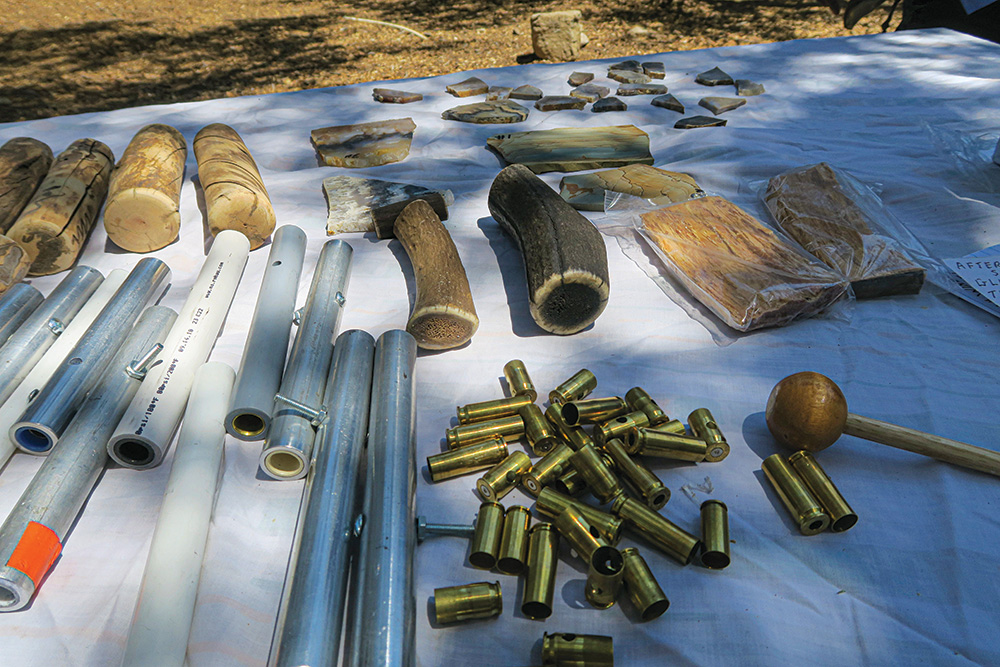
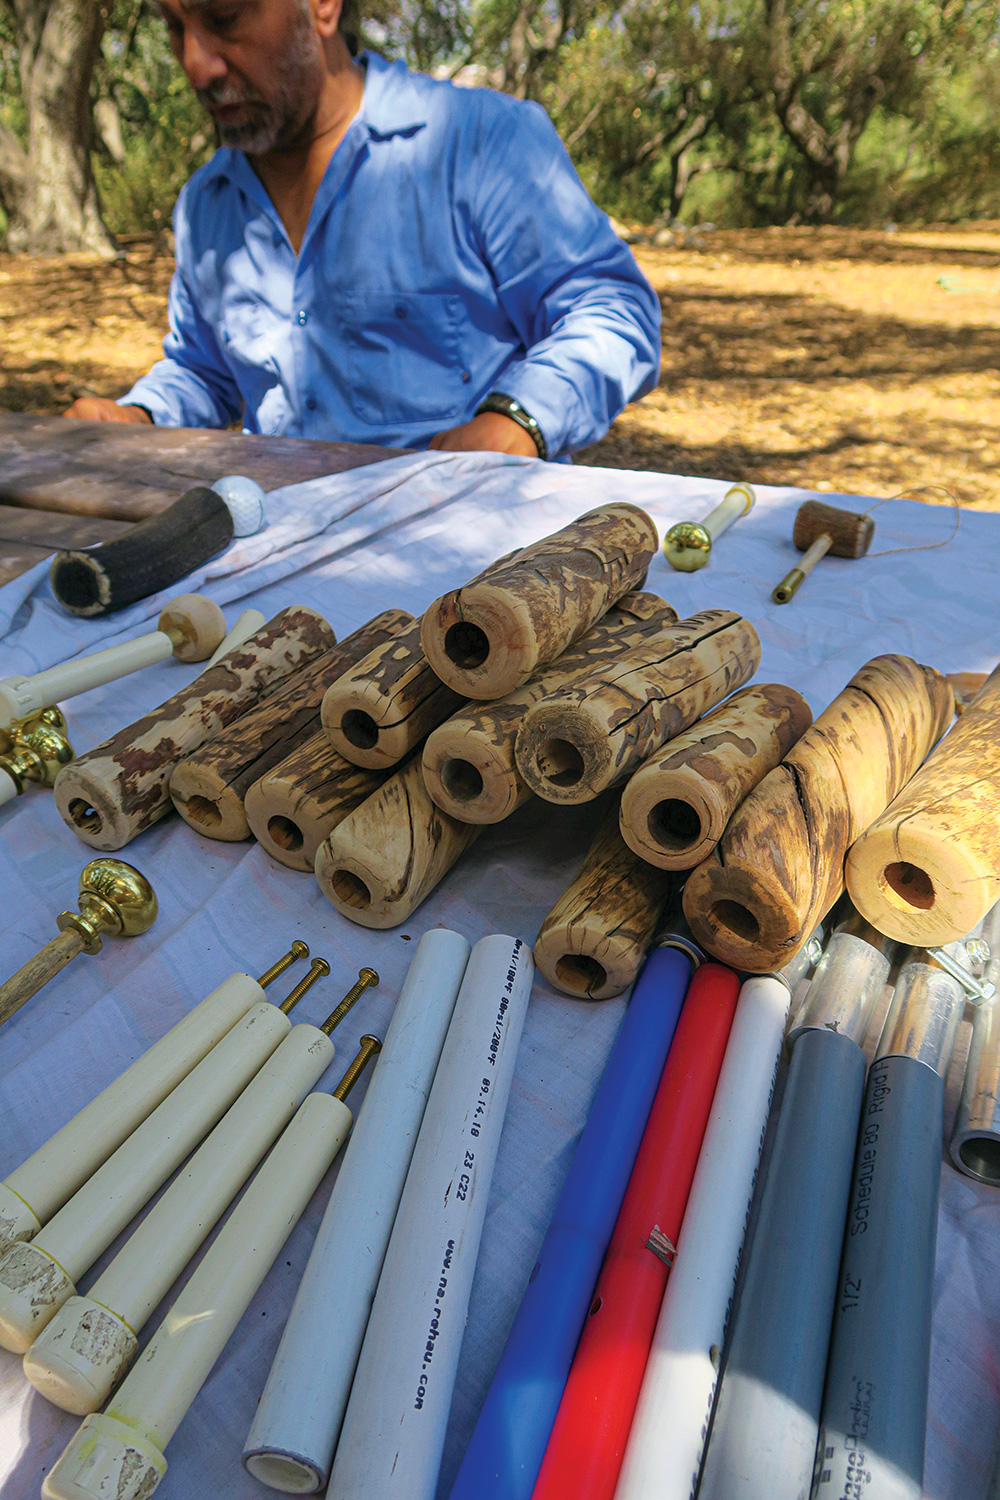
Although ancient fire pistons were undoubtedly created using very different technologies than those described here (such as a pump drill and other sanding methods), Grover builds his with products that are readily available at any hardware store.
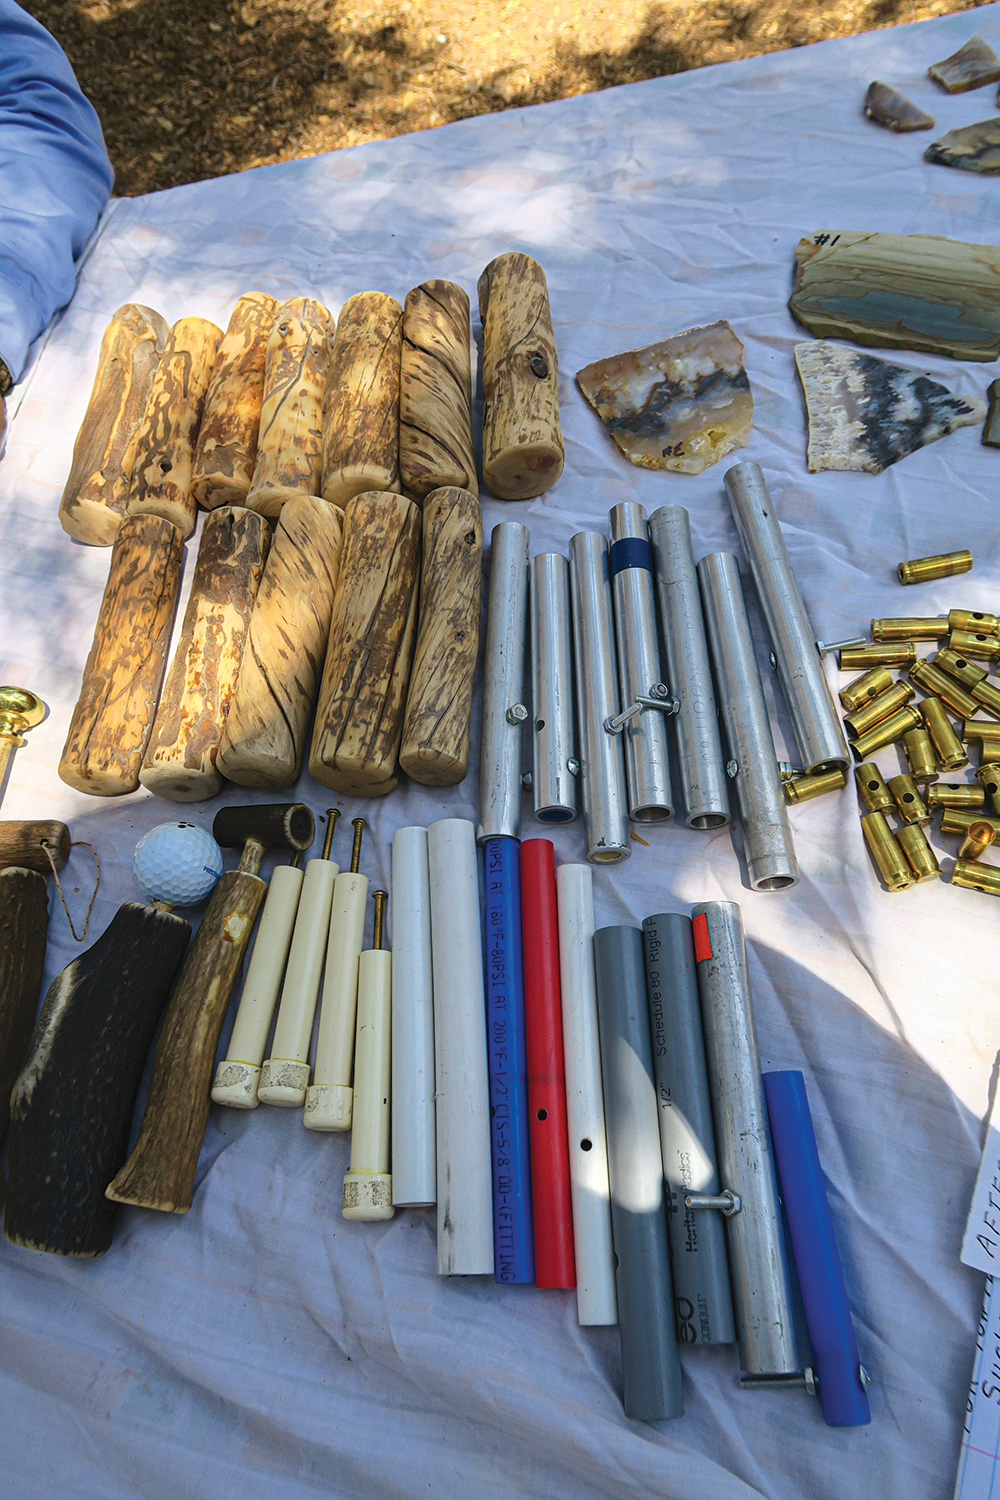
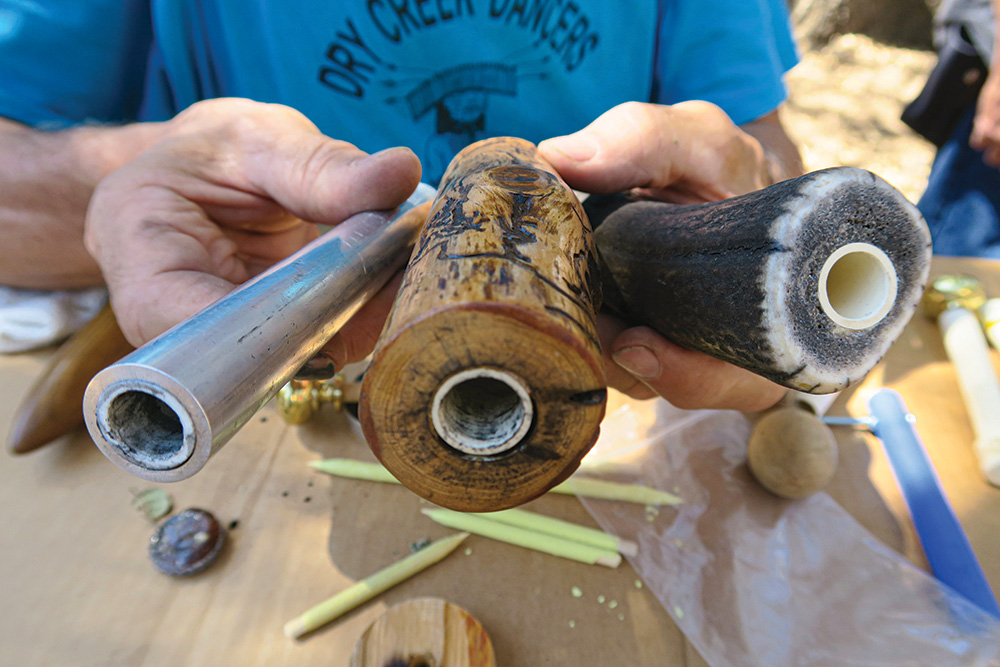
THE CYLINDER
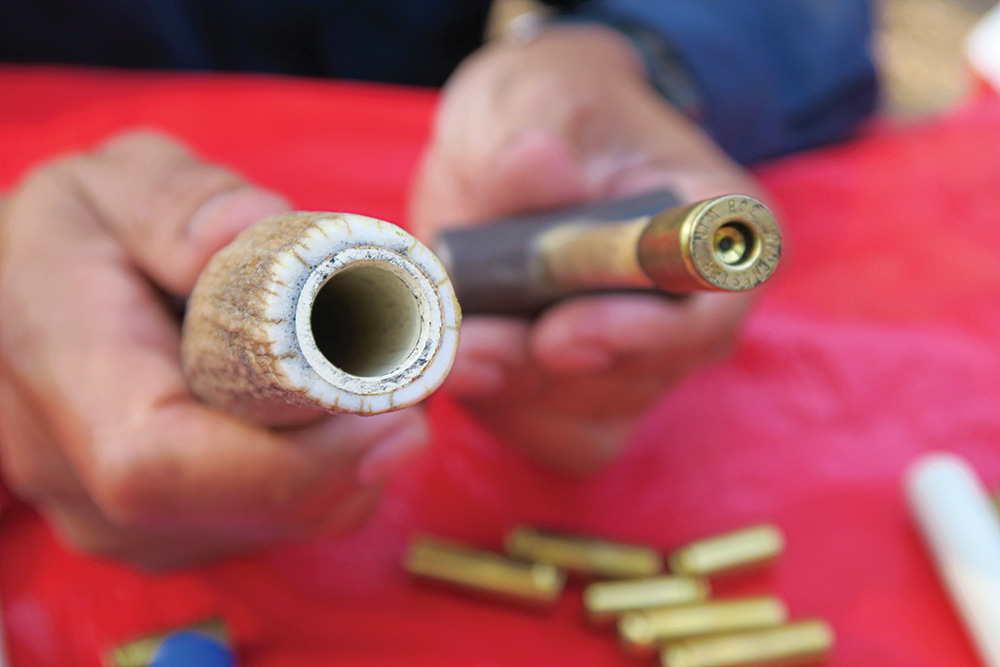
For the cylinder, Grover begins by drilling the wood (or antlers) from 5 to 5¼ inches deep with a 5/8-inch speed bit in order to receive a sleeve that‘s 4 or 4¼ inches deep (he’s drilled as little as 2¾ inches deep, but he’s found that this isn’t the ideal depth). All of his good-working fire pistons feature cylinders between 4 and 4¼ inches deep.
Then, Grover lines the cylinder with a plastic sleeve or tubing.
“I use Flowguard Gold (CPVC piping) that has ½-inch inside diameter and 5/8-inch outside diameter most of the time,” Grover explained. “But be aware that all the tubing will vary slightly in size.”
The sleeve is then glued in with Gorilla Glue (hint: Always check your sleeve to make sure it’s 100 percent airtight before you glue it in).
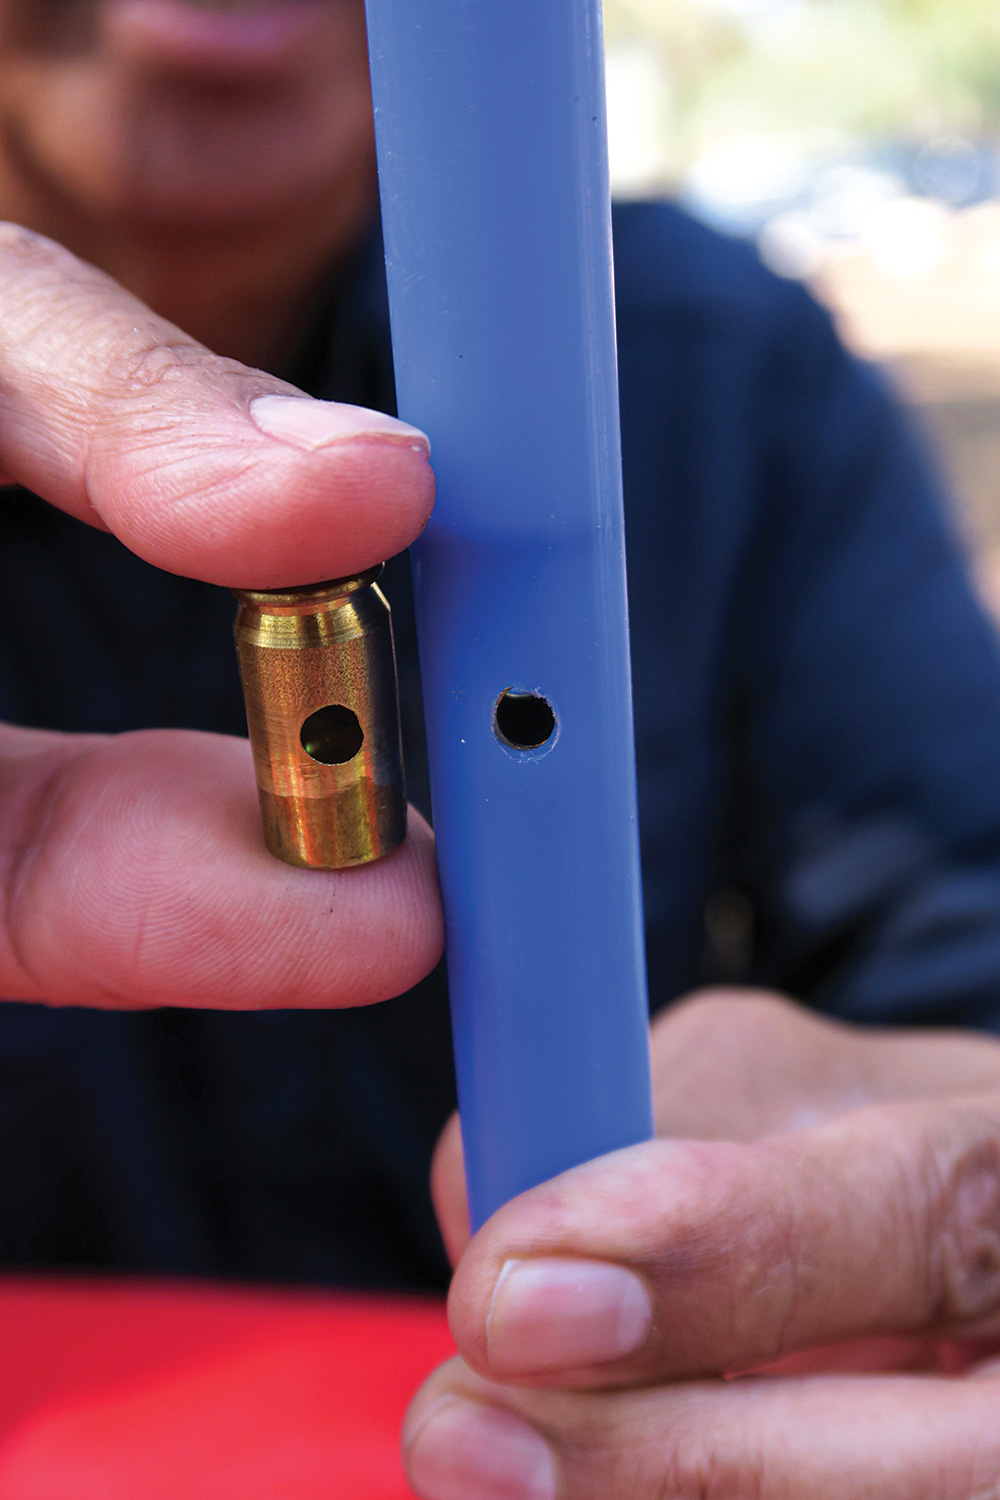
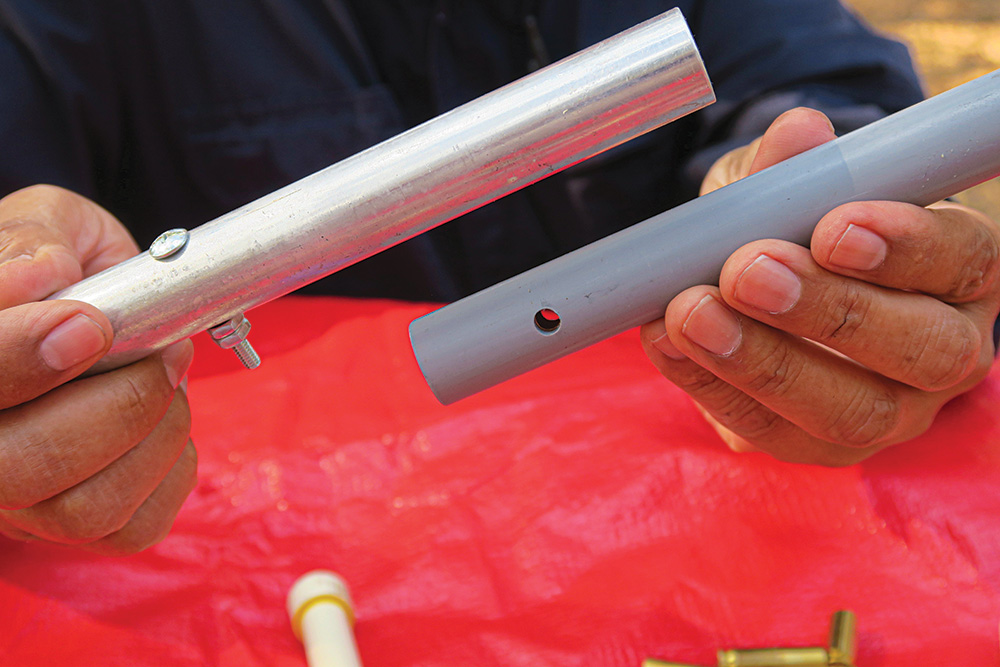
To create a bottom for the cylinder, he uses a .45 auto empty brass cartridge casing, which he then screws inside the bottom of the sleeve. In cases where he uses an aluminum tube (rather than wood or antler), he drills a side hole into the cylinder in order to secure the case inside the cylinder.
“I drill and tap the tubing for an 8/32 screw,” he said. “That holds the .45 auto casing in place.”
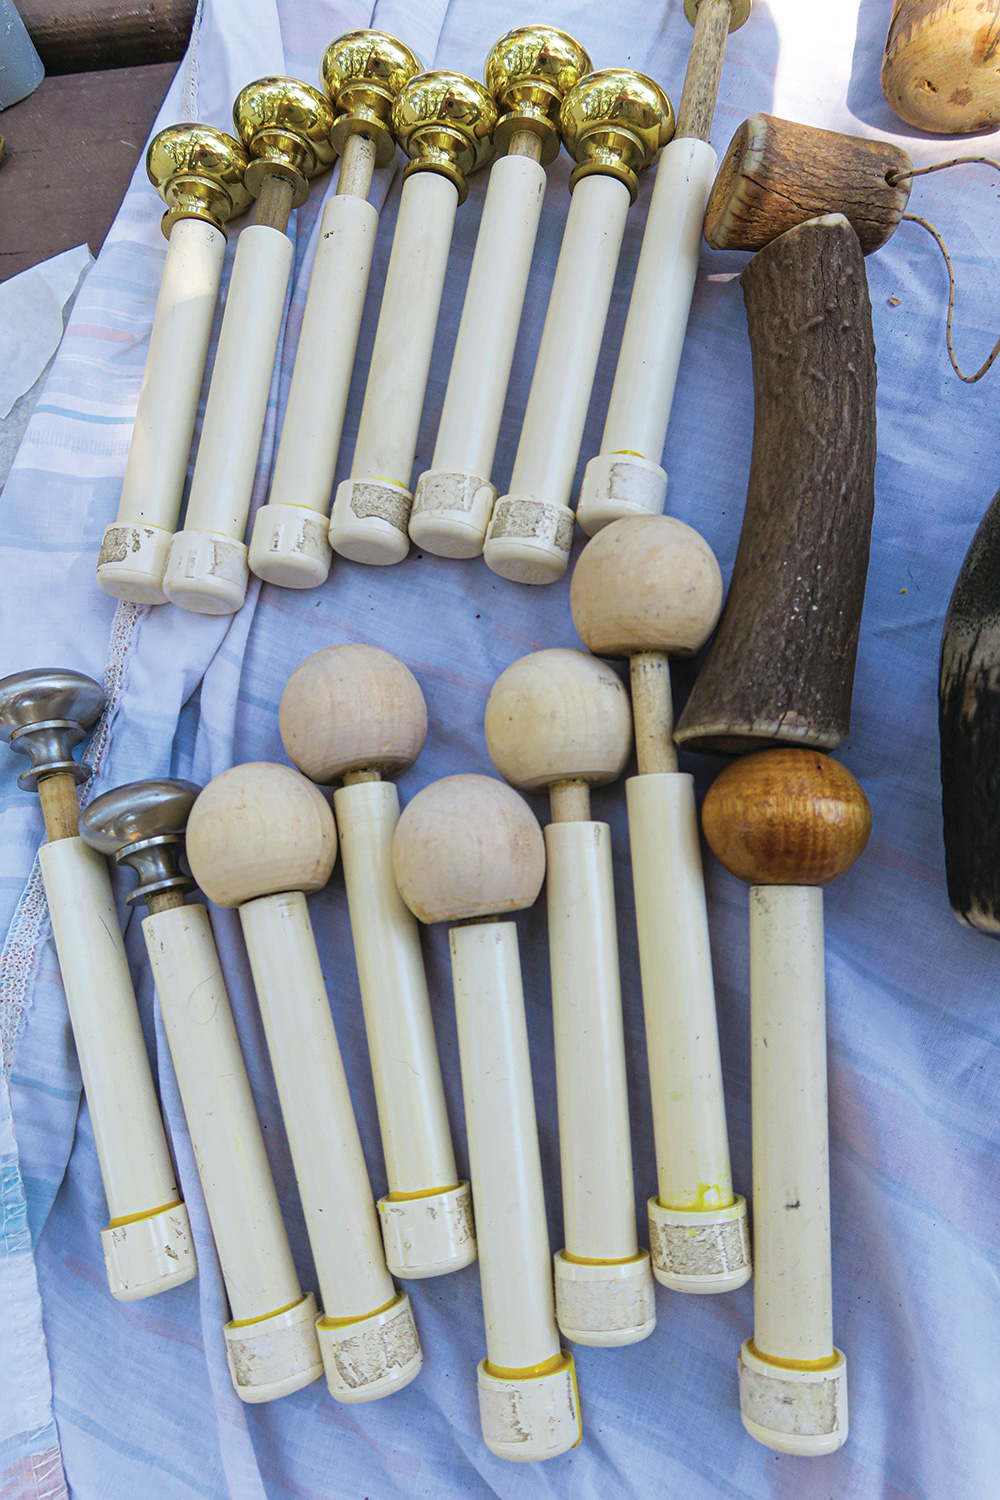
THE PISTON
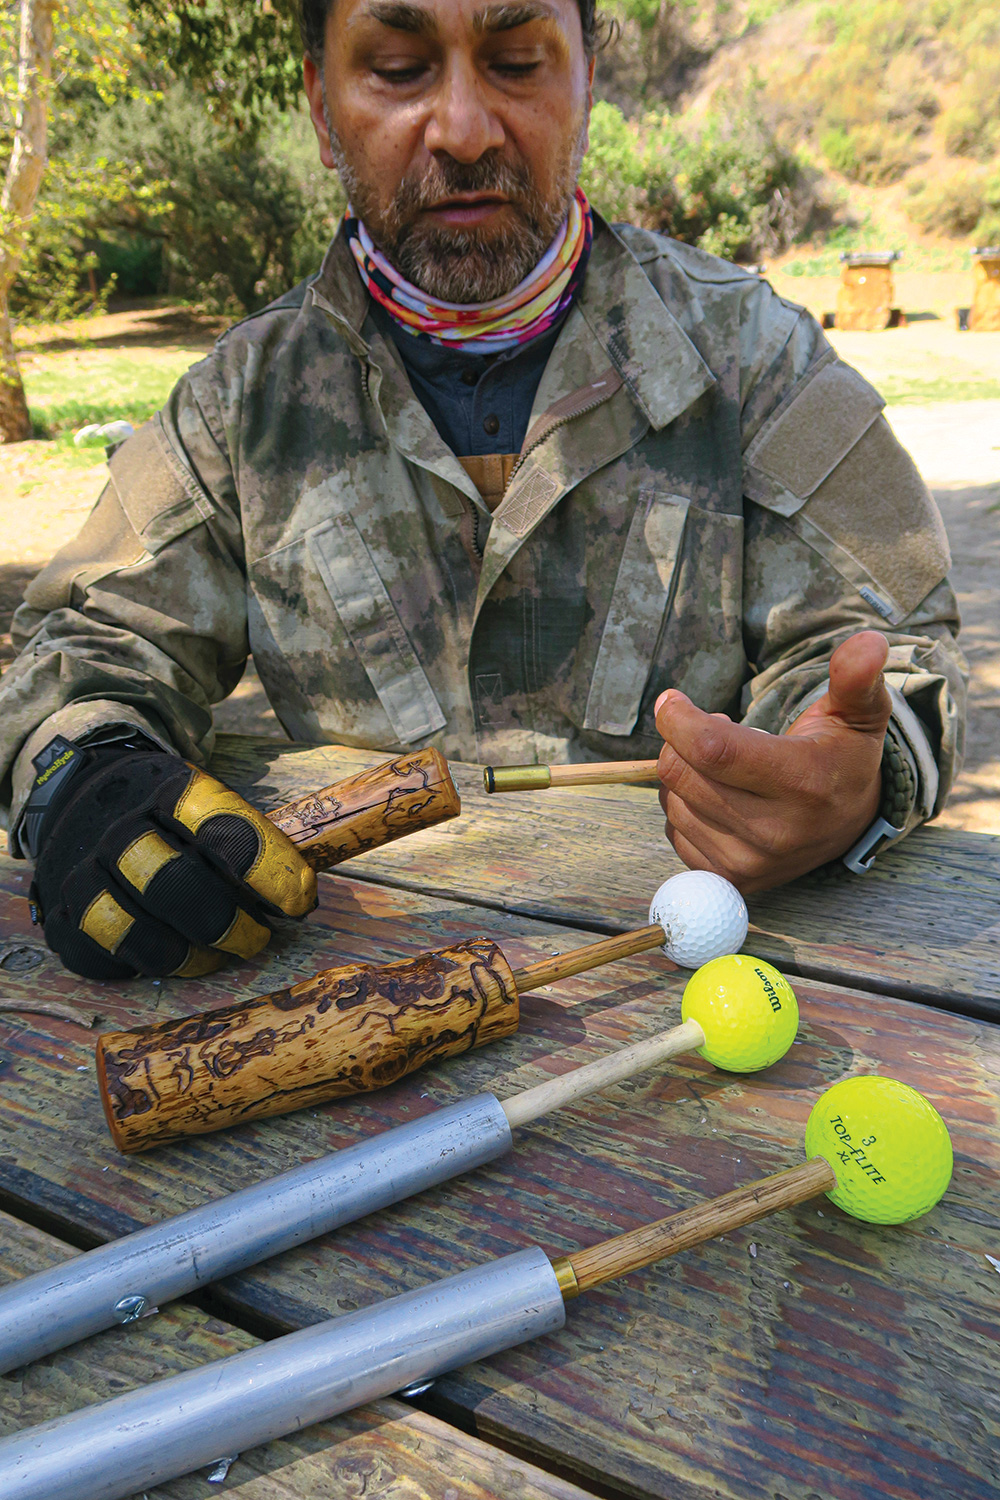
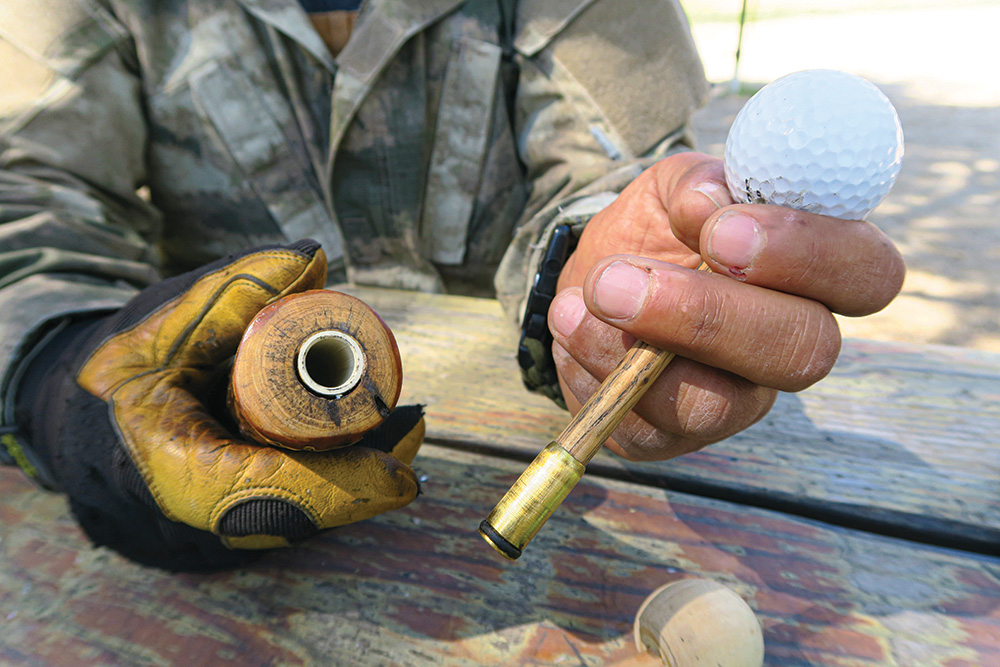
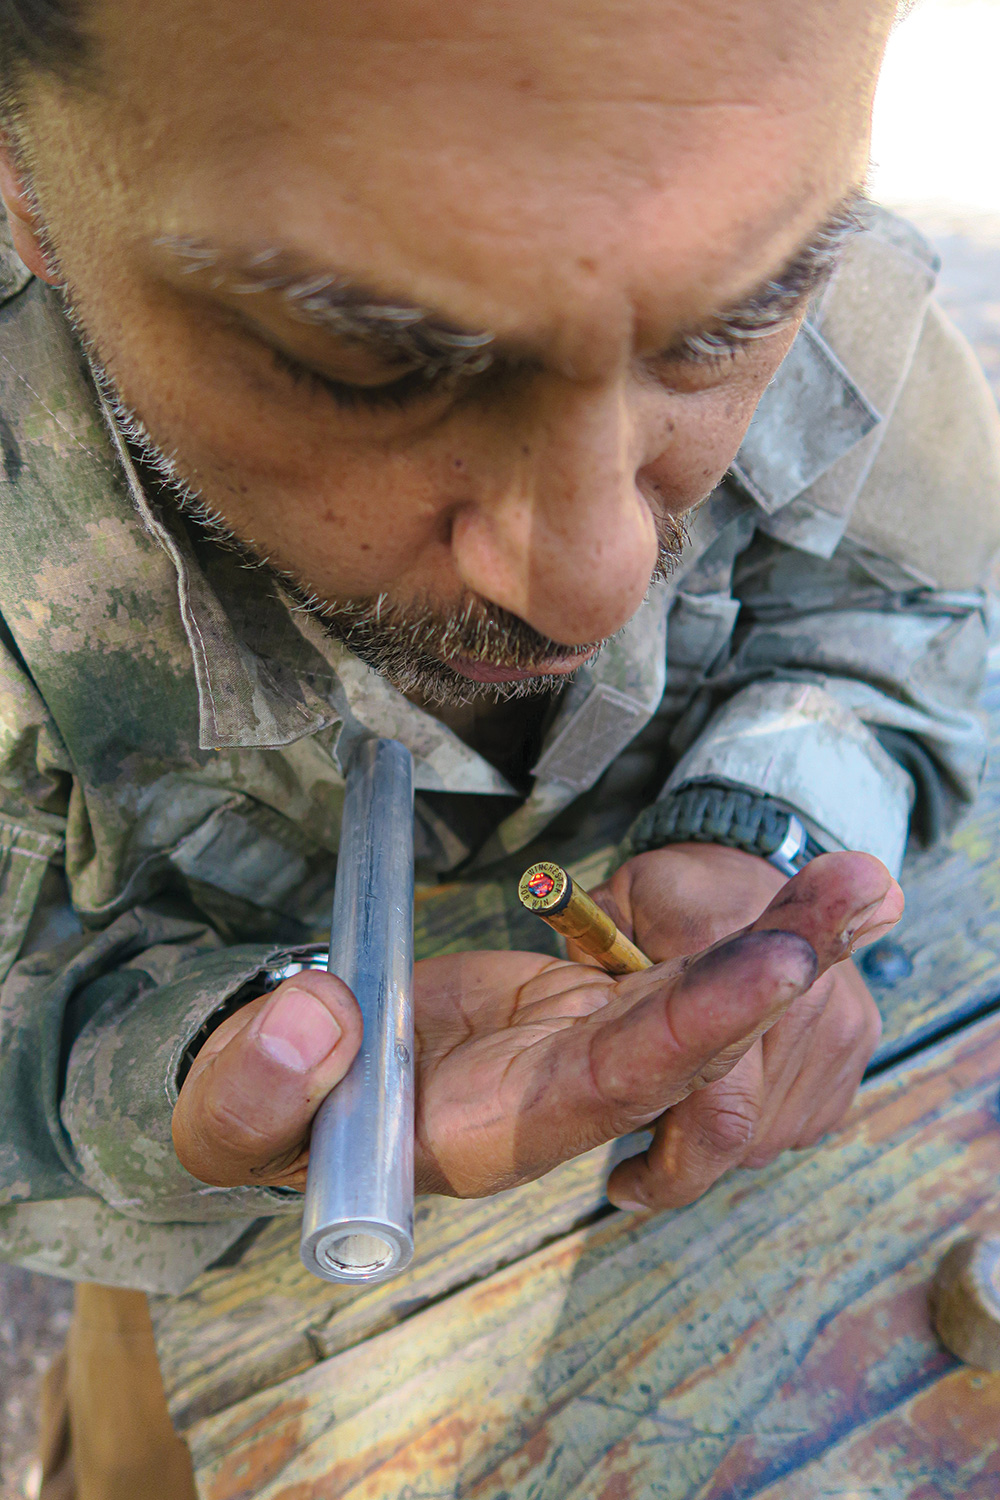
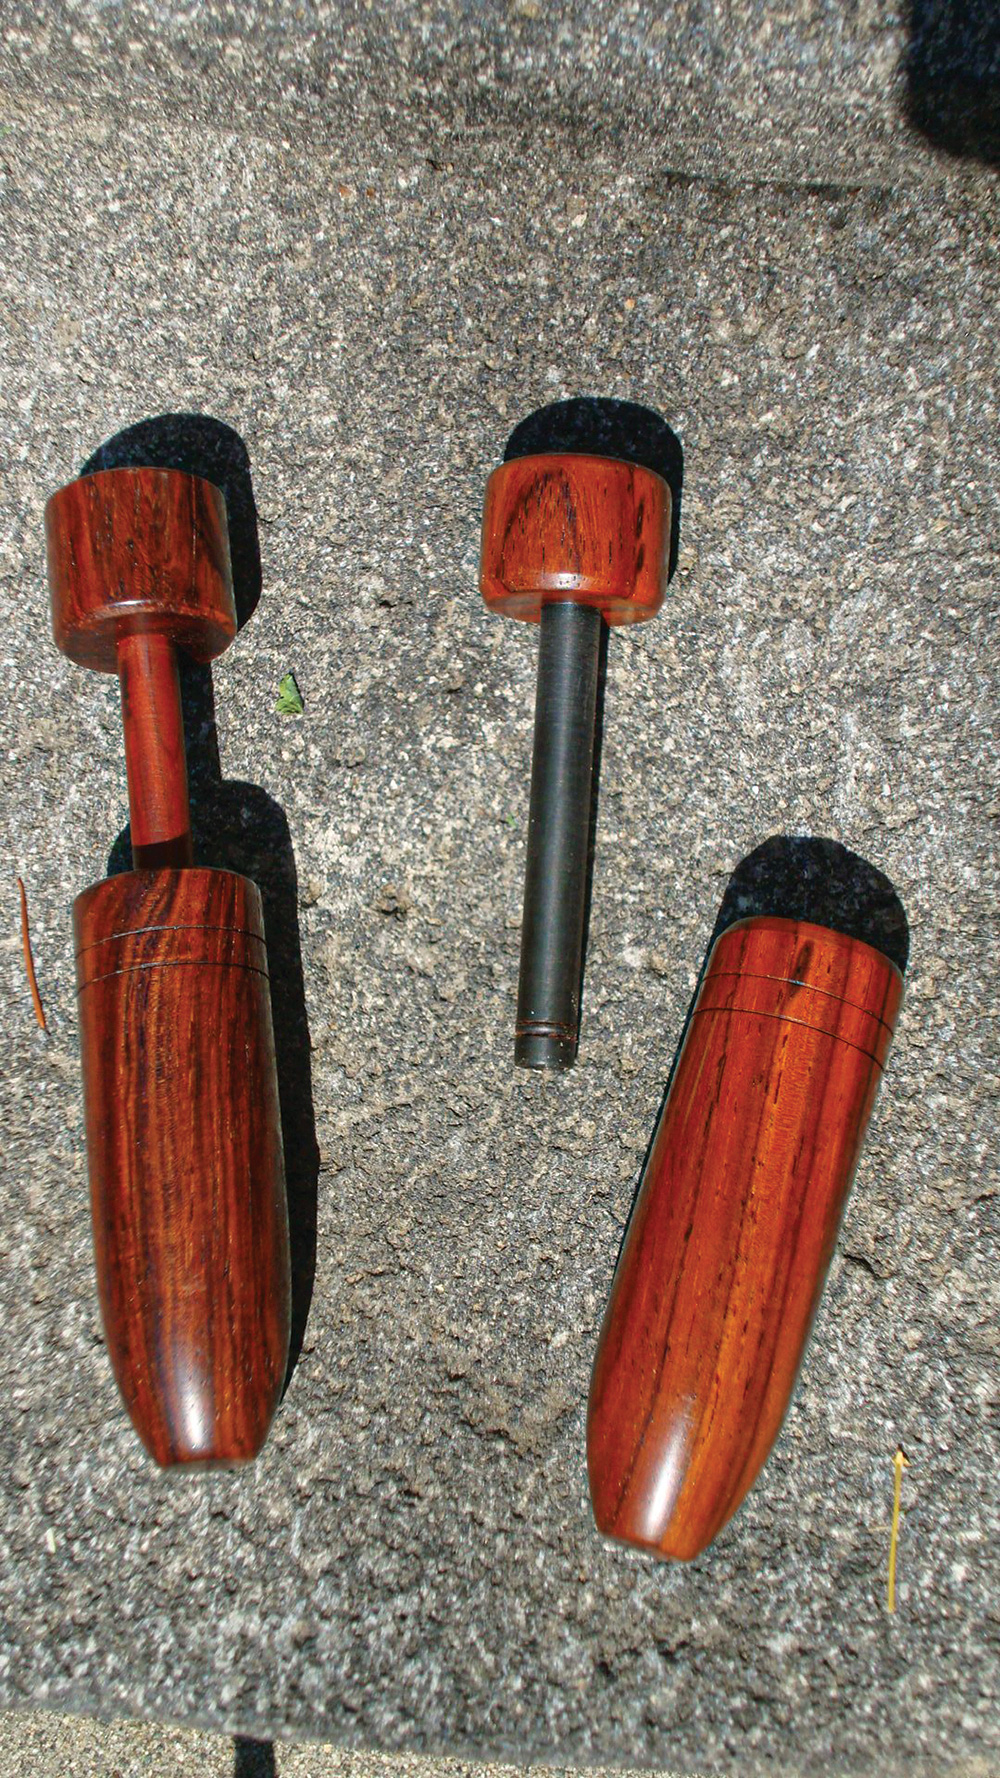
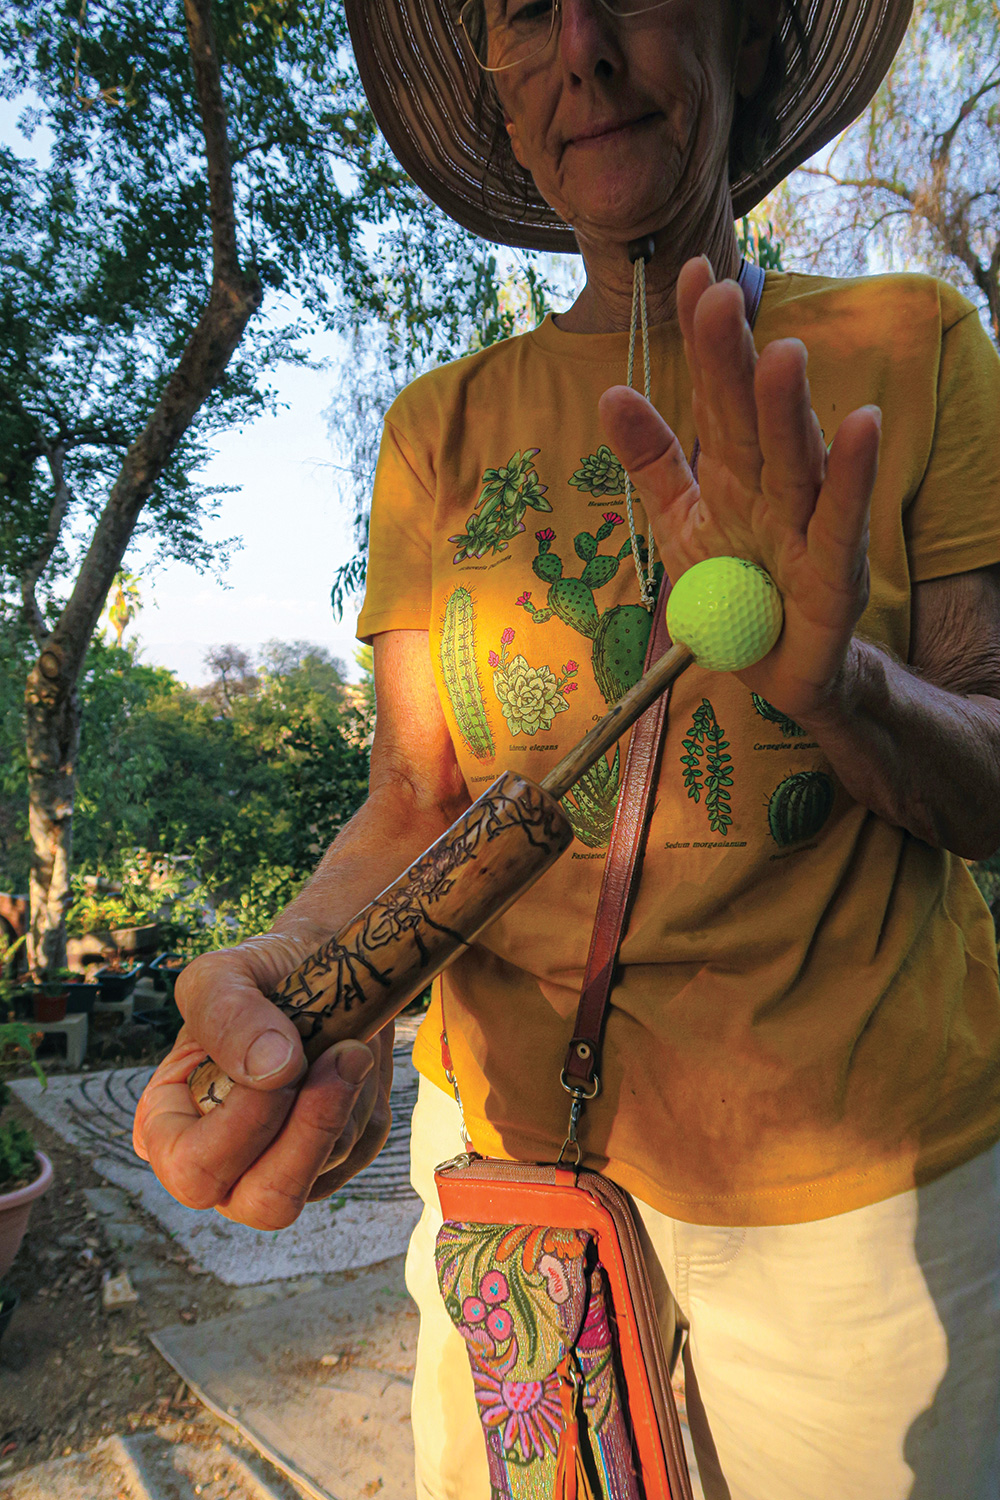
To make the pistons, he purchases 3/8-inch wood doweling, which will receive a cut-off .308 empty brass casing on one end. On the handle end, he places something that can withstand a good whack when driving the piston down. One of his most interesting innovations is the use of a golf ball for a “whacker.” However, Grover also uses comfortable pieces of antler or wood.
“If everything goes just right, you see glowing char cloth from the ember you just created in the cylinder—the result of the compression of oxygen.”
Before adding the brass casing to the dowel, the primer must be removed. Any shop that sells cartridge handloading equipment will have the proper tools for depriming brass casings (as an alternative, Grover has used a pin punch and a hammer to remove the primers. If the primers are crimped in, the crimp needs to be removed).
Grover points out that the .308 casing to be used for the piston head needs to be cut down to about 1¼ inches long. It should then be cleaned thoroughly, inside and out.
Then, before permanently securing the brass casing to the dowel, Grover tests to see how well it will slide into the cylinder casing. It can’t be too tight, but it also won’t work if it’s too loose. Once he confirms the fit is right, he secures the casing to the dowel with glue.
If you’ve ever used a fire piston, you know that you use an O-ring on the piston—very much like piston rings in your car’s engine. For your fire piston, try an O-ring with inside and outside diameters and a thickness of either 5/16×7/16×1/16 or 7/32×11/32×1/6—whichever fits best in the extractor groove of the cartridge casing you’re using on the end of the piston.
“Within a few weeks, I received a box of various artifacts, including four complete fire pistons [Grover had] made, along with various other fire-making artifacts, such as his sulfur sticks and homemade char cloth.”
“These fire pistons work very well, because the seals on the cylinder and piston are very close together,” Grover explained. “The piston I use to check the cylinders is 8½ inches long. If the piston doesn’t hold pressure and begins to sink, there’s a leak in either the piston or the cylinder. Remember: The piston should be longer than the cylinder is deep.”
CHAR CLOTH
For char cloth, Grover found the best results come from a #32 “quickie” cotton mop, with four-ply working well. The cotton is charred in a can (in the standard procedure for making char cloth). Then, he folds about an inch of the charred cloth and inserts it into the hole at the end of the piston.
“The charred material must extend ¼ to ½ inch beyond the piston head, where it’ll be exposed to the heat and oxygen and not simply isolated in the piston pocket,” he pointed out. “This makes the charred material much easier to get out of the piston pocket.”
To use, the piston is inserted into the cylinder and given a sharp whack. Then, the piston is rapidly removed; and, if you have an ember, it’s put into some waiting tinder and blown into a flame.
“As simple as fire pistons are, remember that they’re precision instruments,” Grover said. “You should never whack or slam a fire piston down—as I’ve seen people do many times. Instead, place the bottom of the cylinder on a firm foundation. Insert the piston into the cylinder. Push it down hard and quickly.”
“Grover explained, ‘Fire pistons have been around for more than 200 years. All I did was improve the concept so that these worked well for me. A good fire piston is the fastest way there is to get a primitive coal.’”
Grover explained, “Fire pistons have been around for more than 200 years. All I did was improve the concept so that these worked well for me. A good fire piston is the fastest way there is to get a primitive coal. I tested all the ones I sent you [the author], and all of them worked well, producing coals on the first try.”

Angelo Cervera smacks one of Tom Grover’s fire pistons. This was the first time Cervera had ever used a fire piston—and he was successful.
HOW FIRE WAS MADE BEFORE MATCHES AND LIGHTERS
It’s believed that fire piston technology developed in the South Pacific islands. In general, it’s not a device you’d make in the bush … unless you had the ideal tools, ideal woods and previous know-how.
Walter Hough, author of Fire-Making Apparatus in the United States National Museum, describes five methods of making fire based upon their presumed development.
The first category involved fire-making via the reciprocating motion on wood, referring to the hand drill, the bow and drill and the pump drill. Hough points out that the simple hand drill (“two-stick apparatus”) was the most widespread worldwide.
The second and third methods were via sawing motion on wood (mostly bamboo; and in Malaysia and Burma) and the plow motion on wood (mostly Polynesia and some use in Australia). If you watched the movie, Castaway (starring Tom Hanks), you saw him use the plow method.
The fourth method comprised all the methods that made fire with flint and steel or some variation thereof. The fifth method was via compressed air, as in a fire piston. (Hough points out that this is, by no means, a complete list of all the ways in which fire was created in the past—or the present, for that matter).
KEY FIRE PISTON OPERATION RECOMMENDATIONS
1. Lubricate the piston.
2. Pump it up and down several times to warm it up.
3. Place charred material in the end of the dowel.
4. Place the pistol in the cylinder about ½ inch and rotate the piston back and forth one or two times before pushing it down.
5. No luck producing a coal? Relubricate the piston O-ring and try one or two more times. Still no coal? It’s time to replace the charred material.
A version of this article first appeared in the February 2022 issue of American Outdoor Guide Boundless.