

At one time or another, we’ve all seen our favorite TV or movie hero shoot an arrow and make it all seem so simple. They see the target, nock an arrow, draw back on the bowstring and release, and everything from Orcs to Soviet soldiers drop dead.
So there are no big secrets to firing a bow and arrow right? Wrong. In this article we’ll show you at least two ways how to shoot an arrow from a bow, specifically from recurve bows.
Compound Bow vs. Recurve Bow
Some may ask “why a recurve bow and not a compound bow?” While nothing’s preventing you from using or procuring a compound bow, consider that in a SHTF situation, a compound bow may not be easy to get, let alone construct.
If you’ve managed to procure or have learned how to make your own compound bow before or after SHTF, good for you. But in most survival situations, you’ll likely have to make a recurve bow out of available materials.
While compound bows offer a number of benefits like a heavier, more powerful draw that requires less effort and provides increased accuracy, compound bows are also somewhat more complicated to use and maintain.
The cost of compound bows is typically higher than that for recurves, so purchasing one may not be the most practical idea for some people.
Do note also that shooting a compound bow can be different from shooting a recurve bow, and its increased pull weight requires that you practice on more “solid” targets. This is so as not to risk over-penetration and hurting someone or damaging what lies beyond your practice area.
Eye Dominance
Before listing the steps of firing a bow, you must first determine which of your eyes is your “dominant eye”. Most people will simply assume that your “dominant eye” is the same as your dominant hand but this isn’t always the case. Some may have a dominant eye that’s opposite their dominant hand, and this is called being “cross-dominant”.
To determine whether your left or right eye is the dominant one, perform the “wink test” by following these steps:
1. Place your hands in front of you with your palms facing outward, as if signaling someone to stop.
2. Bring your thumbs together until the tips of your thumbs are touching.
3. Turn your hands towards each other, such that the tips of your index fingers touch, and a triangle is formed in between your hands.
4. Bring your hands even closer together, until the triangle formed is smaller but large enough to peer through.

5. Use that triangle and “aim” at an object a few meters away from you; the object should fit in the triangle.
6. Alternate between “winking” your left and your right eye; notice that you won’t see the object in the triangle with one eye but will see it with the other. Whichever eye that enables you to see the object is your dominant eye.
Shooting the Bow
To shoot a recurve bow the right way, follow these steps:
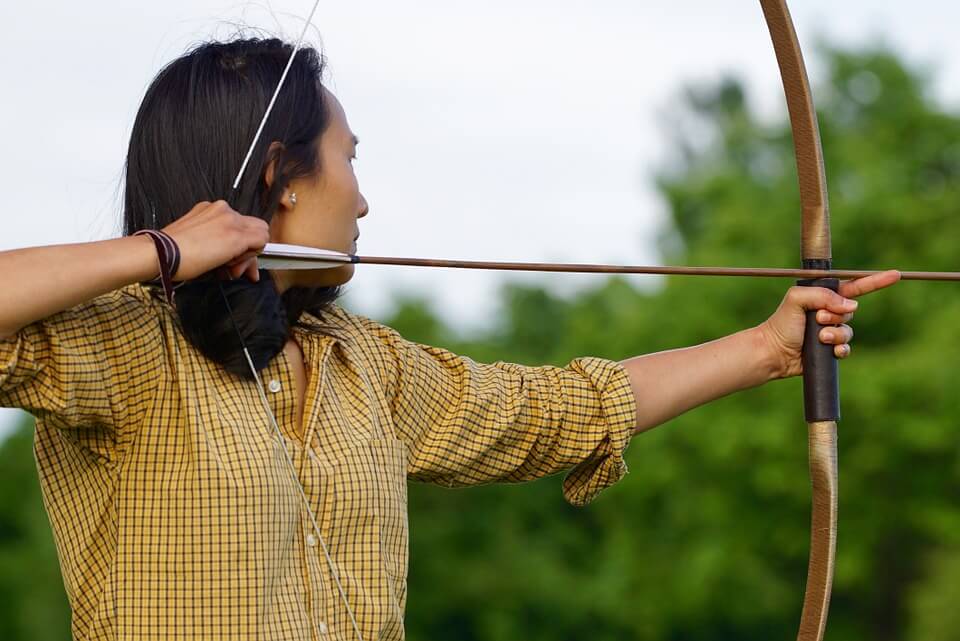
1. Stand upright with your feet shoulder-width apart and perpendicular to the target. Ensure that your dominant hand is behind (farthest from) the target. This is called the “square stance”.

(ArcheryWorld.co.uk/shooting-the-bow).
2. Nock the arrow by placing the arrow shaft on the rest or arrow shelf on your bow. Attach the notch on the back of the arrow, or nock, to the bowstring. Some store-bought bows may even have a nock locator or two on the string to show you where the nock goes; if it’s two, place it between the locators. And if there’s only one locator, nock the arrow below it. If your bow has no locators, nock the arrow at the center of the bowstring, and parallel with the arrow shelf.


PARTS OF A RECURVE BOW
Some store-bought recurve bows may have these parts (see illustration above) for making it easier to use. Less-sophisticated recurve bows may lack an arrow shelf and nocking point indicators.
For your reference, take note of the common parts of the recurve bow:
Nock – This the notch on the back of the arrow that you hook onto the bowstring to shoot the arrow. Nocks also refer to the notches on either end of the recurve bow where you loop the bowstring, as well as the act of “nocking” or hooking the arrow onto the bowstring before shooting.
Arrow Shelf/Rest – The arrow shelf or rest is literally where you “rest” the arrow before shooting. Some recurve bows may place a tuft of animal fur on the shelf to reduce friction and prevent slowing down the arrow.
Nock Locator – Also called nock indicator or nocking point indicator, this is usually one or two beads that serve as a guide for where to nock the arrow. The nock locators are always at the center of the bowstring, in line with the arrow shelf or arrow rest. If you the recurve bow has only one nock locator, you nock the arrow below it; if there are two, you nock the arrow in between them.
Riser – This is the middle part of the bow containing the handle or grip.
Handle or Grip – The area where you hold the bow with your non-dominant hand; this is located just below the center of the bow.
Limbs – Consisting of lower and upper limbs, these are the parts of the bow that flex and spring back to shoot an arrow. The ends of the limbs are also where you nock the bowstring.

3. With your non-dominant hand, grip the bow. Make sure to grip the bow with the arrow rest, or just below the point at which you nock the arrow, resting on the pad of your thumb. To check if you’re gripping the bow right, see if your knuckles make a 45-degree angle with the grip area of the bow; this ensures that the bow rests correctly on the pad of your thumb. Don’t grip the bow too tightly, as this will cause the bow to torque inwards and throw you off-target. For just the right grip, imagine you’re doing a handshake with the bow to make your grip not too tight or too light.

4. Grip the bowstring with your index, middle and ring fingers. The bowstring should rest in the crook made by your top knuckles, with the nock between your index and middle fingers. If you find the bowstring uncomfortable or painful, wear a glove or a finger tab.
See to it that the nocked arrow is between your index and middle fingers
(ArtOfManliness.com/articles/shoot-bow-arrow/).

own archery finger tab (Upload.Wikimedia.org/wikipedia/commons/thumb/a/a5/Usage_of_a_bow_tab.jpg/640px-Usage_of_a_bow_tab.jpg).
5. Keep your bow-handling arm steady, and at about shoulder height. With a firm grip, draw back the bowstring with your fingers. Most beginners at archery use their arm, bicep and shoulder to pull the bowstring back, but this can tire you out faster and you won’t pull the bowstring back far enough to maximize power. Make a conscious effort to “engage” your back muscles by imagining that you’re squeezing your shoulder blades together. Don’t rely completely on your arm and shoulder to draw the bowstring back.

6. Choose your anchor point, or the point at which you draw the bowstring closest to you; this could be a spot on your nose, or a corner of your mouth. Whichever part you make as your anchor point, use this consistently during practice and when you actually shoot at a target.
Hold the bow steady as you align the tip of the arrow with your target, and it’s important not to “overthink” this process; as you work on your technique, don’t concern yourself with other factors like wind direction. Stay focused on the target.

Resist the urge to “overthink” this process
(ArtOfManliness.com/articles/shoot-bow-arrow/).
7. While keeping your bow steady and aimed at your target, release the arrow simply by pushing your fingers on the bowstring out of the string’s way. After you’ve let go of the bowstring, allow your hand to continue moving backwards until reaches a point below your ears. This will allow the bow to move forward a bit and confer more energy to the arrow; don’t counteract the movement of the bow.

Choose the Right Arrowheads
You can buy ready-made arrows or make your own but be sure to use arrows with the right heads for the job. Use only target or bullet arrowheads for practice, bowfishing arrowheads for fishing, broadheads for hunting, and blunt or judo heads for hunting small game.
Never use arrowheads for other than their intended use; the arrowheads can become dull or damaged and ineffective when you need them. Note that most store-bought broadheads aren’t very sharp when you buy them for safety reasons, so you’ll have to sharpen them before use.

They come in many configurations that are designed to cause fatal wounds and can be as sharp as surgical tools. Be careful when handling them (Amazon.com).
Final Notes
Few non-powder projectile weapons can beat the trusty bow and arrow in terms of reliability, simplicity of use, ease of maintenance and effectiveness. As a part of your survival skills repertoire, you’ll have to hone and maintain this skill with a lot of practice.
If you already have a bow for “just in case” situations, don’t wait to use it only for when SHTF. Take it out for practice and get familiar with the way it works and feels.
Practice until shooting your bow and consistently hitting a target becomes an almost instinctive and natural action for you, since the day could come when you’ll need this skill to hunt for food or even fight for your life.