

Build This Simple Setup For Less Than $75!
You don’t need to be a “prepper” or be making preparations for the end of the world to see the practical need for a rain catch. Depending on where you live, water might be a rare or expensive commodity that you need to collect and store when you can.
In areas of the United States that are prone to drought, the amount of water available for gardening and lawns and other purposes might be limited.
There’s also the threat of a natural or man-made disaster that can quite easily cut you off from your normal water supply. Having an alternate means of procuring and storing water is never a bad idea for those who like to be prepared for any contingency.
Building a rain catch is a great way to supplement your current water supply. It’s a simple and fun project that can be done in a relatively short amount of time and with a cost of $75 or less, depending on what materials are already available to you.

Here are the simple steps you’ll need to follow if you’re interested in adding to your water reserves. You’ll probably see some things you can accomplish with a substitution or modification to make a catchment system that’ll work for your situation.
Feel free to make any adjustments needed to make your system as effective and economical as possible.
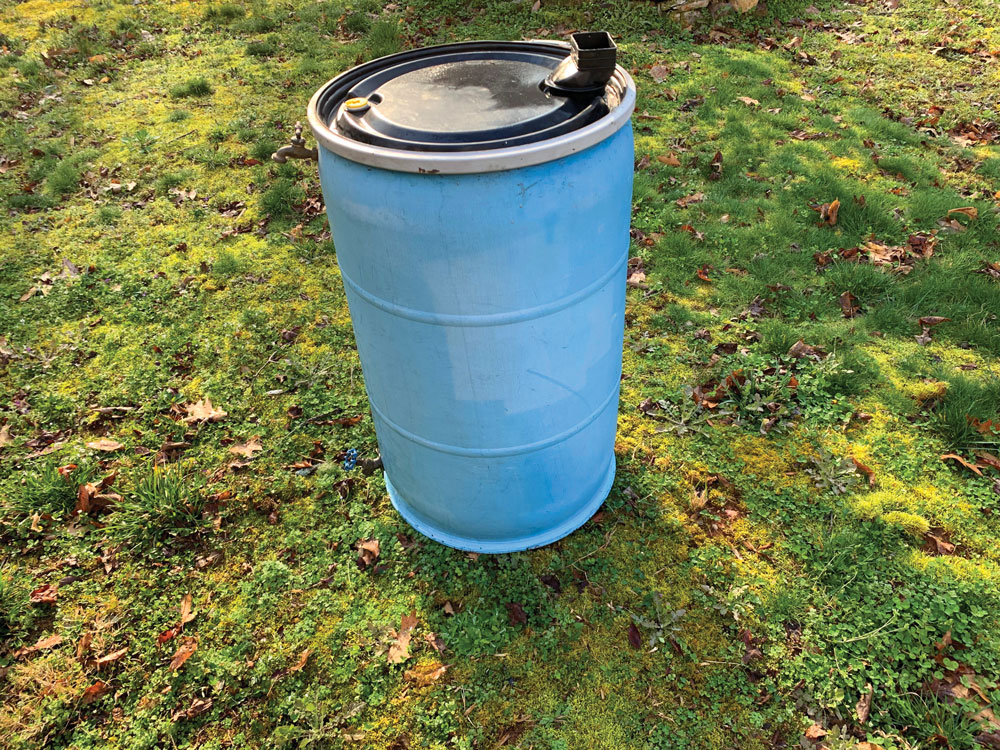
Find Your Barrel
You can find large, food-grade barrels quite easily by checking Craigslist or doing a Google search, and you should be able to purchase one for about $20. Helpful hint: Barrels with removable lids are easier to clean and modify for this project than those with fixed lids.

Clean Your Barrel
Whether your purchase was “reconditioned” or not, you’ll want to clean the inside of the container to ensure you’re not adding anything hazardous to the water that’ll be stored inside. Here are the recommendations for cleaning a water storage container before use, according to the Centers for Disease Control and Prevention (CDC).
- Wash the storage container and rinse completely with clean, safe water.
- Sanitize the container with a solution made by mixing 1 teaspoon of unscented liquid household chlorine bleach in 1 quart of water. (You can use more of this solution to assure complete coverage in larger containers.)
- Cover the container tightly and shake it well. Make sure the sanitizing bleach solution touches all inside surfaces of the container.
- Wait at least 30 seconds and then pour out the sanitizing solution.
- Let the empty, sanitized container air dry before use. Alternatively, rinse the empty container with clean, safe water that’s already available.
- Using the same method, clean the lid, bung, spigot and any other parts that’ll come into contact with the water. After everything is clean and dry, reassemble the drum so the interior isn’t exposed to outside contaminants.

Choose Your Location
Deciding where to place your rainwater catch is very important and should be given serious consideration.
Proximity to the raw water source—probably one of your roof’s downspouts—as well as homeowner association rules, general appearance and drainage issues, should all be taken into account.

Another thing to consider is the end use plan for your stored water. If it’s for your garden, you might want to put it as close as possible to your garden.
While it’s possible to reroute the downspout anywhere you want, as long as it remains higher than your barrel, the easiest and cheapest way to do this project is to choose a location where there’s already a downspout.


Get Your Hardware
You can find spigots in any hardware store worth its salt. When installing the spigot, it’s important to ensure a watertight fit, which a complete kit should ensure.
If you can’t mate the downspout directly to the top of the barrel, you might also need a flexible downspout adapter to connect the downspout to the barrel’s lid.
These adapters are built like an accordion, the ends are designed to fit most downspouts, and they come in multiple lengths.
Alternatively, you might be able to fabricate an adapter out of a piece of downspout you already cut off to get the barrel to fit under it; or, you might have some generic pipe that’s large enough in diameter to connect to the flexible downspout adapter and the downspout.
All are workable options if they result in watertight connections between the downspout and the barrel.


Finally, for added protection, use nontoxic silicone to seal around potential leak sources, as well as the valve on the outside of the barrel, to ensure there is no leakage.
Note: You’ll need to consider the drainage situation wherever you’re connecting to your downspout. Typically, the downspout either directs the water away from the house or it’s connected to an underground drainage pipe that transports the water away.
If you don’t plan to connect additional barrels to your system, and the potential for overflow exists, you should arrange for any overflow from the barrel to be directed away from the house or into the drainage pipe.

Connect the Downspout Adapter
Place the bottom of the flexible downspout adapter on top of the barrel lid at the location you want the water to enter it. Trace the shape on the lid with a marker. Using a bit large enough for a jigsaw blade to fit into, drill a hole inside the tracing.
Place the jigsaw blade inside the hole and cut out the material inside the drawn line to ensure it’ll be as snug a fit as possible with the base of the downspout adapter. Place the bottom end of the flexible downspout adapter into the hole and ensure that it fits snugly and stays in place.


Install Spigots or Chicken Watering Devices
Determine the best location for your spigot. Avoid locating it on sharp bends or curves in the barrel, because these will make it harder to get a good seal between the spigot and the barrel.
Other considerations include placing the spigot at a higher level than watering devices for chickens, livestock or pets (to ensure you don’t mistakenly drain their water supply), allowing clearance for buckets under the spigot or other requirements.


Drill the spigot hole with a drill bit that’s just slightly smaller than the diameter of the threads on the part of the spigot that’ll go into the barrel. Screw the spigot into the barrel until it’s snug in the hole and can go no farther.
From the inside, thread the spigot nut onto the spigot and tighten, being sure not to overtighten it. Once the spigot is attached firmly to the barrel, you can add a bead of the nontoxic silicone sealant around the edge of the spigot fixture on the outside of the barrel.
Depending on your situation, you might need to add a way for excess water to be released from the barrel. This can be a simple PVC pipe connection to another barrel, either at the same height as, or lower than, the first barrel, or you can install another spigot if you want to restrict the outflow for some reason.
This pipe or spigot should be high on the side of the barrel to allow the barrel to fill as much as possible before letting any water escape.
Simply repeat the process described above near the top of the barrel’s side. If you use a spigot, you can attach a garden hose to it and run it toward your drain pipe, garden, pond or other destination.
Just be sure that it delivers the water away from the house, livestock areas or other places where it can cause damage or other issues.


Costs and Tools
Cost for this project will depend on many things—particularly any raw materials and tools you might already have—but you shouldn’t have to spend a lot of money to install one of these simple water catchment systems.
Here’s what I spent on mine, along with the tools I used:

Tools
- Hacksaw or reciprocating saw and blades
- Jigsaw and blades
- Drill and assorted bits
- Permanent marker
- Large wrench or tongue-and-groove (channel-lock) pliers
- Protective eyewear and gloves

Safety
Contrary to popular belief, water that’s collected in a rain barrel still needs to be processed before consuming it.
To make it potable, you need to use an effective method—such as a filter or purifier, boiling, UV light, bleach or water purification tablets, to name just a few—and only a couple of these methods will address chemicals or heavy metals.
The reason is that while rainwater, itself, is potable, once that water is exposed to smoke, smog or clouds, impurities on the roof and in the gutter system, and any bacteria, mold or mildew that might be present anywhere in your system, the water will be contaminated.
It’s always better to err on the side of caution and disinfect the water prior to consumption.
Editor’s note: A version of this article first appeared in the August, 2020 print issue of American Survival Guide.