

Much like high school science fair projects that are based on simple principles of physics, solar ovens employ some of those same principles to create something useful and efficient. People all over the world use the basic concepts of radiation, convection, insulation, and reflection to create solar ovens and cookers that they use to feed themselves and their families when fuel for cooking is hard to find or non-existent. And you can too.

THREE BASIC DESIGNS
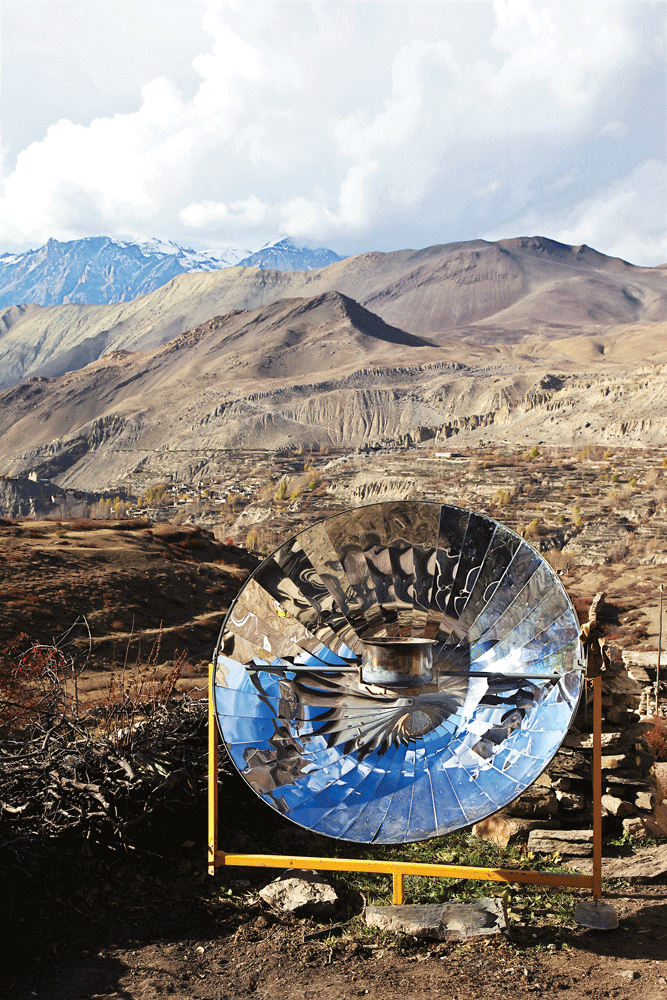
There are three basic designs for solar cookers, box, panel, and parabolic. The parabolic is the most expensive and difficult to make as it requires curved surfaces and an apparatus to hang your cooking vessel in the middle of the solar cooker. Box cookers use two boxes, one slightly smaller than the other, which serves as a cooking chamber that is heated by solar radiation reflected onto it by reflectors on the outer box. Panel cookers take their name from the reflective panels set up around your cooking pot to focus sunlight onto the pot so that it will cook.
WHAT DOES A SOLAR COOKER NEED?
In order for you to use a solar cooker effectively you need some prerequisites:
- You need to be somewhere that is bright, sunny, and clear most of the day.
- You need to be in the middle latitudes so the sunlight is coming in at less of an angle than it does closer to the North and South Poles.
- You need to do your cooking during the middle of the day, from 11:00 a.m. to 3:00 p.m., when the sunlight is at its greatest intensity.
BUILDING A BOX COOKER

To build a box style solar cooker you will need two boxes of similar shape, one smaller than the other, glue, tape, a knife, aluminum foil, newspaper or other insulating materials, clear plastic wrap or a pane of glass or clear plastic. Then follow these steps:
- Cut the top flaps off of the smaller box. The box should be an inch or two wider and taller than the cooking vessel you will be using. This will be your cooking chamber.
- Glue aluminum foil, shiny side showing, to the inside walls of your cooking chamber. This will reflect more solar radiation onto your cooking vessel.
- Place a dark-colored pan, like a dark metal cooking sheet, in the bottom of the cooking chamber to absorb the reflected solar radiation and to help heat your cooking vessel.
- Next, take the larger box, approximately one or two inches wider on each side than your cooking chamber, and cover the flaps on its top with aluminum foil, with the shiny side toward the inside of the box. If the flaps are not the same size, cut off one of the shorter ones and tape it to the other short one so that it is the same size as the longer flaps.
- Place your cooking chamber into the middle of your larger box and fill the space between the two boxes with insulating materials like rolled up or crumpled newspapers or foam insulation. This will help to keep the heat inside the cooking chamber.
- The last piece of your box cooker will be the clear plastic wrap or clear plastic or glass “window” that will go on top of your cooking chamber to allow sunlight into the cooker while sealing in the air as it is heated by the solar radiation.
Once your box cooker is complete, and the sun is at the right position in the sky, you can start cooking. Place your food in a dark, thin-walled cooking vessel that has a lid, then place it in the center of your cooking chamber. Seal the cooking chamber with your glass or clear plastic film to keep the air in as it gets heated by the solar radiation.

Next, place the solar cooker in a sunny spot so the sunlight shines into the center of the cooking vessel. Adjust any reflectors you have added to your cooker so they concentrate more light down into the cooking chamber.
“PEOPLE ALL OVER THE WORLD USE THE BASIC CONCEPTS OF RADIATION, CONVECTION, INSULATION, AND REFLECTION TO CREATE SOLAR OVENS AND COOKERS THAT THEY USE TO FEED THEMSELVES AND THEIR FAMILIES WHEN FUEL FOR COOKING IS HARD TO FIND OR NON-EXISTENT. AND YOU CAN TOO.”
You should check your cooker every 30 minutes or so to ensure the sunlight is shining into the cooking chamber. If it is not, due to the movement of the sun across the sky, move your cooker so it again is facing toward the sun and adjust your reflectors as needed. If the sun is low in the sky, such as early in the morning or late in the afternoon you should position the cooker so the reflector can catch the rays of the sun and shine them back down onto your cooking vessel.
BUILDING A PANEL COOKER

A panel cooker is even easier to make than a box cooker; all you need to do is make reflector panels and tape them together.
- Take a large cardboard box, approximately twice the height of the cooking vessel you will be using, and cut out the side panels.
- Cut one panel into a trapezoid and then use it as a pattern to cut the other side panels into the same shape.
- Tape the pieces of the bottom of the box together to make one sheet of cardboard.
- Glue aluminum foil, shiny side up, to each of the trapezoids and to the piece of cardboard made from the bottom of the box. These are your reflectors. The piece from the bottom is what you will put the cooking vessel on.
- The final step is to lay the trapezoids on a flat surface, foil side down, with the shortest side facing you. Snug the sides together and tape the full length of the sides together securely. Only tape three sets of sides together so the assembled panels can be adjusted wider or narrower, as needed.
Your reflector panels will now stand by themselves with the short side on the bottom and the tops angling away from the cooking vessel so they can better reflect the sun’s rays onto it. You can adjust the angle of the reflectors by moving the outer panels in or out.

When the sun is in the right position in the sky, prepare your food just like you did for the box cooker. Since this design does not have a glass or plastic wrap window to trap the hot air in with the cooking vessel you will need to put your cooking vessel in an oven cooking bag, like the ones used for cooking a turkey or roast in the oven. Then place the cooking vessel on the middle of your bottom reflector and position the reflectors around the cooking vessel so the sun is reflected onto the cooking vessel.
Like you did with the box cooker, you should check your cooker every 30 minutes or so to ensure the sunlight is shining into the cooking chamber, although with this design you can likely get away with only moving things once every hour.
SOLAR OVEN BASICS
For a solar oven to work properly, it needs an outdoor space in direct sunlight. The goal is to convert the light into heat, and that is done best when using black materials, such as the pot, to retain the heat near the food. Around the food, place a transparent heat trap that allows in light but keeps heat from escaping. Extra sunlight can be directed to the heat trap via reflective surfaces.

Editor’s Note: A version of this article first appeared in the July 2015 print issue of American Survival Guide