

Whether you’re out camping, vacationing or living off-grid, there may be instances where you’ll need to signal others for help. Whatever the reason, it’s crucial to know how to make use of internationally-recognized distress signals. In this article, we show you tips on how to signal for help without the benefit of a cellphone, satellite phone or radio –devices which we take for granted but which may not function when you need them the most.
Distress flares
Signal or distress flares are the most common way of signaling for help. They are used for raising the alarm, and to help pinpoint the location of where assistance is needed. Numerous types of flares are available, such as road flares, marine signal flares, hand-held, rocket or gun variety, and are not a case of “one-size-fits-all”. Each type can have subtle variations in deployment and operation.
- Hand-held flares – These are best suited for directing your rescuers to the location of the emergency. They’re ideal since they burn extremely bright for a sustained period (about three minutes) and can be held or left to mark the exact area where assistance is required. Such flares are useful when in line-of-sight, such as a roadside, hillside or on open water.
To use the flare, keep your hands away from either end then ignite the tip while it’s facing away from you and any flammable objects. Remember that the flare’s flame can reach temperatures of up to 1000 degrees, so avoid looking into the flame, be careful also not to touch the tip or throw the flare into anything flammable after it’s been spent.

- Rocket flares – The rocket flare is simply one within a tube that contains a propellant for launching it in the air. This makes them ideal for non-line of sight or over-the-horizon scenarios, such as thick forest canopies and hilly terrain.
To deploy a rocket flare, remove the caps on either end and hold the flare vertically in one hand. Avoid pointing the firing end at your body, face or anything you wouldn’t want burned. With the other hand, remove the safety pin to expose the trigger. Activate the trigger on the bottom of the flare.
There will be a loud “crack” when a rocket flare is launched, raising the chances of attracting attention. Some rocket flares are attached to a small parachute to keep it in the air longer, further increasing the chances of it being seen. The typical flare can reach a height of up to 1000 feet and burns for about 40 seconds; this can make it visible up to 30 miles away.

- Flare gun – Commercially-available flare guns come in four sizes: 12-gauge or 25 mm, 26.5mm and 37mm. The first three sizes are typically used in boats, with the 12-gauge and 25mm being the most commonly used types.
To handle a flare gun safely, treat it as a single-action revolver. Keep your finger off the trigger until you’re ready to fire. Don’t point the barrel downwards; instead, ensure that the barrel points vertically before firing. As with any loaded firearm, never point the flare gun at anything or anyone you don’t intend to destroy, and treat it as loaded at all times.
To fire the flare gun, hold it with both hands, and aim straight up or at a 45-degree angle into the wind((?)) if strong winds prevail. Pull back the hammer, and pull the trigger in one smooth motion. Note that the flares usually last only seven seconds, so you’ll have to fire two flares, a few seconds apart. The first flare is to draw attention, the second is to confirm that you are in distress and to give a better idea of your location to rescuers.


Signal mirror
Carl Friedrich Gauss, a German mathematician, once discovered that even the tiniest of mirrors, even with a surface area of only one square inch can reflect sunlight that can be seen as far as seven miles away. With this knowledge, the signal mirror was created to give soldiers a simple yet effective means of communication, and for pilots of downed aircraft to signal for help when in enemy territory.
You can use an ordinary mirror or anything with a reflective surface, but it’s best to have a signal mirror for the sole purpose of having a means to signal for help when SHTF. Some people opt for plastic signal mirrors, but more experienced outdoorsmen insist on glass, as it reflects sunlight better.
How to use a signal mirror:
Step 1. Reflect sunlight onto a nearby surface, such as your hand.
Step 2. Slowly bring the back of the mirror up to your eye, being mindful not to obscure the mirror with your fingers or the brim of your hat.
Step 3. Tilt the mirror towards the sun until you see a tiny bead of light.

Step 4. After you’ve “found” the bead of light, slowly move it toward your intended target such as an airplane or rescue team. Keep the bead of light within sight as you do this.
Step 5. While aiming at your target, use your free hand to cover the bead of light three times. Doing this signifies “S.O.S” – the internationally-known distress signal. After a pause, repeat the signal multiple times. The intermittent flashing will catch attention better than a steady flash, and repeating the signal ensures they receive your distress call. You may need to continue flashing the signal until the rescuers get a good fix on your location.

Improvised mirror
If you don’t have an actual signal mirror, you can use an ordinary mirror, shard of glass or similar reflective object. Other improvised signal mirrors may be a compact makeup mirror, a car door mirror or even the reflective strip on a credit card. To use these improvised signal mirrors, follow these steps:
Step 1. Hold up two fingers to form a “V” and angle the mirror so most of the light passes through the “V”; find the bead of light.
Step 2. After finding the bead of light, slowly move it toward your intended target such as an airplane or rescue team.
Step 3. Cover the bead of light three times to your “target”; doing this signifies “S.O.S” – the internationally-known distress signal. Keep repeating until your target reacts or signals back.
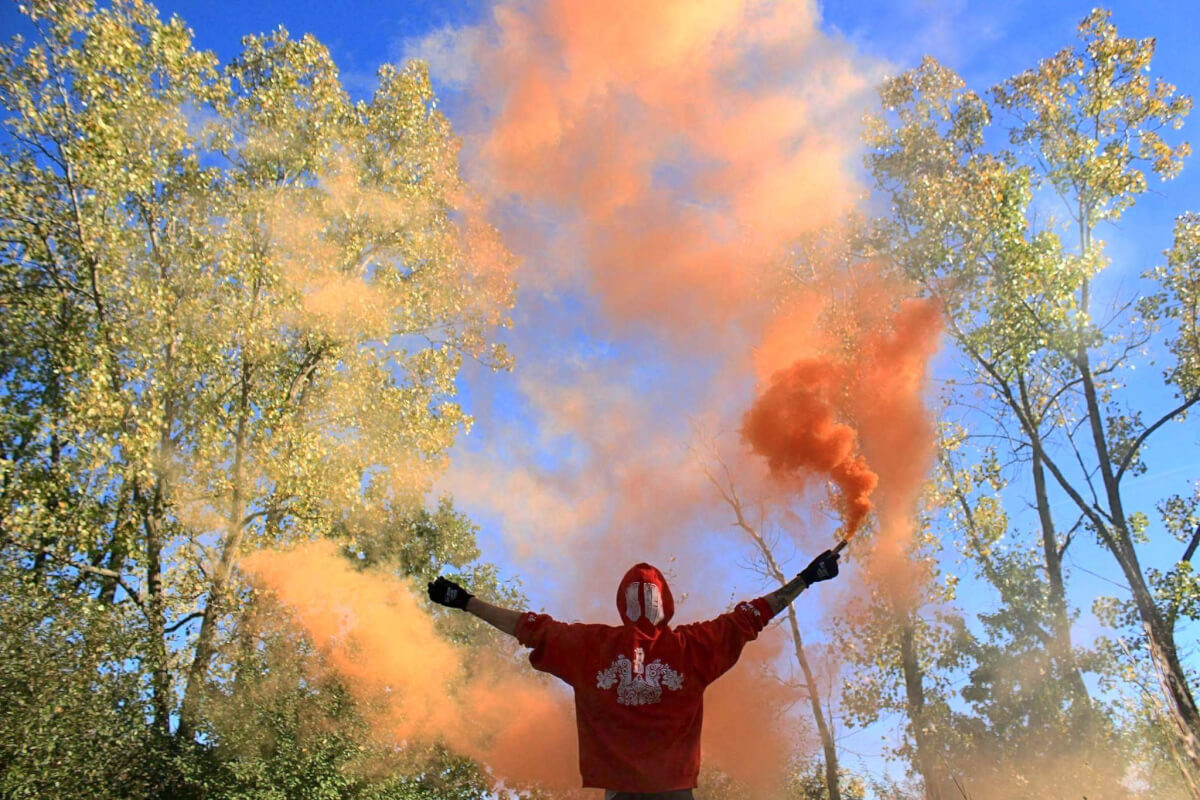
Smoke signal
Should you be in SHTF situation in broad daylight, a flare may not be visible to passing ships, helicopters or planes. In this case, a smoke signal is a better choice.
Smoke signals emit a thick, bright-orange smoke that can be seen for miles. They’re available in two types: Hand-held and buoyant. The hand-held variety looks and works just like a hand-held flare, but it emits orange smoke instead of a red flame. The buoyant type is for when you’re at sea, and comes in a stout can.

To use the buoyant smoke signal, remove the safety seal on top and pull the tab on the bottom. This kind of smoke signal has a two-second delay before spewing dense orange smoke, so you have to toss it onto the water. Hand-held smoke signals can emit smoke for three minutes, and some buoyant smoke signal cans can burn for up to 15 minutes, but smoke will linger for some time after the signal burns out.
Signal fire
If you’re out in the wild without any of the signaling equipment listed above, you can make a signal fire. Three fires are the internationally-recognized distress signal, but if fuel is scarce and you’re too weak or injured to make several fires, your campfire may suffice, and is better than nothing.
When making signal fires, take note:
- Three signal fires should ideally be arranged in a triangle, spaced equally apart.
- If the three fires can’t be spaced equally apart, they must be visibly grouped but remain clearly separated.
- Be sure to set up your signal fires in a clearing; avoid setting up under a canopy of trees as the fires won’t be seen and you may light the trees on fire.
- Depending on your situation, you don’t have to keep signal fires going indefinitely; you can keep them covered and ready to be lit for a passing aircraft, boat or ship to see.
- Use easily-ignited tinder to light your signal fires, such as dry pine needles or birch bark.
- Be prepared to ignite the fires at a moment’s notice; aircraft may pass quicker than expected and they won’t be able to see your signal after they have passed over your location.
- Gasoline, kerosene, diesel or similar fuel may be used to start the fires, but don’t just spread it over the tinder; Use a makeshift torch with a rag as the wick, then soak that with fuel and place it on the fire.
- Keep the fuel can a safe distance away, and put some distance between you and the fire before you light the tinder.
- If close to trees, clear the ground and make an earth wall around each fire to avoid starting a forest fire.
- Keep a pile of green leaves, boughs or oil and rubber close, so you can create lots of smoke for a more visible signal in daylight.
Other creative signals
When making distress signals, don’t rule out unconventional methods. A message in a bottle may not be ideal if you’re stranded in the ocean, but it might work if you’re close to a river or stream. If close to a river, you can make a small raft with “SOS” written on its sail or with a message attached. Flags on trees and large letters scraped into the ground or spelled with rocks can work too. When signaling for help without any implements, scour the surroundings for anything and everything you can use to attract attention.

Final notes
In the absence of a cellphone, satellite phone or other means of communication, the different signaling methods listed above are the types that offer the highest chances of getting rescued. You may use some of them in combination to increase your chances of being spotted, such as hand-held with rocket flares, fire signals with flares or smoke signals with a flare gun. Their use depends on wind, weather, time of day, availability of fuel (for fires), your location and other factors.

Activate the signals only when you see or hear aircraft flying in your area; don’t waste your flares or fires by using them at random. If you’re using a signal mirror to catch a plane’s attention, don’t keep the signal mirror aimed at it for long. The reflected light could blind the pilot and cause them to crash. If the pilot has seen your signal, they’ll acknowledge your distress call by pitching the plane, making the wings move up and down. Once you’ve seen the plane do this motion, stop signaling, whether with a mirror, fire, smoke or flares. This means the pilot has reported your call for help to the nearest rescue station and has informed them of your location. The next thing to do is stay put and wait for your rescue.