

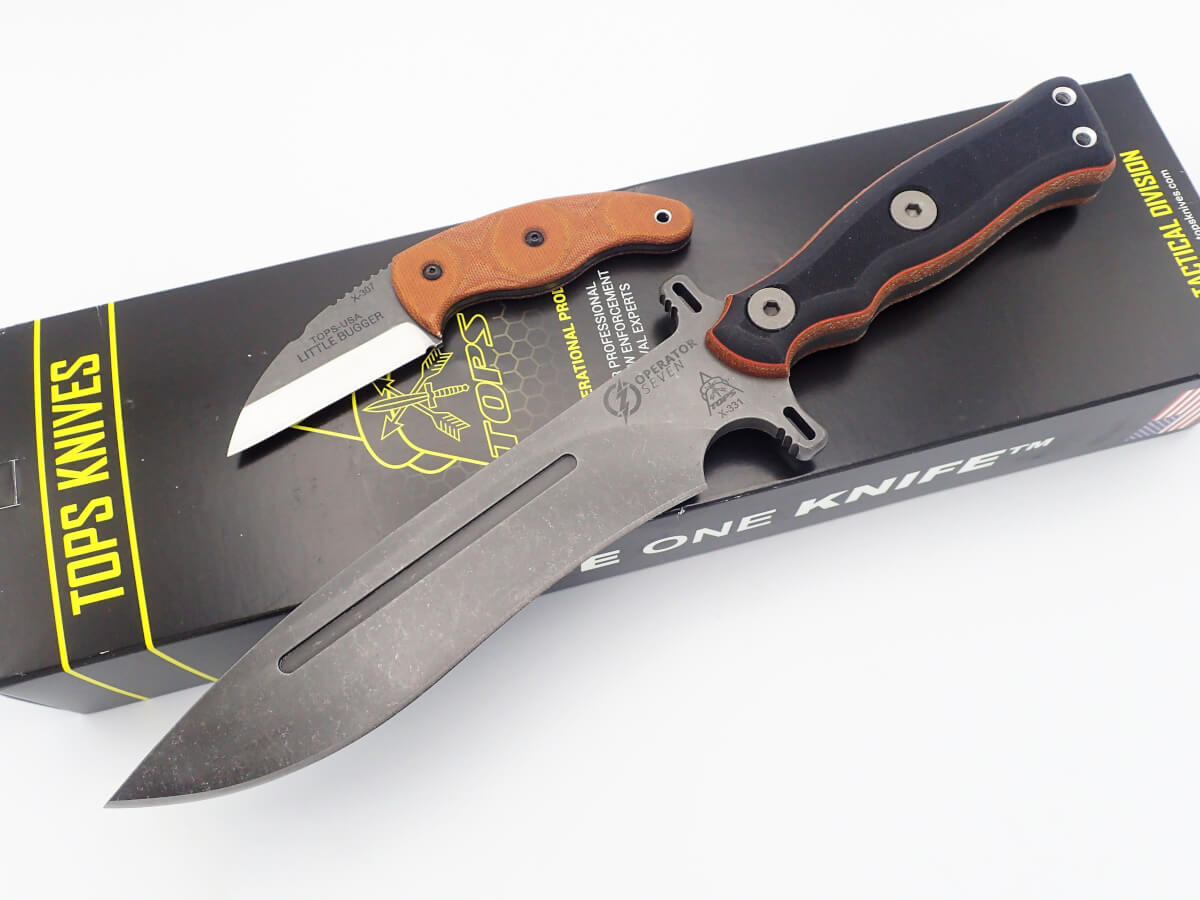
No stranger to the pages of American Survival Guide, TOPS Knives has been making hardworking American cutlery for 20 years. Its two recently launched knives, the Operator 7 and the Little Bugger, couldn’t be more different from each other. The pair looks like a modern-day David and Goliath, yet they complement each other well.

TOPS Knives has some of the best out-of-the-box quality I’ve seen. Because these knives are individually packaged in an attractive black-and-yellow box, even before they are out of the box, they inspire confidence in your purchase decision, Their logo and information stands out in bright yellow, while the knife inside is packaged with clear plastic for an added degree of protection. Both are made in Idaho Falls, Idaho.
The Hefty Operator 7
- Overall length: 12.5 inches
- Blade length: 7.25 inches
- Cutting edge: 6.5 inches
- Thickness: 0.31 inch
- Blade steel: 1075 carbon steel
- Hardness: RC 56-57
- Blade finish: Acid Rain
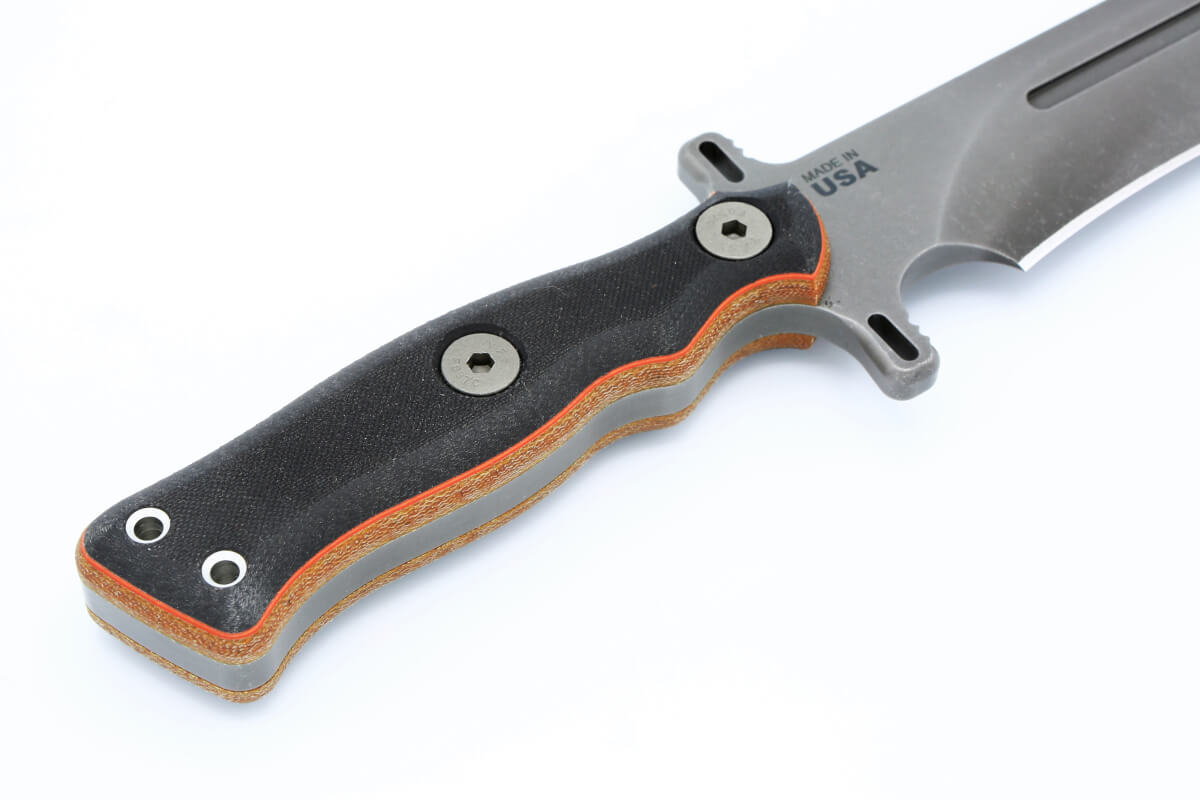
- Handle material: Tan canvas Micarta/black G10
- Sheath: Kydex
- Weight: 18.9 ounces (knife); 24.5 ounces with sheath
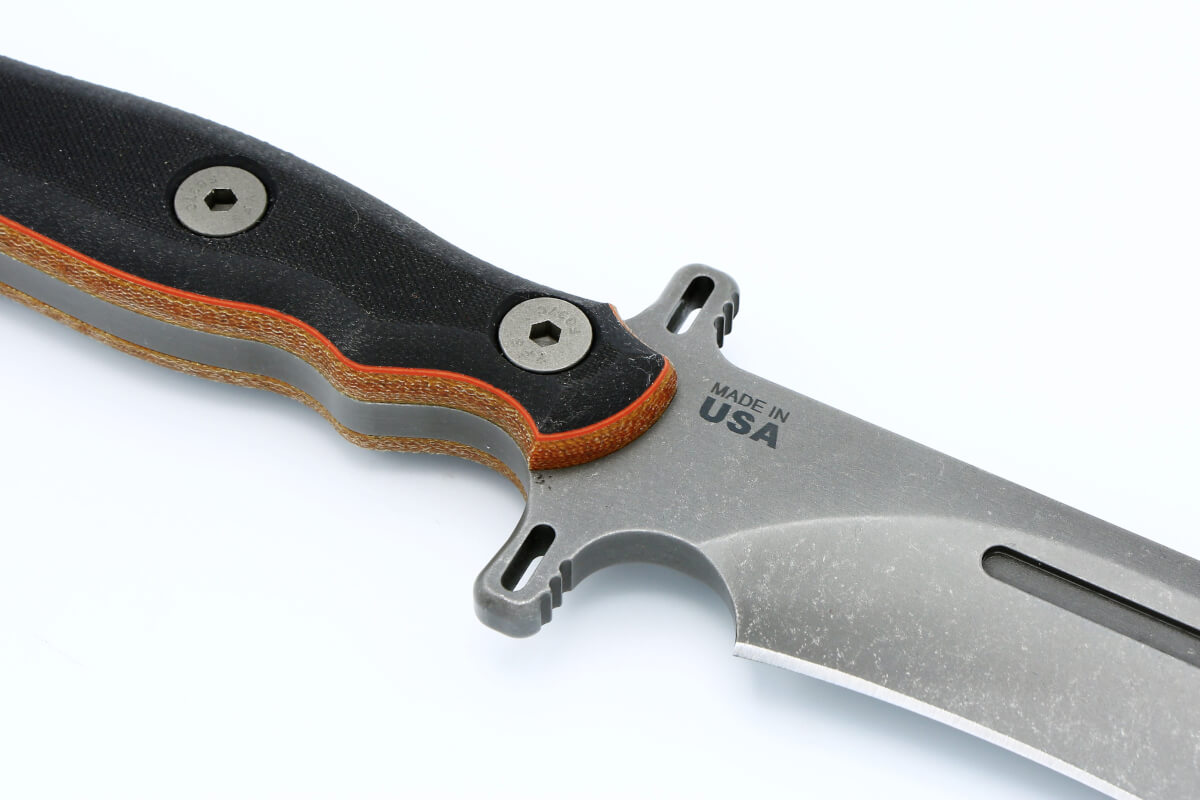
The Operator 7 is a beast! It fills the hand, to say the least. Like a good, hardworking tool, it has to be comfortable for the tasks at hand to cause less fatigue. Take an axe or good pick-axe—it fills the hand for the same reason. TOPS took this to the next level with the Operator 7. Because the 1075 carbon steel is a full 5/16-inch thick, the tan canvas Micarta with black G10 layered scales measures in at about 1 inch thick in the handle. Big steel and big handles with a classic American fighting look—hefty!
I always assess the design and weight of a new knife, which tell you what it is best suited for. A knife with a blade starting around 6 inches long and up and with some heft to it means you can chop. How well or effectively the knife will chop varies. No knife will chop as well as a tool designed for chopping, such as a hatchet or ax, but it all depends on what you are willing to sacrifice when selecting tools.
The Operator 7 can efficiently chop 1-inch-thick green saplings in a single swing … when conditions are right. It can chop thicker-diameter wood when it is backed by a strong chopping stump or if you’re using the rotating technique. I like to use large knives such as a machete and stand the wood up at an angle off to the side and give it a short chop, rotate, chop and rotate until it breaks cleanly.
These short, controlled chops were easy with the Operator 7. I used this method when cutting green poles for camp projects, one of which was a four-pronged survival spear. After chopping the green witch hazel pole to size, I put a rough point on it, utilizing the choil for maximum control. Sometimes, I don’t put a point on first; I do it after the splits and then fine-tune it, because I have found it makes the job easier and more uniform.

Once the rough point is established, I use the knife in an icepick grip, inverted, with the cutting edge facing away from me. I put the knife tip under the rough point before it starts to taper, where the green wood is thicker, and use a wooden baton to hammer the knife tip evenly through the wood. I turn the green pole and repeat the process so that it creates four even sections. Once the splits are established, the knife can be used to make the splits about 6 to 7 inches long. This way, the small sticks that will wedge the prongs open will have enough spread for the spear to cover more area.
Because I put a rough point on the spear to start with, I didn’t have to sharpen the four prongs very much. I consider this “fine work,” but the space between the prongs is small, so I used the big blade in a sideways, chest-lever grip and used my left thumb out near the spine of the tip to assist while carving the points. I finished the spear with an inner strand from some 550 paracord I had cut earlier for small lashing projects. A simple lashing kept the entire pole solid and prevented any further splitting.
I have a “go-to” procedure to test tip strength: pound the knife through a metal ammunition can. Don’t try this at home—even if the knife has a guard that you feel comfortable with—because it can be dangerous. I always wear a heavy leather glove and try to stab the ammo can in a place where the tip is less likely to slip off and end up in my leg … or worse.
A good, hard stab, followed by a few hard blows on the pommel section with a wooden baton, is all that is usually needed to bury a good blade a few inches deep. Then, a little wiggle in each direction is usually good enough to call that test “done.” This shows me a few things: how strong the tip is and how tough the cutting edge portion that penetrates the thin metal holds up. Also, pounding on the pommel shows how strongly the scales are secured. It is an extreme test, but one I reserve for knives that are meant for the long haul—basically, all TOPS knives!

The cutting-edge test was done after camp crafts and the ammo can test. I wanted to use the part of the blade (cutting edge) that contacted the metal to see how well it would cut through a 15,000-pound-rated tow strap. It cut through with a couple of passes, while the recurved portion of the blade, in between the middle and choil area, was perfect for slicing through fibrous material—quickly!
I have said for years in classes and during knife reviews that if a person ever wants to see how comfortable their knife is, make something with it. So, as a final test, I made a figure-4 trap. I use this method to see how comfortable and nimble a beastly knife such as the Operator 7 could be in constructing survival traps.
The vertical top and diagonal end piece were simply chopped at a 45-degree angle, which saved a lot of time. The four other “L7” notches were easy while utilizing the large, comfortable choil.

The Operator 7 will be at home with any and all “weekend warriors,” well-seasoned survivalists and TV personalities.
The Take-Anywhere Little Bugger

- Overall length: 5.75 inches
- Blade length: 2.38 inches
- Cutting edge: 2.38 inches
- Thickness: 0.090 inch
- Blade steel: 1095 carbon steel
- Hardness: RC 56-58
- Blade finish: Tumble finish
- Handle material: Tan canvas Micarta
- Sheath: Kydex/injection-molded nylon
- Weight: 2.4 ounces (knife); 3.7 ounces with sheath
When I received this knife, I was on my way to Alabama to hang out with the Randall’s Adventure & Training survival bunch. Ever since I’ve been a fan of knife and survival magazines, TOPS Knives and Randall’s Adventure & Training school have been synonymous. The first few articles I ever read on these topics were written by writer/photographer Jeff Randall while he led classes through the Peruvian rainforest. He had TOPS knives on a few of those occasions.
Naturally, when I had a chance to share that experience, I had TOPS knives with me. Years later, during the 2018 Field Survival Class, I took the TOPS Little Bugger knife to use and also lend to students during the woodcraft skills portion of the arduous class. The Little Bugger was designed by primitive survival skills guru Matt Graham to have a sharp, full-tang fixed blade that can be carried when everything else is left behind.When a knife weighs in at just 2.4 ounces (4 ounces with its super-light multipurpose sheath), why wouldn’t it be taken everywhere? The thin, 3/32-inch 1095 steel blade is a slicer. It’s best to think of it as a razor blade with tan Micarta handles. Simple, streamlined, sharp and, best of all, handy!

The last thing I felt this knife could be used for was the first thing I made it into—a camp kitchen knife. I took it for a backcountry stir-fry in the summer. I used my hobo skillet, fastened with a newly carved wooden handle … courtesy of the Little Bugger. I sliced broccoli, onions, mushrooms, carrots, peppers and scallions. The garlic was prepared by making a number of scores vertically and then horizontally before slicing all the way through. This makes for a very nice dice, which requires a thin blade.
The Little Bugger is not the traditional kitchen knife design one would usually use for food preparation, but it worked out just fine. The technique was different when slicing, because the blade was straight. Most kitchen knives have a curve or belly, which requires use of a certain technique; but with this style, slicing has to be done in a dragging-back motion. It’s different but easy enough to get used to.
I had to cut a small-diameter sapling for some tongs I was making in camp. I used the Little Bugger to perform a pressure-assist cut, also known as a “snap-cut.” The green sapling was about 1 inch thick, and even though the blade was only 2.3 inches long, it was enough.
I bent the green witch hazel and applied some tension to it with one hand. Once the sapling was tensioned, I simply put the blade where I wanted it—low, where the most tension was—and rocked the blade back and forth. (The tension makes the blade slice through. It’s best to keep tension on the sapling and turn it slightly to help get through all the fibers in the green wood. Sometimes, it makes a clean cut all the way through. However, it often leaves some fibers, which can be easily trimmed off using the knife in a reverse grip.)
After that, I needed to clean up the other end, so I enlisted the help of a baton to shear the green wood exactly where I wanted it. This is called “cross-grain batoning” and was easy with such a stout, yet thin-bladed, knife. I carved out about 3 inches of the middle and bent it with heat over the fire to complete the tongs.
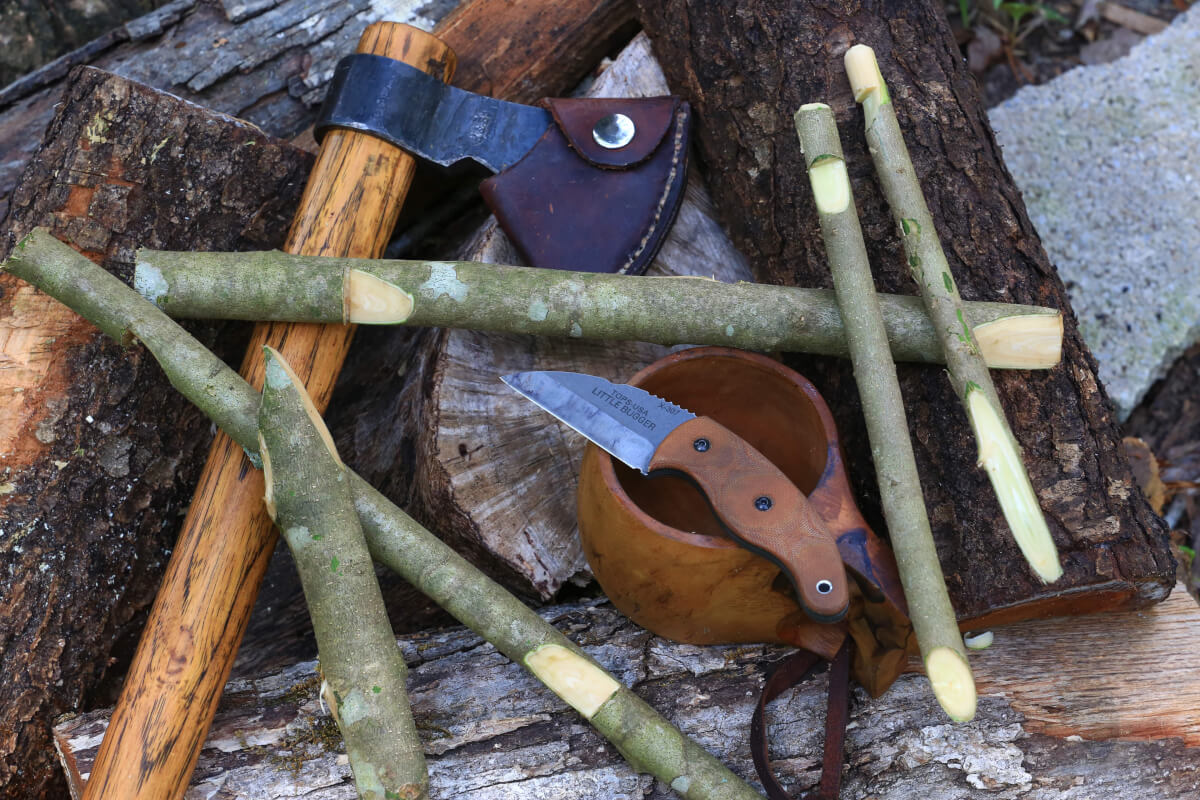
I made several quick tent stakes out of green hardwood for demos during the class; any thin, sharp knife would excel at this. Green wood is quite hard on a cutting edge, but the knife held up well, without a single sharpening during the “skills day” portion of the class.
I lent the Little Bugger to a couple of students to use when their knives got dull. One made a figure-4 deadfall trap with it, which comprised a series of “L7” notches. He also did a notch stick (similar to a tri-stick) but with fewer notches. Another student used it to completely clean a chicken.
The Little Bugger proved to be an able utility knife suitable for outdoor crafts while remaining small and handy. It was always there when it was needed. The Operator 7 performed like the beastly bigger brother it is, contrasting the Little Bugger.
Both knives could easily find their home in any adventurer’s kit, whether for a day hike or any extreme adventure. These two can definitely … hack it!
TOPS Knives
(208) 542-0113
www.TOPSKnives.com
Editor’s note: A version of this article first appeared in the February 2019 print issue of American Survival Guide.