

We had extended an open invitation to the whole family to join my wife Mary and I here at our home for Thanksgiving, but everyone had plans and our guest list topped out at three – the two of us and just one of our two daughters. Then one morning the phone started ringing with folks calling to say they had changed plans and were coming for the holiday, and other folks calling to say that if everybody else was going to be here they were too. In the space of a few hours our guest list swelled to 14 confirmed and a few “maybes.”
Just then, I received a press release from Karen Lutto at Hunter Outdoor Communications with the answer to it all: the Can Cooker. As the story goes, a guy named Seth McGinn had been making the cookers out of old stainless steel cream cans from a nearby dairy. The supply of cans ran out soon, but demand kept increasing, so the Can Cooker of today was born.
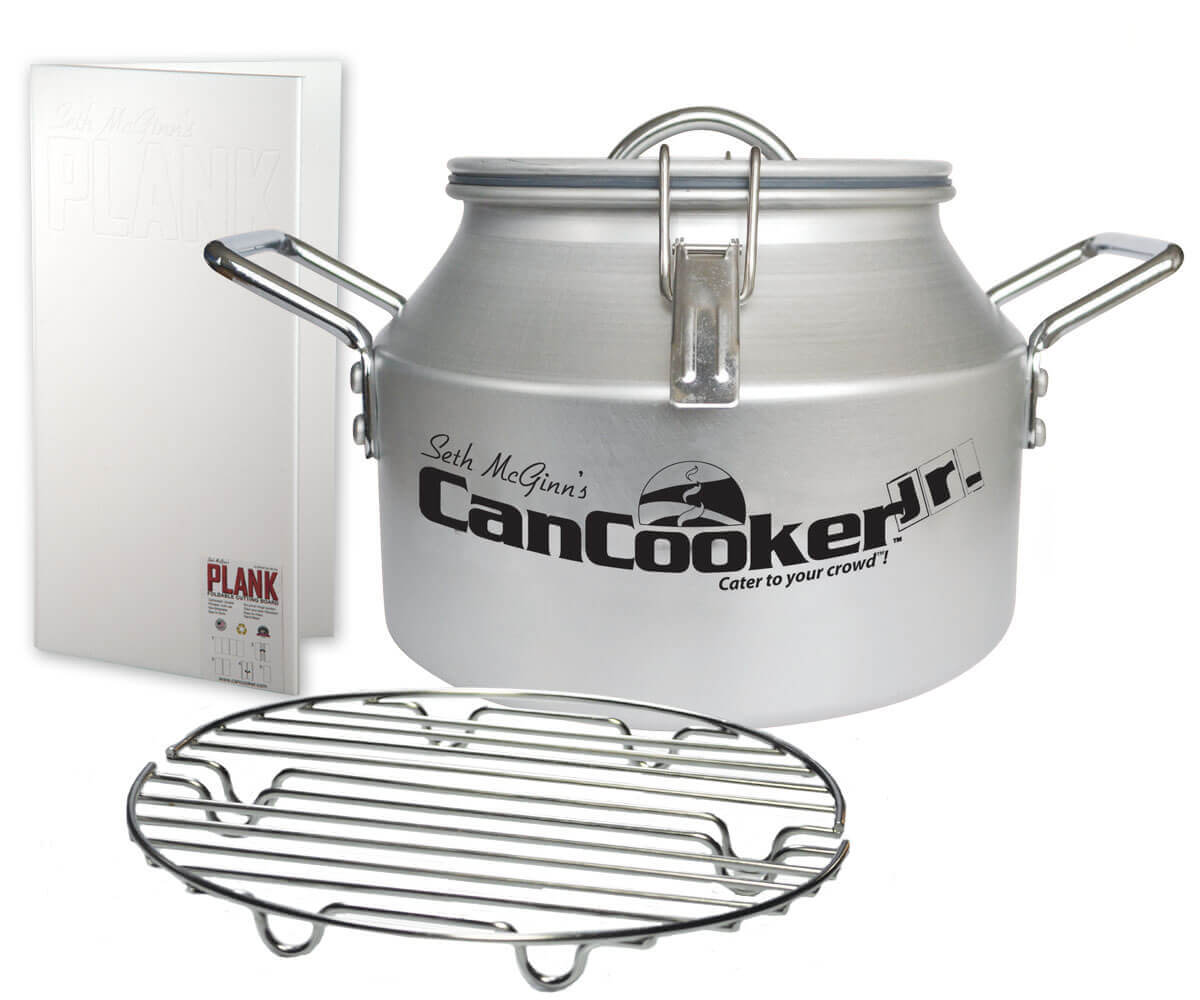
“This modern version is made of aluminum, which dramatically reduces the weight of the Can Cooker while offering the outstanding heat transfer qualities of that metal.”
How it Works
This modern version is made of aluminum, which dramatically reduces the weight of the Can Cooker while offering the outstanding heat transfer qualities of that metal. The can heats up and cools off more evenly and quicker than the old, heavy stainless steel cookers, and the food grade aluminum is anodized inside and out – so the food never touches the raw aluminum and clean-up is a snap!
This original Can Cooker holds four gallons and measures 15 inches tall including the handle on the lid, and the main body of the device is 10 inches in diameter overall, while the sturdy handles extend that out to just about 14 inches. It weighs in at a svelte four pounds.
The Can Cooker necks down to 7.5 inches at the top, where the lid mates to a premium high-temperature silicone gasket to seal itself via two heavy-duty clamps. The lid is vented with a small hole to prevent blow-ups while still providing the pressure cooking action that makes the Cooker so efficient.
It comes with a generous selection of five different spices/flavorings, and a cloth carry/storage bag. There is a folding cutting board available in three sizes, and a two-piece stainless steel rack to keep food off the bottom of the can is also offered.

Using the Can Cooker
Using the Can Cooker couldn’t be easier. Like any cookware, just make sure it’s clean with soap and water, give the inside a coating of your favorite non-stick spray, load it up, add at least 12 ounces of fluid (water, beer, wine, juice, marinades, etc.) and put it on the heat.
They recommend a low to medium heat to prevent the liquid from boiling off too quickly, and another good tip is to coat the bottom of the can with bar soap to make soot removal easy – especially if using BBQ charcoal or an open fire.
Cooking requires little to no skill… simply look for gentle steam coming from the vent hole. If you don’t get steam in fifteen minutes increase the temperature slowly until it starts, if it steams too early turn it down. Cooking time is noted in each recipe, but generally meals will be done in 25 to 35 minutes. As always, cooking times will vary due to heat source, altitude, and the outside temperature.
The can, handles and lid latches will be hot, so use oven mitts to handle the cooker and place it on a safe surface for five to 10 minutes to let the pressure go down. There will still be steam in the can so carefully remove the lid, empty the contents into a large serving bowl and enjoy.
We have a five-burner stove top with a big, high-heat burner in the middle that would have been perfect if not for all the other Thanksgiving goodies that needed space, but no worries, as my BBQ grill has a side burner that was just the ticket.
It is my humble opinion you can’t have too much mashed potatoes or dressing at Thanksgiving, so I loaded about 15 good-sized spuds in the Can Cooker, poured in a couple of bottles of beer, and lit the burner. Following the easy instructions I had all the potatoes ready for processing much quicker than if I had tried to boil them, and then it was on to the corn on the cob.
We shucked and halved 20 ears and this time I used water with a couple of tablespoons full of natural cane sugar. Having now had some experience with the potatoes I calculated the time back from when the turkey would be ready and carved to start this load and the corn was done perfectly and exactly on time.

Surviving Thanksgiving
When all was said and done it looked a pack of hungry wolves had been through the place, with just enough turkey left over from a 22 pound bird for a few sandwiches. It doesn’t matter if this is your first meal on your first day of being lost in the wilderness or an emergency Thanksgiving dinner thrown together at the last minute, the proper gear is important. It could save your life, but in this case, it just saved a family’s Thanksgiving… and sanity.
Glazed Wild Duck

8 boneless skinless wild duck breast
1 cup Iron Chef Orange Ginger Glaze Sauce
6 oz of chicken stock
6 oz of water
1 tablespoon of Kosher salt mixed in a bowl of water deep enough to cover all duck breast. Refrigerate for 2 hours. Dry the breast and use fresh coffee grinds to dry rub on each breast. Refrigerate for 2 hours. Take out and rinse off coffee grinds, dry with some paper towel and brush the Orange Glaze Sauce on each breast.
Spray non-stick cooking spray in CanCooker and on racks, pour in the 6 ounces of chicken stock and 6 ounces of water. Put the glazed duck breasts on racks. Put the CanCooker lid on and latch. Use a medium low heat for cooking and once it starts steaming, cook for 5 to 6 minutes depending on preferred rareness. Take cooker off heat source and let sit for a couple minutes. Remove duck breast, put on a platter and brush on more of the Orange Ginger Glaze and serve with wild rice and vegetables.
Beef Stew

2 lbs of beef cut into 1-inch pieces
1 lb of potatoes into 1-inch pieces
6 oz of Portobello mushrooms caps cut into 1-inch pieces
2 medium onions cut into wedges
2 cups of fresh baby carrots
1 (14-oz) can of beef broth
1 (14-oz) can of diced tomatoes with Italian herbs
1 cup of Burgundy or Pinot Noir wine
½ teaspoon pepper
Spray non-stick cooking spray in cooker, place beef pieces in bottom of cooker, add the remainder of the ingredients. Cover with lid and bring up to mild steam. Cook on med-low for 45 minutes. Remove lid, and allow the heat to come out for a minute then carefully stir in a mixture of 3 tablespoons of water and ¼ cup of all-purpose flour to thicken the stew to desire consistency. Remove from heat and serve!
Have you used the Can Cooker? Tell us what you think about it. Share your pictures and recipes with us on Instagram at #americansurvivalguide and on Facebook at facebook.com/americansurvivalguidemagazine
Paul Hantke has been a self-reliant outdoorsman all his life. His father set the mold with camping trips that were then reinforced by many years in the Cub Scouts, Boy Scouts, and Explorers. Hantke served in the USMC/R from 1968 to 1974, including a one-year “camping trip” to Vietnam, where he spent all his time at primitive forward outposts or completely in the bush. His work has been published in virtually every Outdoors/Firearms journal since 1986, and he was a Staff Editor for the original American Survival Guide magazine from 1997 to 2000.
Editor’s note: A version of this article first appeared in the May 2015 print issue of American Survival Guide.