

Every survivalist is familiar with the rule of 3: You can survive 3 hours without shelter, 3 days without water and 3 weeks without food. What they probably forgot to mention is one more thing that’s important and often taken for granted: sleep.
Why is sleep important?
“Sleep is a weapon!” is what popular fictional superspy Jason Bourne once said in his novels, and he’s right in saying so. Many military commanders throughout history cite proper rest, besides food, water and shelter as a necessary component for a soldier to perform as expected, and continue to function like the “weapon” he’s trained to be. Combatants aside, when you’re in a survival situation, sleep is likewise a precious resource to you, regardless of your occupation.
Many studies have emphasized the importance of sleep, as being deprived of it can result in serious errors in judgment and the inability to perform even the simplest of tasks. Apart from the obvious fatigue and lack of concentration, sleep deprivation’s short-term effects include downsides like a weaker immune system, making you open to sickness and disease. Your digestive system also becomes less efficient, which could lead to poor waste elimination and nutrient absorption. In the long-term, the survivalist who lacks sleep is prone to depression, fits of aggression and compromised judgment. These may all seem trivial, but in a SHTF scenario, one minor inconvenience or one small mistake can prove fatal.
In this article, we show you how you can improvise beds for a more restful sleep at your camp or shelter.
Make a bed – and lie in it
Other than the importance of a good night’s sleep to allow your body to rest and replenish, sleeping on a bed is also a matter of safety. Lying directly on the ground puts you at the mercy of creepy critters. Snakes, scorpions, spiders, ants and all manner of crawling or slithering creatures may pay you a visit during the night and bite you while you sleep, so sleeping directly on bare ground is not viable.
Additionally, the lack of space or insulation between you and the ground causes faster heat loss, as direct contact leaches warmth and causes your body to consume more energy to maintain a constant temperature. This is why most of the beds we recommend are raised from the ground.
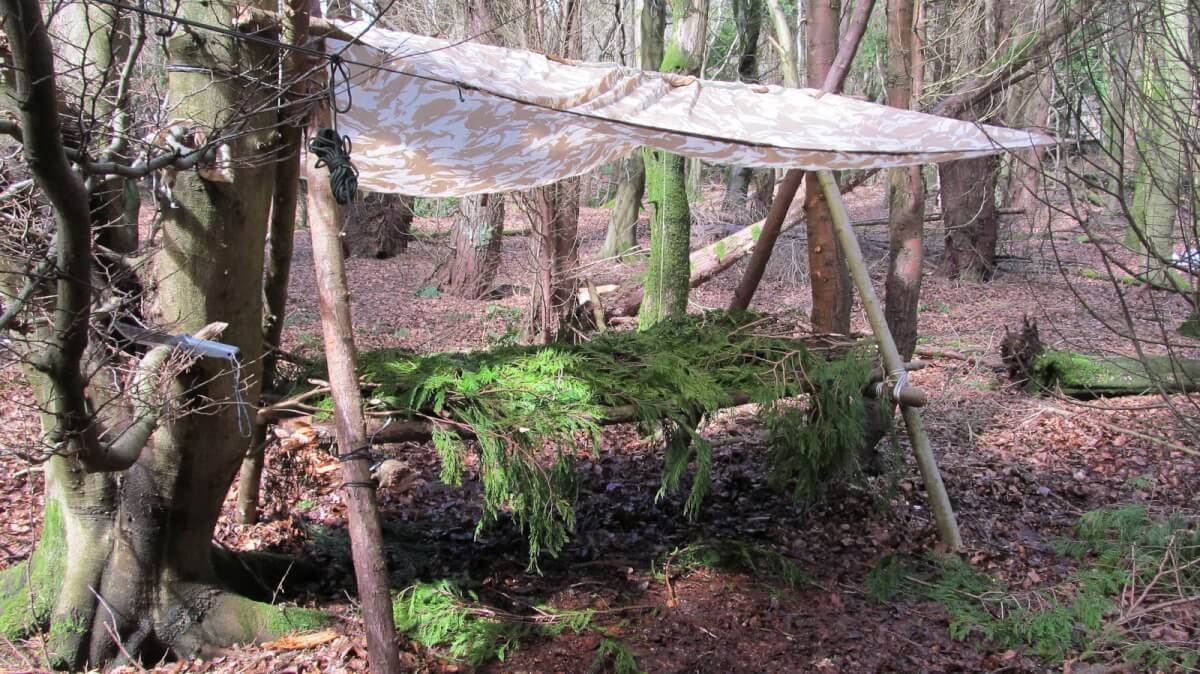
A-frame bed
To make this kind of bed, start by looking for two trees that are fairly close together. A couple of trees about 6 feet apart will suffice. Next, you’ll need 4 thick wooden poles about 8 inches thick, with lengths long enough to just bridge the gap between the two trees to make your A-frame bed.
To make the bed, follow these steps:
Step 1. Against one tree, on the side facing the other tree, place two of the poles so they cross each other about a foot from the top to form the outline of an upper case “A”. Lash them together, and to the tree, where they cross. Repeat this process on the second tree, making sure the poles cross at the same angle and stand parallel to the poles on the first tree. Tie them securely with cordage or nail them down if you have nails.

Step 2. Tie or nail a cross piece to both of the crossed poles on each tree, at about 2 feet off the ground. Make sure that both cross pieces are level with each other. Place a ridge pole between the trees, and lash it at each end, atop the crossed poles. This is how you will place a tarp over your bed.

(BuzzardBushCraft.co.uk).
Step 3. Cut about 8-10 poles the length of the space between the two A-frames for the “platform” of your bed; ensure that the poles are also thick enough to support your weight and are of uniform thickness to provide a level sleeping surface. Lash them securely to the A-frames.

Step 4. Cover the “bed” with soft boughs and grass for your “mattress”.

Step 5. For a simple roof, tie a tarp or heavy-duty plastic sheet to the ridge pole on top of the A-frames.

Ladder bed
If you need a bed without having to lash the frame to two parallel trees, you can make a ladder bed. The construction is a lot like making an A-frame bed, with a few differences.
To make a ladder bed, follow these steps:
Step 1. Make A-frame supports with poles, without lashing them to trees. Stake them to soft ground instead.
Step 2. Secure the cross piece poles to the A-frame supports about 2 feet off the ground.
Step 3. Attach two long poles of equal length to the cross piece poles.
Step 4. Lay and secure several poles (at least 2 inches thick) perpendicular to and along the length of the 2 poles, such that it looks like a ladder.
Step 5. Make a “mattress” of boughs, grass, ferns or leaves.

Bough bed
The Bough bed, depending on the availability of materials, is probably the fastest and easiest “survival bed” to make.
To make one, follow these steps:
Step 1. Gather or chop down two logs, 5 feet in length and 6-8 inches thick.
Step 2. Get another two logs, 7 feet in length and 6-8 inches thick.
Step 3. Lay the two 7-foot logs on the ground, parallel to each other.
Step 4. Tie, nail or make notches to attach the shorter logs across the ends of the longer logs; this will comprise the “bed frame”. Depending on your preference or needs, you may decide to build the frame higher with more logs.
Step 5. Gather enough boughs to fill the “frame” and keep your body off the ground. Choose boughs from trees that have soft needles like white pine, balsam or spruce.

The Hammock
This type of bed is relatively simple to make as long as you’re good at tying knots and have the right material.
To make a hammock, you’ll need a large tarp, bed sheet, poncho or blanket. For the cordage, use paracord, nylon or hemp rope, or anything similar that’s strong enough to hold your weight.
To build your simple hammock, follow these steps:
Step 1. Pull one end of the material into a bunch. Secure the bunched-up end with a lark’s head knot or clove hitch with your cordage.

Step 2. Find two trees a reasonable distance apart from each other; make sure that the distance is right for the hammock to be pulled taut, without overly stretching it.
Step 3. Wrap a length of rope around the first tree several times for a secure anchor.
Step 4. Repeat the above steps with the other end of the hammock.

Final notes
When SHTF, getting a good night’s sleep is vital for keeping both your energy levels and spirits up until you’re rescued or make your way to civilization. Crafting these beds largely depends on the available materials, so make the best bed you can with whatever’s on hand.