

During normal times, your main goal upon encountering an injured or ill person is to get them to a modern medical facility as soon as possible. These medical assets and facilities will, unfortunately, be nonexistent in many survival scenarios.
Standard first-aid protocol dictates that you should leave a victim in the position in which they are found until emergency personnel arrive. When help is not on the way, however, this might eventually become impractical or impossible.
As a result, you will have to make a decision about whether your patient can or cannot be treated for their medical problem at their present location. If they cannot, you must consider how to move your patient to where the bulk of your medical supplies is.

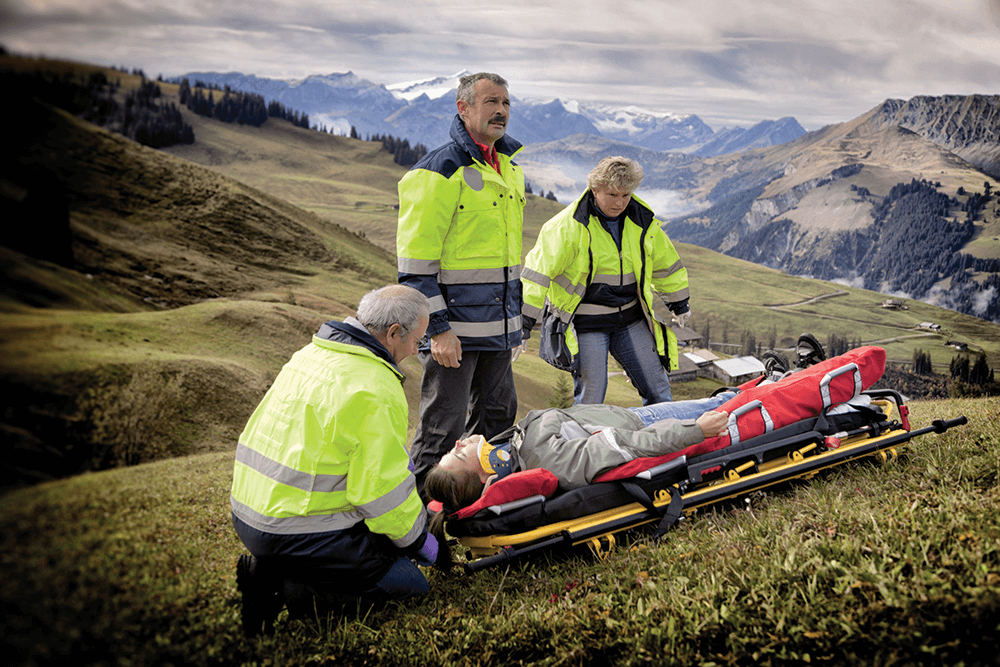
Before deciding whether to transport, stabilize the patient as much as possible. This means assuring open airways, stopping all bleeding, splinting orthopedic injuries and more. If you are unable to do this, consider having a group member get the supplies needed to make transport safer. Have as many helpers available as possible to assist you before you move the patient. If you know the amount of assistance you’ll have, you can choose a method of evacuation that will cause the least trauma to both patient and medic.
A person with a possible spinal injury should be “logrolled” onto a stretcher as a unit without bending their neck or back if possible. A cervical collar and supportive blocks with straps can be used to secure the spine of all patients suspicious for injury. An unstable neck, especially in an unconscious victim, could easily be traumatized, even if not involved in the original accident. Keep the head in alignment with the spine during transport.
If you have several helpers, transporting the patient is easier but requires coordination. You, as medic, will serve as leader of the transport team. This entails making sure the patient is transferred to the stretcher safely and also that all team members lift and evacuate at the same time. A simple “Prepare to lift,” “Lift” and “March” command should suffice to ensure that everyone is on the same page.
To move a patient onto a stretcher, the medic positions the casualty next to it on his back with his arms at his side. Then, one helper slips his arms under the casualty’s back and waist, and another helper does the same under the hip and knees. Upon your command, they lift and place the victim on the stretcher.

An alternative would be to have two helpers carefully turn the patient on their side, rather than lift. You would then slip the stretcher underneath. For this, the casualty’s arms can be placed across their chest. The head is kept in alignment with the spine throughout. There are many methods available to move the injured patient. You would, of course, prefer to have a vehicle of some sort, but this will be a challenge in a survival environment.
The next easiest method involves using a stretcher. Many excellent litter systems are available commercially, but stretchers can be improvised with a little ingenuity. Even without any materials to put together a litter, there are still methods that will allow one or two medics to achieve their transport goal.
THINGS TO REMEMBER BEFORE MOVING THE PATIENT
TRANSPORT USING FOUND MATERIALS
In a survival setting, an injury will likely occur without a commercially made stretcher readily available. However, abandoned residential buildings in urban or rural settings will contain a number of found materials that can serve the purpose.
An inside door, blankets or even an ironing board will be easy finds; after all, who takes their ironing board when they bug out? All these can function as a litter or backboard—as long as enough helpers are present to hold the victim in place. Folded-over paracord, blankets or rope can be used to serve as handholds and to prevent the patient’s arms or legs from dangling off the litter or backboard.
Another example of an easily found item in an abandoned building is a chair. If you have a conscious casualty, a sturdy chair can be used by itself as a reasonable litter. In this method, the patient sits or is placed on the chair. One transporter stands in back of the chair, grasping it from the sides and tilting it back. The second transporter grasps the chair legs in front, and both lift the chair. For short distances, the second transporter can face the victim, but it would be easier for longer distances to face forward.
TRANSPORT USING BLANKETS OR CLOTHING
Four-person blanket stretcher: Even if you have no backboard, a blanket and/or sturdy poncho can help move a casualty. Simply place the victim on the stretched-out blanket and then roll the sides inward to form handholds to lift and carry.
Two-person blanket stretcher: With fewer assistants, you’ll need additional support. If you have two long poles or sticks about 6 or 7 feet long and 2 or more inches thick, you can easily make a litter.
Lay the blanket flat on the ground and then place the two sticks on top so that the blanket is divided into thirds. Fold both of the outer thirds over the sticks, back toward the middle. Once done, the patient’s weight will keep the blanket and folds in place during transport.
The jacket stretcher is a variation of this method. You’ll need two buttoned jackets or shirts, preferably still on the rescuers. While the first transporter is grasping the litter poles, a second pulls the first’s garment off, inside out. The jacket automatically moves onto the poles, forming a “bed” for the stretcher. A second shirt or jacket goes onto the other end of the pole when the transporters reverse roles. It should be noted that this method should only be used if the weather is such that rescuers can tolerate the loss of the jacket or shirt during transport.
One-person blanket pull: Sometimes, you might find yourself alone with the victim and can’t wait for help to move them. In this case, the blanket can be placed under the patient. Grasp the blanket at one end with both hands and position your forearms to cradle the head. Use your legs to pull instead of your back to avoid injury. Alternatively, you can drag the victim out by the shoulder of his shirt or jacket: Grasp the back of the clothing under the shoulders, and use your legs to pull. If done correctly, your forearms should cradle the head.
TRANSPORT USING NO MATERIALS
There are circumstances in which you might have absolutely nothing at your disposal to help evacuate a patient—other than your own muscles. Here are methods to transport a patient without any equipment:
Three-person team: With a number of assistants, you can form a “hammock” that will make for easier lifting and transport. In this method, rescuers kneel on both sides of the victim. You’ll reach under the victim to grasp the wrist of the person across from you. Those at each end will use one hand to support the head and feet of the person being moved. Upon command, rescuers will get on one knee and then stand.
Three-person carry: Sometimes, you might have to get a patient onto a higher level than a stretcher on the ground, such as a gurney or an operating table. For this purpose, the three-person carry is useful to lift a victim for short distances. The transporters, on one knee, roll the patient to his side, facing them. He is then lifted onto their knee, and the team stands on command. The casualty is held on the transporters’ chests, and they all start the evacuation using the same foot.
TWO PEOPLE
Four-handed seat: When it’s you and one assistant, you have a number of options. If your casualty is conscious and can hold onto your shoulders, you can make a four-handed seat with interlocked wrists. With all four wrists interlocked in a square, a wider, more-stable seat is formed. If one of the rescuers needs a free hand, three wrists can form a triangular seat.

The two-handed seat is meant to provide a seat with a back for victims who might be less alert. Each rescuer interlocks one wrist to form the seat and uses the other arm to grasp his partner’s far shoulder. This forms the back support. All versions start with the transporters squatting on either side of the victim, using their legs to lift instead of their backs.
Another two-person lift is the crutch method. For a conscious patient, this carry allows the victim to walk using the rescuers as a pair of crutches. Each rescuer grabs a wrist and puts the crook of the arm on the back of their neck and over the shoulder, with the other arm around the victim’s waist. The victim can then stand with assistance. If unconscious, the waistband or belt can be pulled to help lift the casualty, with their legs dragging behind as you move.
The fore-and-aft technique can serve effectively as a long-distance transport method for conscious or unconscious victims. The first rescuer, from behind, puts his arms under the shoulders of a victim lying on his back and locks his hands around the chest. The second rescuer, facing front toward the feet of the victim, uses both arms to grasp underneath each knee. It is more comfortable if the taller transporter is at the patient’s head.

ONE PERSON
There are situations in which it’s just you. There is no equipment, and you have to evacuate a patient.
If you are alone with a patient, the fireman’s carry is effective and keeps the victim’s torso relatively level and stable. While squatting or kneeling, grasp the person’s right wrist with your left hand and drape it over your shoulders. Keeping your back straight, place your right hand between their legs and around the right thigh. Using your leg muscles to lift, stand up. You should end up with their torso over your back and the right thigh resting over your right shoulder. If you have done this correctly, the patient’s left arm and leg will hang behind your back. Adjust the patient’s position in order to cause the least strain on you.
Pack-strap carry: Another option when you are the lone rescuer is the pack-strap carry. With the patient behind and facing your back, grasp both arms and cross them across your chest. If you are squatting, keep your back straight; use your legs and back muscles to lift the patient. Bend slightly so that their weight is on your hips, and then lift them off the ground.
Joe Alton, M.D., is a physician and the co-author of the Survival Medicine Handbook, as well as the founder of www.doomandbloom.net. A version of this article originally appeared in the April 2016 issue of ASG.