

So there you are. Your exploration crew is stranded in the Arctic Circle with an ominous-looking storm fast approaching on the horizon. The sun is dipping below the endless expanse of snow-swept flatlands and the temperature gauge is near its bottoming-out point.
A sudden chill sweeps over the barren ice fields that disappear into the distant bleached white haze and, in moments, your team will be battered by Mother Nature’s harsh disposition. You brush the ice from your watch and realize you only have about three hours until your team begins to pass out from hypothermia, until their fingers turn black and their toes crack off inside their boots. Face it, you’re all going to die. But wait, there’s one last hope, and it’s just crazy enough to work!
Ironically, snow makes great insulation because of the amount of air trapped in the frozen water, meaning a properly-constructed igloo can warm you up by trapping the heat from people and other sources (such as candles or stoves). A single candle burning in an igloo is usually enough to raise the inside temperature as much as 40 degrees.
Throughout history, these traditional dome-shaped snow houses have been used primarily by eastern Inuit (in Greenland and northeastern Canada) as temporary winter shelters used mostly when traveling. But it’s a lost art today. I had the good fortune to learn igloo-making from Rick Maschek, who, by our best estimates, has made more igloos than anyone living today, Inuit or otherwise.
Building an igloo isn’t easy. It takes time and manpower. Plus, you’ll need to know a few igloo-building tricks that will help make your igloo strong, safe and warm. To really do it right, you’ll want a small camp shovel or a snow saw for cutting your building blocks. But if these aren’t available and you were really caught out in the tundra with your pants down, anything that can cut snow will work, even if you have to shape the blocks sand-castle-style.
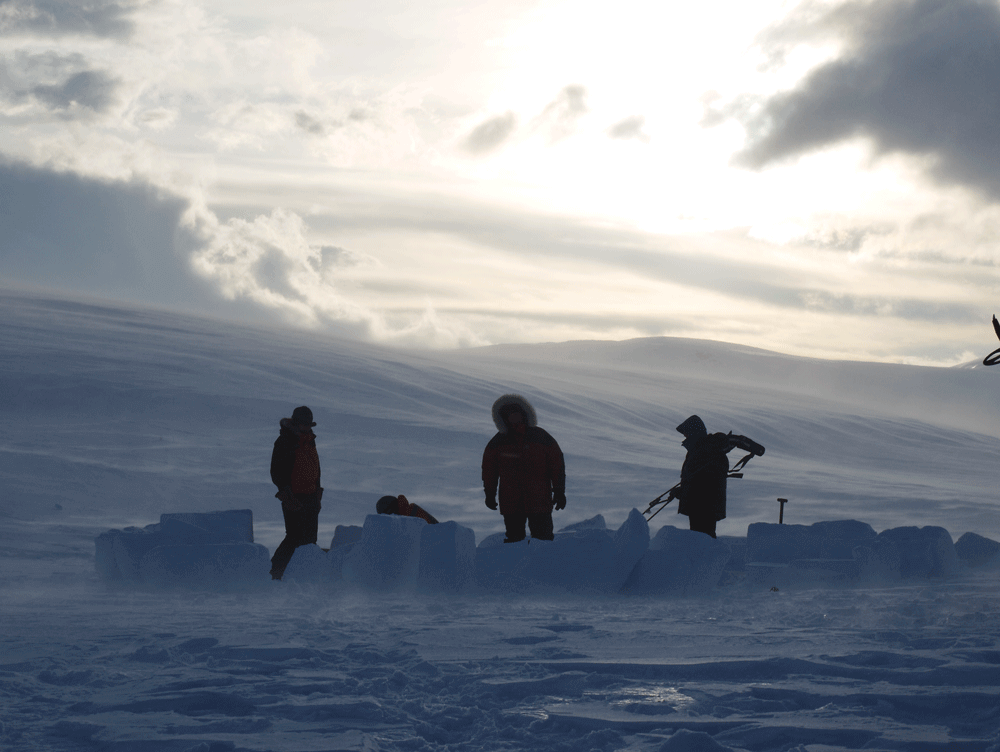
BUILDING THE IGLOO
When building an igloo, you first need to select a relatively flat site with at least two feet of snow on the ground. You then begin by drawing a circle in the snow, which will be the igloo’s inner diameter. Cut blocks from the snow using the snow saw, which should have a blade at least one foot long. If you don’t have a snow saw there are many other possible substitutes such as a ski or a flat piece of wood.

The size of the blocks will vary depending on the condition of the snow. When I made my first igloo with Maschek, we were just a few miles west of Wrightwood in the Angeles National Forest. The blocks we made were about two feet wide, a foot tall and about eight inches deep.
As each block is placed around the circle that had been drawn in the snow, trim each block so the outer edge of the block just placed points directly to the middle of the circle. You could put a post or stick in the middle as a reference. That is, each block is actually trapezoid in shape in order to fit snug and form a circle.
Once the first layer is in place, a diagonal cut is made across three consecutive blocks, and their top portions removed. This then forms a diagonal ramp, which then enables the subsequent blocks to be stacked spirally all the way to top. That’s right – an igloo isn’t made of layer after layer of blocks, but rather of one spiral to the top.

As each block is put into place it should be chinked into place with snow both inside and outside. For this reason, it is considerably more difficult to build an igloo by oneself than if there are a few people working together.
To make the dome, snow blocks are stacked at steeper and steeper angles. “Beginners usually think that the blocks will fall,” says Maschek, “but snow has an incredible cohesion quality which enables you to form the igloo’s rounded dome.”
A trench is then dug into the igloo, so that you walk or crawl up into the igloo. Once the trench is covered, the igloo is complete.
For the first day in the igloo, Maschek says that holes are not needed since snow is mostly air. “And the holes are not necessary for ventilation but to allow excess heat to vent, and prevent snow melting.” Holes should be poked on the sides of the igloo dome, but not directly on top. If it gets too warm inside the igloo, it will melt.
After two and a half hours of carefully cutting and stacking blocks of snow, our igloo was finished. Our group of seven students were working under the tutelage of Rick Maschek, who was a training officer of the Barstow, California Desert Rescue Squad. He also taught at a middle school and worked at an outdoor sporting goods store.
“EVEN THE MOST EXPENSIVE TENTS DON’T HOLD UP WELL IN A HEAVY STORM. THEY’RE SHAKY, NOISY, AND WILL SAG FROM THE WEIGHT OF THE SNOW. BUT AN IGLOO IS QUIET AND WILL HOLD UP TO THE MOST SEVERE OF STORMS.”
Once our 10-foot-diameter dome of snow was finished we dug a tunnel into it and all seven of us (and two dogs) crawled into the igloo to inspect our handiwork. At first, our reaction was awed silence as we each entered into the subdued light and quiet of the igloo, and then we all began to spontaneously laugh at the remarkably unique experience of being inside an igloo for the first time. There was no wind, sound was muffled and it was comfortably warm.


Maschek told us he’d built his first igloo in a snow survival class many years earlier and it hooked him. Now he said he doesn’t carry a tent anymore when backpacking in the winter. “I carry a 12-ounce snow saw,” he told us, showing us a nearly foot-long wooden-handled aluminum tool.

Maschek related an incident when his group built an igloo near San Gorgonio, CA, and then skied up to a higher elevation and built another. When they came back down a few days later, he noted an expensive, top-quality Marmot tent pitched next to the igloo. He went to say hello but discovered the tent was empty and the campers had moved into his igloo.
“Even the most expensive tents don’t hold up well in a heavy storm,” explained Maschek. “They’re shaky, noisy, and will sag from the weight of the snow. But an igloo is quiet and will hold up to the most severe of storms. In fact, the igloo gets stronger and thicker form the new layers of snow.” In a heavy winter storm, one needs to shovel constantly to keep the snow off a tent to prevent it from collapsing. Maschek advises his students not to waste their time with the shoveling, and to simply build an igloo.

During another expedition to Mount McKinley, Maschek and his team built four igloos and a snow cave, one at each successive camp as they made their ascent. As he came back down, he discovered that every one of the previous igloos were occupied by climbers who followed.
“When I leave my igloo behind,” says Maschek with a broad smile, “I leave behind an emergency winter shelter for others to use.”
Igloos can last much of the winter if conditions are right. Maschek relates how he built an igloo near Mount Baldy one November and when he returned a week later, the igloo was in better shape because a storm had added more snow and thickened the walls. He came back to the same igloo a month later and it was still there, though it was now entirely under new snow and he had to tunnel into it. The same igloo was still there when Maschek visited for the last time that season in late March.
“IGLOOS ARE MADE FROM BLOCKS OF SNOW, AND IT IS THE AIR TRAPPED IN THE SNOW THAT INSULATES. ICE, ON THE OTHER HAND, HAS LITTLE TRAPPED AIR AND DOESN’T INSULATE.”
According to Maschek, it is a misnomer that igloos are ice houses. Igloos are made with blocks of snow, and it is the air trapped in the snow that insulates the inside from the cold exterior. Ice, on the other hand, has little trapped air and doesn’t insulate. Eskimos in the old days would have villages of 10 to 20 various-sized igloos, with many connected by tunnels. Some of the bigger igloos would be able to accommodate up to 15 people, and would be used for dancing or for meetings. Windows, if any, would be made of ice.
The biggest igloo Maschek supervised accommodated eight boys. It was built in Idaho with 20 Boy Scouts. It took an hour-and-a-half to build. Typically, Maschek will build an igloo to accommodate two or three people and he can make one by himself in 45 minutes.
SNOW CAVE
In an emergency you could simply burrow a cave into a thick drift of snow. This will insulate you as well as an igloo. A snow cave should always be dug into the side of a hill, so that you tunnel in horizontally, and then hollow out the cave up from the tunnel. This allows your body heat to rise and keep the cave warm. A simple hole burrowed into the ground is not ideal because cold settles, and such a burrow would be like sleeping in a refrigerator.
The main advantages of an igloo over a simple cave is you can build a much larger and stronger structure even if there is only a few feet of snow on the ground. But you can’t build an adequate snow cave if there are only two or three feet of snow on the ground.
Whether you have an igloo or a snow cave, you’ll need to insulate the floor with something so your body is not directly touching the snow. A blanket, sheet of plastic, or a thick layer of pine needles would do. It’s not dark inside an igloo during the day, though the light is subdued. At night, a single candle is usually sufficient to light up an igloo.
Maschek’s devotion to teaching igloo-making helps keep alive the aboriginal “Old Ways” where skills and knowledge are far more valuable than gadgets.
Snow Safety Tips
-
- Cutting through snow, digging caves and stacking blocks of snow is hard work and, though it might be only 10 degrees (F) outside, you’ll more than likely find yourself drenched in sweat after a little bit of work. Sweat will get your clothes wet on the inside and the snow will wet your clothes on the outside. Soon enough, after you stop working, the moisture will begin to evaporate or freeze, and that will suck the life from your body, degree by degree. So, have dry clothes to change into after construction is complete.
- Drink fluids often during the day and keep a water bottle by your side at night. Dehydration will seriously reduce your body’s ability to produce heat.
- If your feet are cold and your boots are already tight, don’t put on more socks. Toes with wiggling room stay warmer. The best way to keep your feet warm is to put on a hat, and always wear a hat to bed.
- Dehydration can kill and if you’re low on water don’t start grinding on the snow banks. Eating snow dries out your mouth and lowers your core temperature, which will eventually kill you. Instead, fill a water bottle with snow and wear it inside your outer clothing layer, but not against your body, while you’re hiking or building camp. With help from your body heat and movement the snow will easily turn into water.
- Crawling into popsicle pants in the morning is not a good idea, so remember to put a dry pair in your sleeping bag with you at night so you’ll have toasty clothes in the morning!
Editors Note: A version of this article first appeared in the March 2015 print issue of American Survival Guide.