

Recently, I took a weekend off to get away and have some fun. It was time for a road trip. Just three hours’ drive away, the National Preppers and Survivalists (NPS) Expo was about to get started. This expo was a good chance to meet a lot of interesting people, see a variety of gear dedicated to preppers and learn from different speakers scheduled to talk during the two-day event. They covered topics such as bartering, bushcraft skills, essential oils, and gold and silver ownership, among others. Well-known survival expert Dave Canterbury was there and drew the largest crowds for these free lectures.
However, the class I took on Sunday morning was a little different. It was a three-hour class (with an attendance fee of $99) that focused on wound closures. I’ve always had an interest in this area of medical care, because I’ve often wondered what a layman would do if they or someone they were with got a wound or a laceration and there were no doctors or hospitals available.
Sure; I know what needs to be done, but how do you really do it? I had watched some YouTube videos, but that didn’t quite do the trick, so I had to find another way. This wound closure class fit the bill.
The instructors for this course were Doctor Joe Alton and Amy Alton, an advanced registered nurse practitioner. They go by the nicknames of “Doctor Bones” and “Nurse Amy.” Both have been involved in the preparedness world for many years and have produced hundreds of videos and blog articles. Even more to their credit is the huge success of their book, The Survival Medicine Handbook, which was a number-one seller on Amazon.
The class covered wound closures in general but focused mainly on suturing. I got a lot out of those three hours. Doctor Alton began the class with a presentation showing different types of wounds and different wound-closure methods and provided information about the importance of maintaining a sterile treatment environment.
The doctor emphasized the fact that if doctors and hospitals are available, you should use them and only resort to these alternative measures if you have no other choice. He also conceded that if you or a family member has to suture a wound in an emergency situation, you probably won’t have a sterile environment, but you should attempt to provide as clean an area as possible.

CLASS BEGINS
I am not a doctor. What I convey in this article is what I understood from the class, based on my perceptions and observations. This is for general information only, and I would recommend that you participate in your own training if this subject matter interests you.
That said, the first areas we covered were the non-invasive and invasive types of wound closures. Whenever possible, non-invasive methods are preferred to avoid causing any more damage to the skin.
Non-invasive wound closures: Examples of non-invasive methods include Steri-Strips or Super Glue or medical glue such as Derma- Bond. Steri-Strips should be used when the laceration is fairly shallow, limited to the epidermis and when the laceration is somewhat narrow. When both sides of the wound are close together, it doesn’t require as much tensile strength to keep it closed, compared to a wide cut, for which you have to pull the two sides together.
Super Glue or DERMABOND can be used for the same types of wounds. While these two adhesives are almost exactly the same, the chemical composition of DERMABOND allows it to hold up better when the area gets wet.
A good piece of advice was that if some type of glue must be used to close wounds, we should test it on all family members ahead of time and watch for any reactions during the ensuing 24 hours. There’s no sense in stocking up on Super Glue, only to find out that someone has had a severe reaction to it.
Finally, something else the doctor pointed out was that glues used for wound closures are not as strong as sutures.
Invasive wound closures: On the opposite end of the spectrum are sutures and staples. These are very invasive, because two new holes are created in the skin at every point you bring the wound together, thus increasing the chance of bacterial contamination and infection. Having an infection in a SHTF scenario when doctors aren’t readily available is definitely something you want to avoid. So, go with the Steri-Strips or Super Glue when possible.
Before we learned how to suture and staple wounds, we discussed when they should be used—and especially when they shouldn’t. There are several things to consider before suturing or stapling a wound. First, you must determine the type of wound it is. If it’s a large, gaping wound such as an “avulsion” (when a chunk of skin is torn away), the sides of the wound are too far apart to be brought together.
In such a case, you should leave the wound open and pack it with sterile gauze that’s been moistened with a sterile solution. This will help stave off bacterial growth and infection. The packing should be changed at least a few times a day. This type of wound would heal from the inside out in a process called “granulation,” rather than healing by growing into adjacent flesh that’s been pulled together with sutures.
“[DR. ALTON] EMPHASIZED THE FACT THAT IF DOCTORS AND HOSPITALS ARE AVAILABLE, YOU SHOULD USE THEM AND ONLY RESORT TO THESE MEASURES IF YOU HAVE NO OTHER CHOICE.”
Some basic indications that a wound should not be closed include:
- The wound is dirty or contaminated.
- The wound is already infected.
- The wound is more than eight hours old.
- The wound is large and gaping (as already discussed).
If conditions indicate that the wound needs to be left open, it should be treated with moist heat, drainage and antibiotics. I asked Doctor Alton what antibiotics are best for dealing with wounds (rather than internal issues). He said amoxicillin or cephalexin—that is, if you’re not allergic to penicillin. In the case of penicillin allergies, Dr. Alton suggested erythromycin or clindamycin.
Clearly, it’s best to do your research ahead of time so you know what to keep on hand. Some basic indications that the wound should be closed include:
- The wound is clean.
- The wound is not infected.
- There is no dead or burned tissue in the wound.
- The wound is fewer than eight hours old.
- The wound is deep.
- The wound is over a joint.
- The wound is too wide for Steri-Strips to effectively close it.
Before actually closing the wound, try to determine if the closure you want to use (i.e., suturing or stapling) will result in a decent seal of all the layers of the wound, such as the epidermidis, the dermis and even the fatty tissue below. If you pull the top together but leave a void, or “dead space,” beneath the closure, that situation will create an almost-guaranteed infection because of too much open space that would act as an incubator for bacteria. This type of scenario might call for having to stitch together two or three layers of the wound so there isn’t a large void.
Remember: We aren’t surgeons; we are amateurs having to treat wounds under bad conditions. Unless you went to medical school, the best you can do might not be enough. Chances are that if we must create sutures deep inside the wound to avoid dead space, we’re not going to do a great job.
And that’s when Dr. Alton mentioned Penrose drains. A Penrose drain is a small, rubber tube placed in the wound to allow drainage and avoid fluid buildup. A small portion of the drain will remain outside the wound at the suture line and will drain fluids onto gauze padding. Drainage should be monitored carefully. This is an excellent entry point for bacteria, and chances of infection increase dramatically after three or four days, post-insertion of the drain.

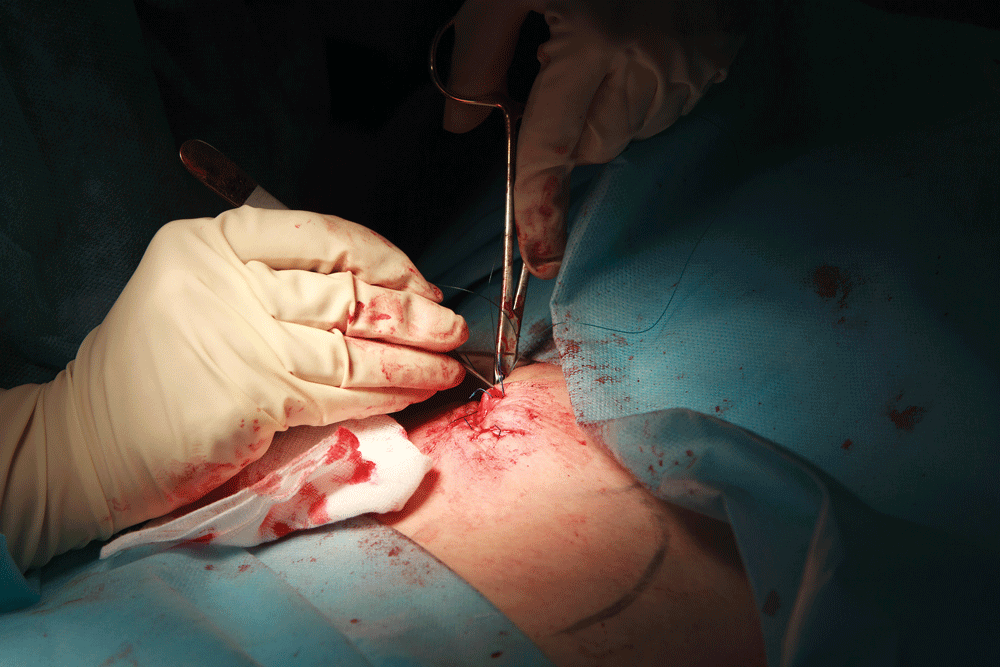
STAPLES AND SUTURES
Stapling is a faster process than suturing, but it has limitations. Due to their relatively small size, staples should be reserved for lacerations of the epidermis. Suturing, on the other hand, can be done deeper inside a wound to bring different layers together as you work your way to the top.
We finally got to practice both suturing and stapling on a pig’s leg. Following is the preparatory procedure before proceeding with this method of closing a wound (I’ll just note some of the major points from the class session):
- Irrigate the wound with sterile solution to clear out dirt and other foreign particles.
- Always prep all sides of the wound with a Betadine pad or applicator by starting at the wound and applying the Betadine in a circular motion, moving out and away from the wound.
- A fenestrated drape (a drape with a window in the center) helps maintain a sterile field and comes in a standard laceration tray with other materials and tools.
Doctor Alton didn’t think the forceps that came with the laceration tray were delicate enough to work with human skin. So, he provided us with Adson tissue forceps, which he felt were more suited to the task.
- We used a 2-0 silk suture (non-absorbable), which is relatively thick, in order to make it easier to learn to tie knots and also increase the strength of the sutures.
- For suturing, we used triangular cutting needles, because they make it easier to get the needle and suture through the tissue.
- We held the piece of skin to be sutured with the Adson forceps. It allows you to maintain visual contact with the needle so you know where it’s going and to prevent the needle from poking into the wound itself.
- We used interrupted stitches. It saves the amount of suture material you use. Also, if you do one stitch at a time and tie it off, you don’t have to worry about the entire suture line breaking down because of one stitch failing.
- We tied and pulled the knots so they were all on one side of the wound.

To get the best effect from stapling, two people should do the job. In our class, one person used two Adson forceps (one in each hand, held as if they were writing) to grab both sides of the wound closest to the person doing the stapling, bring them together and bring the two sides up, slightly inverted. The other person then placed the staple. This method was repeated until the wound was closed.
WELL WORTH THE DRIVE
After that, the class quickly ended, and we cleaned up our work areas. My juices were flowing. I had a little knowledge, and now, I was “dangerous!”
I started making lists in my head of what I needed to acquire and store. One thing I learned is that just one wound can quickly knock out an average person’s supply of gauze wraps and pads.
It had been a three-hour drive and $99 to sit in on that class, but it was well worth it. The class opened up a whole new area for me, and I’m going to dig into the practice, as well as the theory.
If you’re a serious prepper, this kind of training is absolutely required to get you rolling in the right direction. You’ll be glad you took the time to get professional training instead of watching YouTube videos at home.