

CARVING OUT A HOME IN THE WILDERNESS
Imagine yourself in the middle of a vast wilderness. The only sign of human life is the unmaintained trail you’ve been hiking along all day. With the autumn sun hanging low in the sky you pull a map of the area from your pocket and make the decision to head off trail to reach a small town you believe is shorter walking distance away than the trailhead that is, by your estimate, still 20 miles away. With only a few hours of daylight left and minimal gear, you set off due east through thick undergrowth and thorns. The terrain immediately becomes a literal uphill struggle as the temperature continues to drop as the sun sets. Reality sets in as you accept the fact that you are lost and are not going to be able to hike out before dark.

You cringe as you lay your small day pack on the ground to access your gear as you already know that you are not prepared for a long cold night in the woods. The contents of your pack include a stainless water bottle, ferro rod, folding saw, knife, a paracord survival bracelet, and a small military style poncho. You quickly set up an improvised shelter using the poncho, build a fire, and begin to boil water from a nearby stream. As you lay in your shelter on a bed of leaves you remember that you had arranged a vehicle pick up at the trailhead and hope rescue will come at some point over the next few days once your friend arrives to find you’re not there.
“REALITY SETS IN AS YOU ACCEPT THE FACT THAT YOU ARE LOST AND NOT GOING TO BE ABLE TO HIKE OUT BEFORE DARK.”
After tossing and turning all night with very little sleep you awake to find several inches of snow on the forest floor. You know that you’re going to have to build a cold weather shelter in order to stay warm until help arrives. You run through the mental catalog of survival shelters you’ve built in the past, weighing the caloric expenditures versus the benefits of each shelter design. Accepting you will likely be here for a few days and possibly even weeks, one specific long-term primitive shelter comes to mind…the wiki up.

WEIGHT VERSUS SECURITY
In a wilderness survival scenario a reliable shelter is often first priority. A good shelter can keep you out of the elements and when combined with a fire, an effective micro climate can be created to regulate core body temperature. A number of factors can affect the type of survival shelter you choose to build. It is good practice to always carry some sort of a cover element in your backpack as it will save you the valuable hours of work required to build a primitive waterproof shelter that is equally as effective as a modern tarp.

The downside to carrying a tarp or other man-made shelter with you into the wilderness is that it will likely be the bulkiest item in your pack. And, unlike other essential gear, it cannot be easily attached to a belt or carried in a pocket. For this reason many times day hikers will not carry much for shelter with the intention of being home in a warm bed by nightfall. If one chooses to sacrifice security for pack weight in the case of shelter, they must possess the knowledge of a variety of emergency shelters.
WHEN TO BUILD A LARGE SHELTER

In an authentic survival scenario any caloric expenditure is a waste if the result of the use of calories doesn’t improve your situation. This is especially true when it comes to constructing a primitive shelter with only a few tools. If you only need a shelter for one or two nights and are confident that you can make your way back to civilization in a day’s trek then there is no need to build an extravagant shelter. A simple lean-to with a roaring all night fire is enough to stave off hypothermia, even in freezing conditions. If there is no way of producing a fire then a lofty debris hut constructed of as much available natural insulation as possible should keep you warm enough provided you are appropriately dressed for the environment and don’t get wet. For survival scenarios of an unknown length of time, few structures give the feeling of security and warmth like a wiki up.
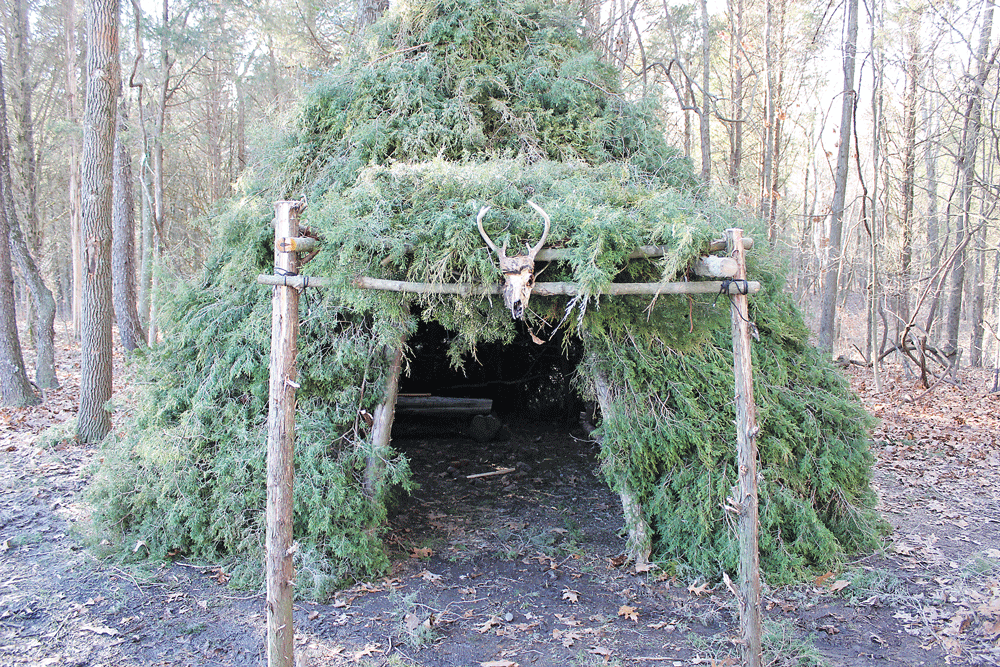
WHAT’S A WIKI UP?
A wiki up is conical living structure that is constructed of straight poles that are lashed in place by vines or cordage and then shingled with forest debris or the bows of evergreen trees. A wiki up is essentially a poor man’s tipimade from trees and leaves. It is ideal for living long term in cold environments as it is one of the only large primitive shelters that can be easily built with minimal equipment and can safely contain a fire within its interior. Wiki ups can range in size and shape to be better suited for their intended use. A small wiki up can easily have enough room for one person to sleep and work. This featured wiki up has more than enough room for two people to sleep, work on projects, and even cook meals indoors.
SELECTING A BUILD SITE
The first step to any shelter build is to select the building site. Remember to look up to make that no “widow makers” are hanging in the trees above where you intend to set up camp. You’ll also want to avoid areas that have standing pools of water to avoid mosquitoes. Look for an area that has enough natural resources to yield the building materials required for this structure without completely depleting the forest.

This is a big project so be sure not to underestimate the amount of materials it will take to fully waterproof this structure. The last thing you want in a survival scenario is to be wasting calories dragging large trees through the thick forest. An ideal building site should have flat ground, abundant resources, and a thick canopy overhead to act as a first layer of roofing. Once you’ve selected an area, clear away any small brush or debris from the ground that the wiki up will directly stand on.
CONSTRUCTION
The construction of a wiki up begins with the selection of three strong poles lashed together to form a tripod. This tripod will be load bearing so it’s a good idea to use straight green trees for this. Raising the tripod can be a little tricky with a one man crew so you may have to get creative by making use of any cordage you may have to create a makeshift pulley system. One top of the tripod is raised above eye level staking the two outer poles will keep them from sliding. If done correctly even a large tripod like this one should raise into place as the middle pole is pulled outward.

After raising the tripod, maneuver the three poles so they are as symmetrical as possible. Pulling the back pole outward an extra foot or so will create an area in the back of the wiki up with a little extra head room. Keep in mind that a steep pitch will shed more water so don’t over extend the diameter of the tripod. It is better to have a small waterproofed living area than a large shelter prone to leaking. Once you have the desired width and height of your tripod, place large rocks or stakes to the outside edges of the poles to secure them in place before adding any additional poles.
When gathering the additional poles keep the weight of the poles in mind. A wiki up is a semi-permanent structure and the poles will not only have to support themselves but also the hundreds of pounds of debris used for waterproofing. Using fewer poles and weaving a natural cordage, such as grapevine, will save you the hassle of cutting down a lot of trees. However, you will need to gather a larger amount of cedar bows to fully waterproof the structure.

On the other hand, completely enclosing the structure with poles will require less cedar bows overall to waterproof. However, it’s a lot of extra work and a lot of heavy weight hanging over head as you sleep at night should something go wrong. For this build, 15 green poles in total were used and interlaced with wild grapevines. The cedar poles will dry to a fraction of their green weight much like pine and the grapevines not only sync the structure securely together but also provide a way to suspend the cedar bows for thatching.
As you’re placing your poles, try and lock the tops together by simply placing each pole in a different fork than the last. These forks will typically form naturally as poles are added. Keep in mind that at some point during the building process you will need to decide where to place the door. Once you’ve selected the door placement, add a header at the desired height of the door frame.
WRAPPING THE WIKI
Virtually anything pliable with a good tensile strength can be use to wrap the wiki up. This is typically decided for you by what is available in the immediate area. Grapevines seem to work very well. However, green saplings, roots and even modern cordage will work in a pinch. Simply weave the vines through each pole in an “over/under” fashion until you are satisfied the entire structure is solid and there are plenty of vines to hang the first layer of bows from. Be sure to wrap extra grapevine from the door frame to the top of the wiki up to prevent a weak area from the lack of vines where the door will be.
THATCHING THE WIKI
The process of collecting thatching materials is without a doubt the most time consuming portion of the build. It is crucial that any primitive shelter is thatched from the bottom up like the shingles of a house to prevent leaking. When beginning the thatching process use larger cedar bows with the branches left on to encircle the bottom of the outside walls of the wiki up. These branches will serve as a starting point for attaching smaller bows as you work your way from the bottom up.

If you run into a situation where there is nowhere to hook a particular bow, try squeezing it tightly together and then jamming it into the desired portion of the wall. The bow will expand and anchor itself as the tension is released. This technique works very well when patching small gaps in the roofing. There is no set depth measurement for how thick the bows need to be layered but two or three feet thick is a good starting point for wet environments. These bows will pack down tighter as they begin to decompose. They will need to be replaced eventually as the fire will dry them from the inside.
MAKING THE DOOR
Adding a door to a wiki up helps to trap the heat inside of the shelter. When the door is closed the entire structure becomes a sort of chimney and the fire will draft straight up as a result. To build the door frame, cut several saplings to length and lash them together with several cross beams. Making X’s in between the cross beams with cordage will give you a place to hang cedar bows. When the door is not in use it can simply be slid over to the side of the doorway for easy access to the shelter during the day. By extending the length of the door’s vertical poles, the door can be easily raised from the bottom and braced with a couple of Y sticks to serve as porch when desired.
THE INTERIOR
One of the most enjoyable parts of building large primitive structures is designing the interior. Anything you can dream of from custom bunks to tables and chairs! In a primitive scenario a post bed would be a quick and effective option. By simply putting four logs on the ground in the shape of a small bed and packing in as many leaves, grasses, or pine needles as you can, you will be high enough above the ground to prevent conduction. For this build a cot was constructed using a cedar tree frame with cordage strung tightly in between. A small fireplace is located in the middle of the shelter for heating the wiki up during the night.

To say it took a lot of cedar bows to thatch this wiki up would be an understatement! Keep in mind this wiki up was built as a permanent Bushcraft shelter using only a handsaw and an axe. The exterior of this wiki up took an estimated 30 hours from start to finish with 20 of those hours being dedicated to thatching. A wiki up of this size is at least twice what the lost survivor would need, but it does show the massive scale of these shelters.
Editors Note: A version of this article first appeared in the April 2015 print issue of American Survival Guide.