

It’s been three days and food is becoming an important concern. Surrounding you are many animals, most of which are too small and quick to be easily caught. You have no weapons and no immediate means to make any. Instead of trying to catch a small animal with your bare hands (there’s a tremendous amount of luck involved) a more practical method would be to create a small trap and patiently wait for the animal to trigger it on its own. The best method readily available in most every environment is the deadfall trigger, something people have been using to provide dinner for thousands of years.
“INSTEAD OF TRYING TO CATCH A SMALL ANIMAL WITH YOUR BARE HANDS (THERE’S A TREMENDOUS AMOUNT OF LUCK INVOLVED) A MORE PRACTICAL METHOD WOULD BE TO CREATE A SMALL TRAP AND PATIENTLY WAIT FOR THE ANIMAL TO TRIGGER IT ON HIS OWN.”
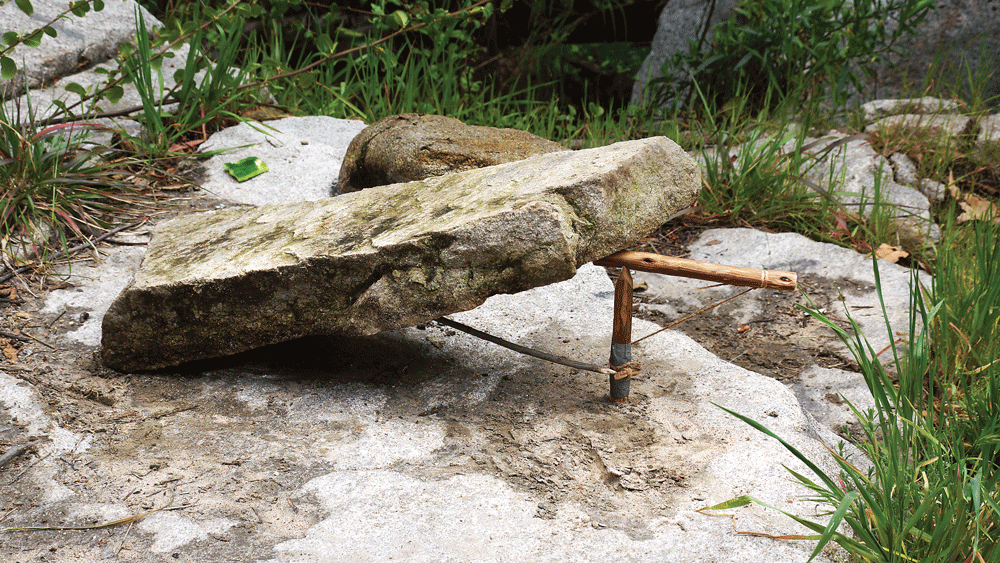
A deadfall is simply a heavy log or rock balanced precariously by an easily tripped trigger so that when an animal goes underneath and activates the trigger, the rock or log falls, either crushing, trapping, or killing the animal. They are easy to set up and work very efficiently provided you have the correct materials and needed skills to build one.
TYPES OF TRIGGERS
There are many variations of the deadfall, but the big variable from trap to trap is the trigger mechanism. You want a trigger strong enough to hold up the rock or log, but you want it to drop at the slightest motion. You need to position your deadfalls on an animal run, or where the animals frequent, or you need to attract the animal to your deadfall with the use of bait. In other words, simply knowing how to set up any particular deadfall doesn’t guarantee you’ll capture anything. You need to practice, and you need to be very observant to animal activity in the area.

There are many possible trigger mechanisms, including the Paiute trigger, Figure Four, and Promontory Peg. All have their adherents and detractors. You should try all of these and then decide what works best for you.
WOOD SELECTION
Many woods will work fine and you might be limited with what is in your environment. Triggers will work best if made from dry wood, not green wood. Green wood may bend from the pressure of the rock, and may not release as quickly as dry wood.

I have nearly always used pieces of mulefat when making these triggers, because mulefat has long and straight twigs of an even thickness without knots or bends. Plus it is very common where I live.
Straight shoots of willow would work fine also, and willow grows world-wide. The type of wood is not all that critical, but it should be relatively straight, and should be dried wood. I have seen a trigger carved entirely from one large piece of unknown driftwood which was picked out of a pile.
FIGURE FOUR TRIGGER
This trigger is made from three straight twigs, and it looks like the number “4” when it is set up, which is why it is referred to as the Figure Four. Begin by cutting three pieces, no bigger than your little finger and about 10 inches long. This is just for illustration, because in real trapping scenario, the size of these pieces is wholly dependent upon what animal you are intending to trap, and therefore, how large or small it will be.

Begin with the vertical piece. Cut the top to a flattened edge, like a knife. Next, cut a notch into the diagonal piece so the diagonal can rotate on the top of the vertical piece. Then, cut another flattened, knife-edge on the bottom end of the diagonal piece, which will push onto the horizontal piece. Then cut another notch, as illustrated, on the outer edge of the horizontal twig where the diagonal will fit into it. Each piece needs to fit precisely into the next piece, so take your time as you carve them.
Now, observe where the horizontal piece overlaps the vertical. You’ll need to cut it so the horizontal piece grabs the vertical. Carve a square edge onto the vertical, and then a corresponding 90 degree cut into the horizontal. If you have made all your cuts “just so,” the weight from a rock or a log will produce the needed pressure to keep all three pieces of your trigger together.
“NO TWO ROCKS OR LOGS ARE ALIKE, SO YOU HAVE TO LEARN TO BE CREATIVE AND TO TWEAK THE WHOLE SYSTEM IN ORDER TO GET IT TO WORK.”
When I carve this, I use my left hand, pressing down on the diagonal piece (where a rock would be pressing) to test how well the three pieces hold together. You have to use a bit of finesse to get the weight in just the right place. It is designed so the slightest bump from the animal will cause the trigger to collapse, sending the rock onto the animal. And yes, no two rocks or logs are alike, so you have to learn to be creative and to tweak the whole system in order to get it to work.

It sounds really complicated if you’ve never made one, but it’s all very logical. I learned how to do this by watching others. One of the best on-screen explanations is Ron Hood’s “Traps and Trapping” DVD.
PAIUTE DEADFALL
The Paiute trigger requires the same beginning vertical piece as the Figure 4 trigger, and the diagonal. However, the lower end of the diagonal is not carved. Rather, you tie a string onto it. The string must be long enough to pull horizontally to the vertical piece, and a little twig about an inch long is then tied to the end of the string. The twig wraps around the vertical post, and is held in place by a longer, slender twig which is placed from that little twig to the bottom of the deadfall rock or log. This longer slender twig is held in place by friction.

Though this seems a bit more difficult to set up, trappers have reported this trigger works just a bit better than the Figure Four.
THE PROMONTORY PEG
The promontory peg is a simple trigger made from one piece of wood. It is named after Promontory, Utah, where archaeologists kept finding the triggers in caves, but weren’t sure how they were used, and assumed a piece was missing.
Larry Dean Olsen (author of Outdoor Survival Skills) offered $100 to anyone who could figure out how the trigger was used. Finally, George Michaud, trapper (who appeared on History Channel’s “Mountain Men”), demonstrated at a Rabbit Stick event how the trigger worked, and he collected his “crisp” $100 bill.

Make three cuts onto a straight twig. Then carefully bend the wood from both sides, until the wood flakes at the cuts and breaks into three pieces. If the three pieces do not break cleanly, you might need to clean the pieces with a knife. Then you set it up as a deadfall trigger. Michaud insisted this trigger doesn’t work at its optimum unless the twig is cut with a sharp stone, like obsidian or flint, or a knife.
Carefully balance piece Number 2 on one of the pieces Number 1 (see illustration), and then carefully balance the deadfall rock to top. You can sprinkle some bait to attract your prey under the deadfall. Attach some bait to the upper tip of piece Number 1 as well to make sure the animal trips the trap.
The Triggers in Detail
THE PROMONTORY PEG DEADFALL requires exact cuts and precision balancing in order for it to work properly. Once cut, balance (2) on (1), and then balance the deadfall rock or log (3) to top. It is best to do this all at the same time. Attaching bait to the top of piece Number 1 to make sure the animal trips the trap.

HOW A FIGURE FOUR WORKS: Piece (2) holds up the deadfall and (1) fits into a notch carved on the bottom side of (2). The lower end of (2) is carved on two sides so it fits into the horizontal stick, (3). A cut-out on (3) receives stick (2), and allows (2) to transfer the weight of the rock onto (3). This weight on (3), twists the notch where it meets (1) and allows (3) to link with (1). This pressure is what barely holds the whole thing together. The more precarious, the better.

PAIUTE DEADFALL For the Paiute Deadfall, the upright stick (1) has a V shape carved into the top end, which the diagonal stick, (2), rests upon. The cordage of (2) is wrapped around (1) and tied to a little stick. The bait stick (4), holds the little stick at the end of the cordage in place until an animal triggers (4).

Editors Note: A version of this article first appeared in the April 2015 print issue of American Survival Guide.