

CREATING FIRE WITH THE BOW AND DRILL
You’re huddled in your shelter on a cold wet winter night listening to the wind howl as sleet bounces off the tarp overhead. As you stoke the fire you glance over at your dwindling pile of firewood. You’re careful not to let the fire burn too fast. This is the kind of night when you can’t help but admire how physically tough the deer must be as they bed down in the cedar thicket just a stone’s throw away. You are humbled realizing that, without a combination of shelter and fire, sleeping would not be an option on a night such as this. This is a night when your buddies choose to stay indoors. You, instead, saw an opportunity for working to perfect your wilderness skills!
You’re a seasoned survivalist and you have effectively created a micro climate to regulate your body’s core temperature and you’ll make it through the night with only your knife, ferro rod and a small tarp.
MAN AND FIRE
Humans have long had a relationship with fire. While it’s possible to suffer through the occasional long cold night in a well-designed primitive shelter, fire is what separates humans from every other creature in the wilderness. In a survival scenario, fire is everything. Once a seasoned woodsman has acquired fire, the scenario becomes just another camping trip. Fire is the flickering light of humanity that keeps the dark forest from swallowing you in the night.
UNDERSTANDING FIRE
The first step to pursuing advanced fire-making skills is to understand the triangle of fire. The triangle consists heat, fuel and oxygen. These three elements are absolutely essential for ignition. This becomes especially important when making fire primitively as it requires the harnessing of friction to produce an ember. An ember is fire at its most vulnerable state.

Before attempting a friction fire, we must first make sure we have all of the components required for nurturing an ember into a sustainable fire. In a true wilderness survival scenario you may only get one shot at making fire! Fire by friction is 90 percent prep work and attention to detail is required.
MATERIAL SELECTION

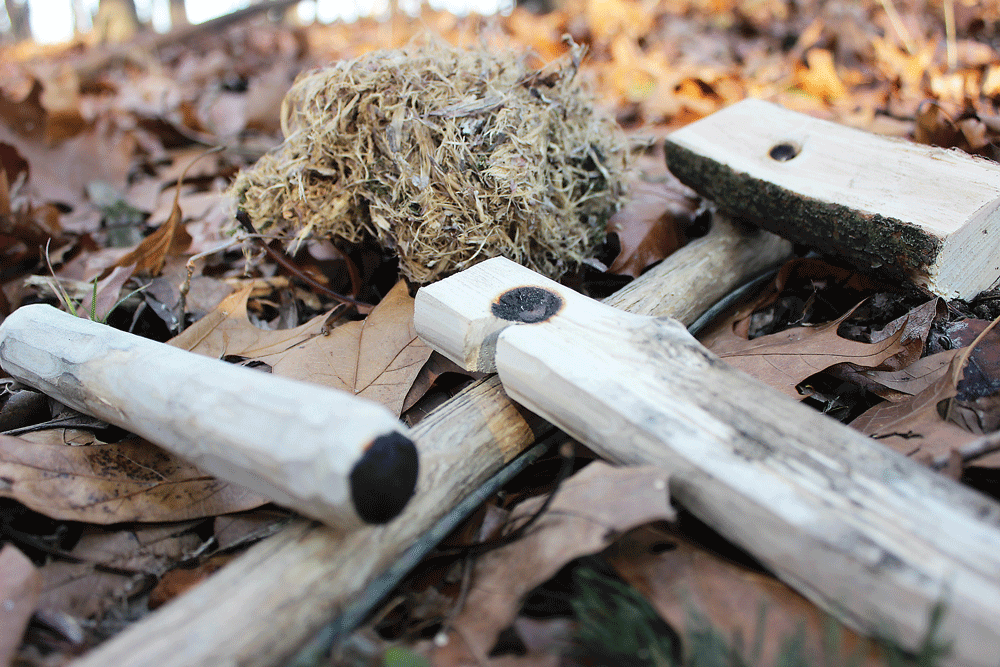
A bow drill kit is made of four components. These four components, when constructed of viable materials and used together with proper technique, will produce an ember. The components include a hearth board, spindle, bearing block and the bow.
Let’s begin with material selection. The hearth board and spindle can be made of a variety of different materials. While materials such as yucca and basswood will produce an ember will relative ease, these premium resources may not always be available.

It is important we learn to identify the properties of materials that will support combustion as opposed to simply memorizing a few common resources in our area. A true survival scenario is likely to take you beyond your specific bio-region and quite possibly out of the country all together. In such a scenario it won’t help much to know that cottonwood supports combustion in Kansas, if you’re not in Kansas anymore. This selection is most crucial when choosing materials for the hearth board and spindle. Knowing where to look will greatly increase the chances of securing a viable friction fire kit in a timely manner. Oftentimes, we “go to water to find fire” because certain species of trees known to support combustion, such as cottonwood and basswood, tend to grow on river banks or in the outlying wetland areas.
Easy to identify from its conical growth pattern and tulip-shaped leaves, the yellow or “tulip” poplar has a tendency to drop its long and often straight branches so they hang in the breeze and dry sufficiently for our requirements. It is a soft wood, and an easy way to tell if a questionable material is soft enough to support combustion is to simply press your thumbnail into it. If a visible nail mark is left in the material, then you likely have a material that will support combustion as long as it’s not too damp and too rotted. It is important to note that dry wood is preferred, if not necessary, when making fire by friction.


CARVING THE SPINDLE
There is a lot of personal preference involved when crafting a bow drill kit and the spindle is no exception. A good baseline is to begin with a spindle measuring the length of thumb to pinky at full spread plus an additional two inches and a diameter of the thumb itself. Smaller youths may require a shorter spindle so they can fully exert the downward pressure required to reach ignition. Keep in mind the spindle will inevitably shorten as it wears against the hearth board and bearing block.

The top of the spindle should resemble the tip of a dull pencil so it limits the friction against the bearing block. As the tip of the spindle wears, “shouldering” becomes an issue. This is where the tip is worn down so what becomes the top of the spindle is too wide for the bearing block. To prevent this, the top of the spindle should be touched-up after every attempt. Rounding the shoulder of the pointed spindle top can limit shouldering to some extent. The bottom end of the spindle should resemble the ends of a hot dog. This promotes maximum friction between the spindle and hearth board while drilling. Like the top of the spindle, the bottom of the spindle will also wear and require regular maintenance.


When touching up the bottom of your spindle between attempts, be careful to not remove the charred potions from the main area of contact as this will only require re-charring before ignition is possible.
THE HEARTH BOARD
The hearth board is the portion of the kit that rests on the ground when drilling. Downward pressure and speedy rotation are applied to the spindle via the bow and bearing block as it is drilled into the hearth board to generate dust and eventually enough heat to ignite that dust into an ember. To produce a flat hearth board from a round piece of wood, use a knife to baton at the one-third points on either side of the block of wood. A hearth board should be roughly three quarters of an inch thick and flat on both sides. A divot is carved on top of the hearth board so the bottom of the spindle is held in place during the “burning in” process.
THE BEARING BLOCK
The bearing block rests atop the spindle and is used to apply downward pressure, driving the spindle into the hearth board to create heat and dust. Hardwoods are most suitable for crafting bearing blocks as the friction and wear needs to be focused into the hearth board, which is the softer of the two. Osage, oak and hickory all make suitable bearing blocks.
To craft a bearing block from a round piece of wood, cut a length that fits well in your hand and split one third of it off. Carve a pronounced divot into the flat side of the bearing block so it will mate with the pointy top of the spindle.
THE BOW
The bow is simply a bowed branch strung with a length of cordage which the spindle is then strung into. Personal preference also plays a big part in bow length, weight and shape. A longer bow promotes a longer pass. The length of the pass directly dictates the amount of rotations the spindle will have during each pass. A longer bow means fewer passes and, in turn, less exertion. The curve of a bow will also affect the true length of each draw. A slight curve will slightly extend the length the spindle may pass along the bow string with each pass.

For starters, gather a branch with a slight natural bend measuring from armpit to fingertip. A sturdy lightweight branch is ideal, although a slight flex will help to grip the spindle with a little extra tension, which is sometimes preferred. When possible, find a branch with a natural “Y” on one end and carve a “number 7 notch” in the reverse end to prevent cordage from slipping.


BURNING IN
Once the bow drill kit is carved, it’s time to burn it in. This process will char and “mate” the spindle to the hearth board. For a right handed person, place the hearth board on a flat and dry piece of land and lay your left foot across the hearth board securing it. Wrap the spindle in the string of the bow by pressing it into the string pointed side up and rotating the top of the spindle over the string until the string wraps around the spindle.
With the bearing block in your left hand, place the rounded end of the spindle down into the divot in the hearth board and cap the top of the spindle with the bearing block. With your left wrist secured tightly against your shin, make slow and full passes with the bow, gradually increasing speed and downward pressure until the hearth board begins to smoke. At this point, continue bowing for five to ten more seconds until you hear and feel a change in the wood itself.
You should feel the kit mate together, it will sound like sand paper and there will be less resistance with each passing of the bow. If successful, the bottom of the spindle as well as the divot in the hearth board should be charred. At this point, you’re ready to carve the notch. With your knife or saw, carve a triangular notch into the burnt divot of the hearth board. The notch should extend to just shy of the center of the divot.
GOING FOR THE EMBER
Set up exactly the same as you did to burn in the kit. Think of the burn in process as a checkpoint as you’re already halfway there! Place a green leaf or piece of bark underneath the notch to collect the ember once it has formed. Allow yourself to relax.

While obtaining an ember will require a certain level of exertion, if you’ve taken the time to select and craft a proper kit, the majority of the work has already been completed. Begin with slow full passes of the bow and gradually increase speed and downward pressure while concentrating on your breathing.
The downward pressure will produce dust and the speed will raise the temperature of the dust until ignition is achieved. You will develop a sort of sixth sense with friction fire over time. This will allow you to make an educated guess of when an ember is obtained. Until then, watch for the pile of dust to begin to smoke on its own. This is a promising sign an ember has formed.
EMBER TO FLAME
Once you’ve achieved an ember, allow yourself to breathe and recover. Even in humid conditions, an established ember should smolder for upward of five minutes. Bring the bird’s nest to the ember, place the ember into the nest, and sandwich the ember into the center of the bundle. Bring the bundle out in front of your face and begin to blow directly into the bundle being careful not to blow too hard as this could extinguish the ember or even blow it through the bundle. Manipulate the fuel and oxygen flow by squeezing and releasing the bird’s nest with your hands. The more smoke you see the more oxygen you can then give, eventually achieving an open flame.

Editors Note: A version of this article first appeared in the April 2015 print issue of American Survival Guide.