

Survival shelter is a priority that’s often hardest to get when you need it the most: when your fingers are numb from hypothermia, the wind is howling, or you’ve sustained an injury.
We humans are pretty delicate creatures once our body-core temperature dips or rises a few degrees, and being able to construct a survival shelter is critical for staying alive during a wilderness emergency.

Your shelter needs will vary depending on the time of year and region. If you are stranded in the Boreal Forest in January, a lean-to and a large campfire will help with staving off hypothermia. While you may only need a simple tarp survival shelter for shade and wind protection during a desert mishap in July.
The methods that follow cover a variety of modern and primitive techniques for sustaining your body until help arrives or the weather clears and you can self-rescue.
CLOTHING: YOUR FIRST LINE OF DEFENSE FROM THE ELEMENTS
As the old saying goes, there’s no such thing as bad weather, only inappropriate clothing. Before any outing, I first make sure I’m dressed properly to match the worst weather I might face.
My clothing is my first line of defense against the elements and I try to wear nylon/cotton blends from spring through fall, and wool or fleece in the winter.
Jammed in my daypack is also a down jacket. This accompanies me on every hike in every season and compresses into the size of a softball.
A Helly Hansen or Frogg Toggs rainjacket is also high on my list of must-have garments for any season.
IMPROVISED AND MODERN SHELTERS
The last thing I want to do in a true survival situation is to burn up precious sweat and calories by having to make a natural shelter. Carrying a few, trusty items can save hours of labor.
Given the fact that most lost hikers are injured and hypothermic, you want to be prepared for any outing with some of the following pieces of gear.
I carry an Adventure Medical Kits Heatsheet in my cargo pocket along with a blue, 8×10-foot tarp in my daypack. My truck has additional gear in it and can be used as a stationary shelter if I break down in the wilds.
As you can tell, I’m a big fan of the layering approach, so I always have gear on hand to cope with handling the elements.
Let’s say, I’ve planned ahead, left a travel plan, and have all of my gear but I still run head-on into Murphy on the trail and have to spend a grueling night in the wilds.
RIGGING UP A TARP INTO A SURVIVAL SHELTER
A tarp can be set up in mere minutes and reduce the debilitating effects of exposure. An 8×10-foot tarp is spacious enough for two people to ride out a storm and can be rigged up in a variety of ways.
Most of the time, I prefer a simple lean-to with one end attached at shoulder-level to a tree with the other end anchored to the ground. If it’s a heavy downpour, I can adjust this by converting to an A-frame or pup-tent style.
When I’m in the field for a few weeks in a stationary basecamp setting, I’ll bring a 12×12-foot canvas tarp arranged in a diamond configuration, which is very spacious and allows for a small campfire near the entrance.

The tarp is suspended using 550 cord. I usually carry a 20-foot bundle in my jacket and tie off one end with a timber hitch, followed by a few cobbler pegs (sticks) that secure the rope in the grommets, and then finish off the lashing at the other end with a few half-hitches.
Don’t worry if you can’t recall a specific hitch or lashing under duress; if you don’t remember your knots, tie lots! The last thing is to fashion a thick bed of debris to keep me from having contact with the frigid ground.
THE IMPORTANCE OF BEDDING
A Serta Mattress is not far off in the backcountry with the addition of a thick layer of pine-needles, leaves, moss, or cattails depending on your region.
Strive for a minimum of 12 inches of compressed debris, as this amount will keep your body off the cold, conductive properties of the ground. What’s the point of having a great roof over your head if you’re just going to plunk down on the chilled earth and awaken with hypothermia at midnight?
In the desert heat during the summer, this gets somewhat reversed and I’ll dig a foot-deep trench in the ground and lay directly in it which uses the cool ground to conduct itself into my heat-stressed core.
NATURAL SURVIVAL SHELTERS
If you come prepared with a tarp, rope, and some know-how you can avoid building an energy-draining survival shelter, but maybe you became separated from your campsite or your gear.
I remember reading about a North Woods canoe trip where two friends had their canoe drift down the river during a rest break after one of them failed to properly tie it off.
They were stranded in the Canadian wilderness for four days with only a few items in their pockets. Fortunately they were clad in wool garments and it was late spring so the lean-to they constructed only needed to fend off the rain.

DEBRIS BED
If you are severely injured and can’t move well or find yourself in an area lacking downed wood, consider creating a debris bed which is nothing more than a four-foot high pile of pine-needles, duff, or leaves.
One plane-crash survivor in the Sierras used this very set-up to stay alive during a grueling 10+ day ordeal during frigid temperatures. Basically, you’re creating a large squirrel’s nest by kicking piles of debris into a large mound.
Build it against the base of a large tree to keep it in place and then crawl into the center and cover yourself with a foot or more of leaves. No, it’s not fun, but survival and comfort don’t go together. You’re trying to gut out a brutal night in the wilds, so crack open a big can of Toughen Up and cope with the unpleasantness until the searchers arrive.
If you have the means, you can also make a frame by using logs to fashion a knee-high rectangular bed to hold the debris in place. I use this set-up quite a bit during the drier months and suspend a poncho in an A-frame configuration over the bed.
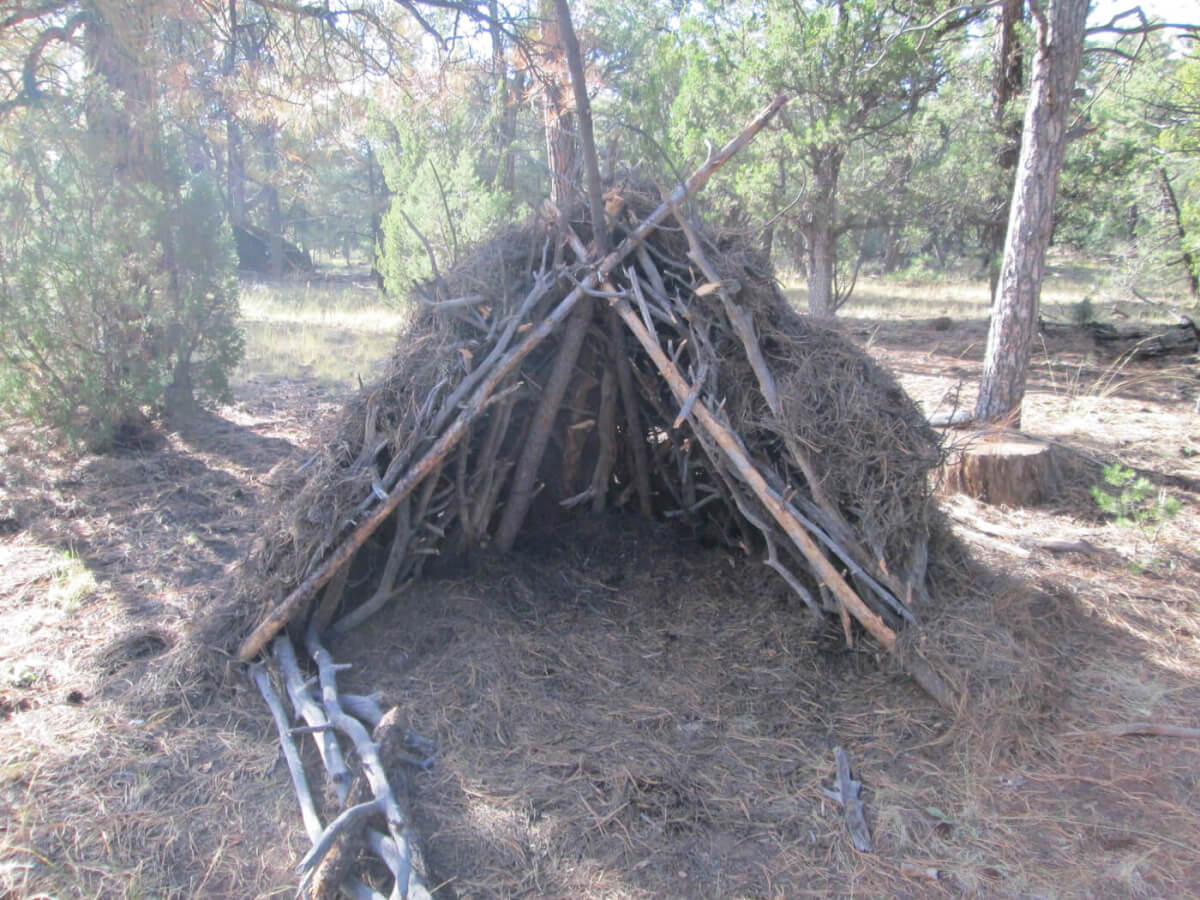
QUICKIE LEAN-TO
This lean-to is a modified version of the type the mountain men used, which were typically made by lashing both ends of a ridgepole at shoulder-height. Instead, you only tie one end to a tree which makes for a more compact design and thus less material-gathering on your part.
The ridgepole is around four feet longer than my height and very stout. I use two jamknots to lash the elevated end in place and then place branches and debris on the back side to form a two foot thick wall.
The interior bedding consists of a little over 12-inches of debris with a retaining log to hold it all in place. One thing I learned the hard way is to avoid collecting your debris from game trails, as this where the deer ticks hang out.
I prefer a lean-to and fire combination, which allows me to boil water, cook any food I procure in a long-term situation, and for woodcarving into the late hours. A fire can also serve as a signaling device.
However, fire safety is key and it needs to be a nonwindy day and the immediate area around my shelter needs to be cleared of fallen leaves.
When making a lean-to or wickiup with a campfire, try to keep the ridgepole or
entrance parallel to the prevailing wind as this will prevent the smoke from eddying into your face all night.
HAMMOCK
When I venture to the jungle or spend time in a forested setting, I pull prefer a hammock. A double-size model provides a little more space.
Before a trip, I spray my hammock with the topical insecticide permethrin which provides protection from biting insects that try to penetrate the hammock underside as I sleep.
Combine this with an 8×10-foot tarp suspended four feet above, along with a sheath of mosquito netting encapsulating the hammock and you’ll have a snug shelter from the elements and the plethora of vampire bugs found in the tropics.
THE 5 W’S OF SHELTER CONSTRUCTION

When selecting a campsite or location for a shelter, take into account the following factors:
1. WOOD. You are going to need tree branches and debris to build a natural survival shelter and for making fire so build your shelter in a region with plenty of resources.
2. WEATHER. Setting your campsite back 20 yards into the forest, rather than on the treeline, will help minimize gusty winds. It may seem like common sense but you also want to avoid sleeping at the bottom of a canyon or arroyo due to flash flood concerns (yet backpackers still do this every year in the desert!) and the temperature gradient.
These low regions will be much colder at night. Don’t rig up your tarp or lean-to on the edge of a forest and field or other major transition area. The weather will be more pronounced and lightning safety will be an issue during thunderstorms.
3. WATER. Staying hydrated is a critical survival priority so set up camp a short walk from a lake, waterhole, or stream. These areas will also provide opportunities for fishing, foraging, and trapping, which all come into play with a longer stay in the wilds.
4. WIGGLIES. Packrats, scorpions, ants, mice, and other creepy crawlies look for dark, damp places and are often found in downed timber and rock piles. Where I live in Arizona, scorpions relish hiding out under cowpies.
I always avoid downed, rotting logs and boulder fields. This is another reason to always carry some gloves in your daypack so you can avoid getting stung when gathering firewood.
5. WIDOWMAKERS. Construct your survival shelter far from dead standing trees!
Editor’s note: A version of this article first appeared in the How To special issue of American Survival Guide.