

BUILD YOUR OWN TWIG AND ALCOHOL DUAL-FUEL COOK KIT
STORY AND PHOTOS BY STEVEN PAUL BARLOW
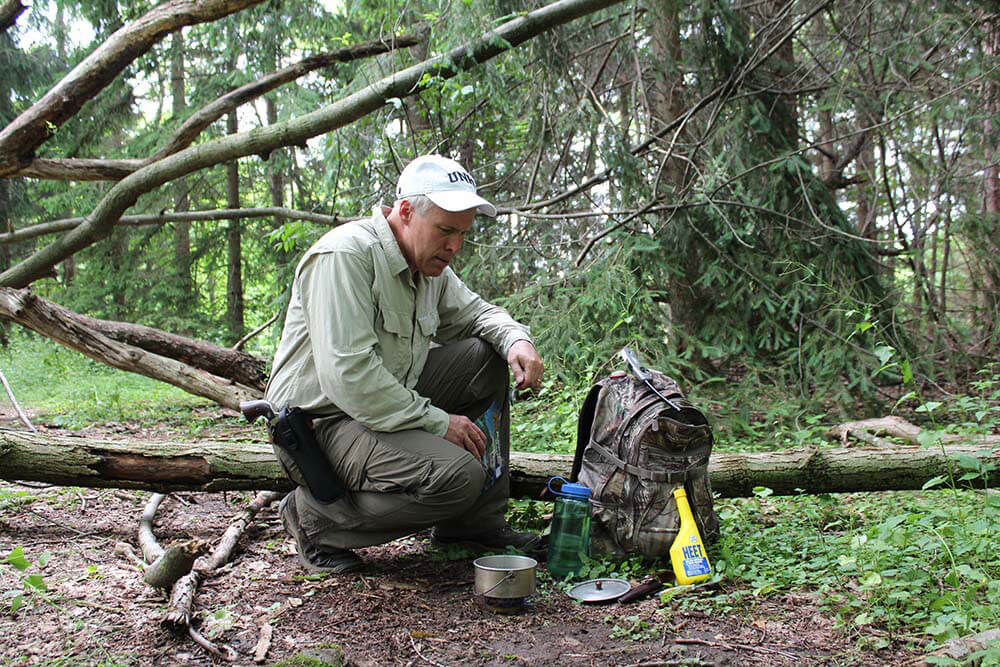
You’ll always find something in my daypack – usually some type of backpacking stove — that allows me to cook a meal or at least to boil water.
Yes, there’s a lot to be said for ready-to-eat meals and snacks when you’re on the trail or down the road. I always have those available too for times when time or my location doesn’t allow for starting a fire or setting up a stove.
But when I’m hiking, hunting, camping or on a long road trip by car, I like the option of having a cup of hot coffee, tea or soup to go with my ready-to-eat food, even if the weather isn’t extreme. From a survival preparation perspective, I want the capability to purify water by boiling and, because I’m often trekking alone in cold conditions, I want the ability to prepare warm beverages to keep hypothermia at bay.
MY CURRENT COOK KIT
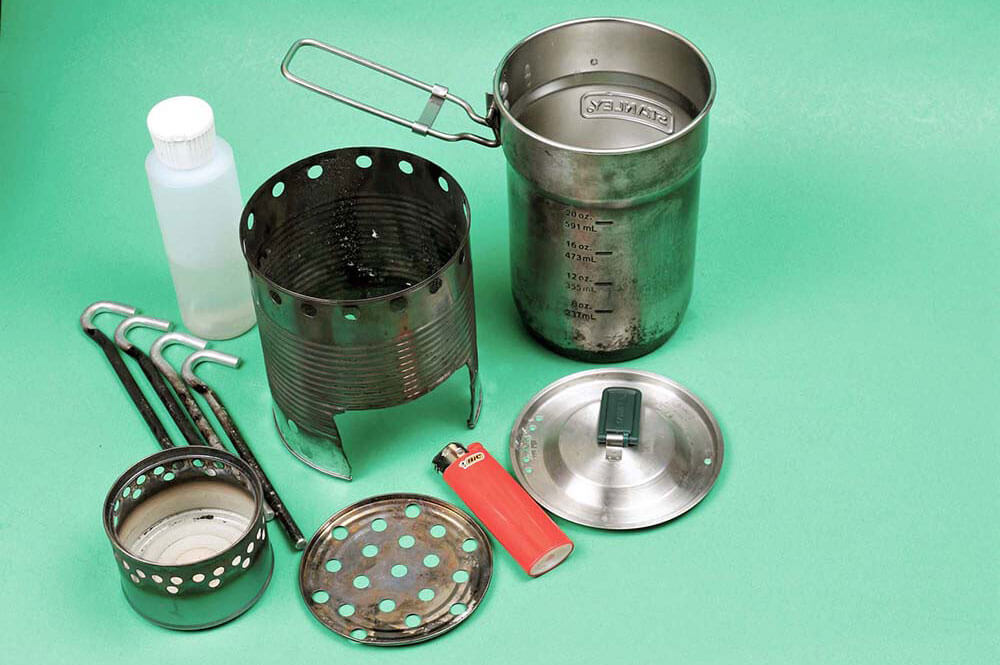
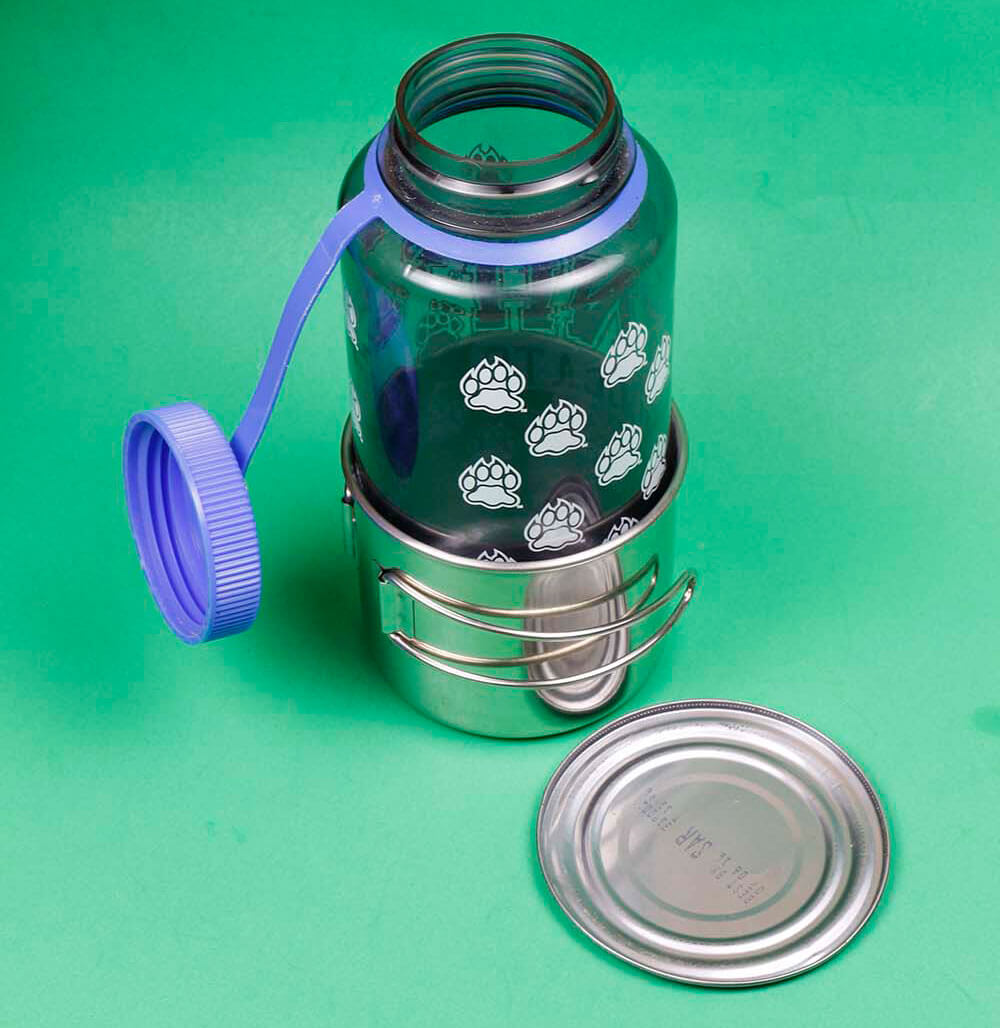
When going ultralight, that cooking capability can be as simple as a steel cup, one that fits either over a Nalgene water bottle (Ozark Trail cup, Walmart, $5.68) or one that mates with a military-style canteen. More often these days, my cook kit includes a homemade hobo stove, a homemade alcohol stove, a steel cup with lid, and a spork that all fits into one easy-to-stow package. This kit gives me dual-fuel capability. I can use the virtually limitless supply of wood shavings, small sticks, and other bio material to fuel the hobo stove or I can opt for the convenience of the alcohol stove.
TOOLS NEEDED
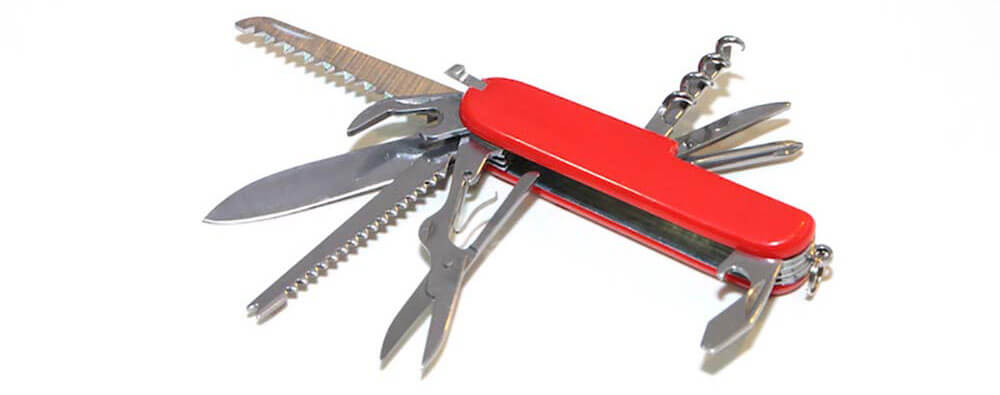
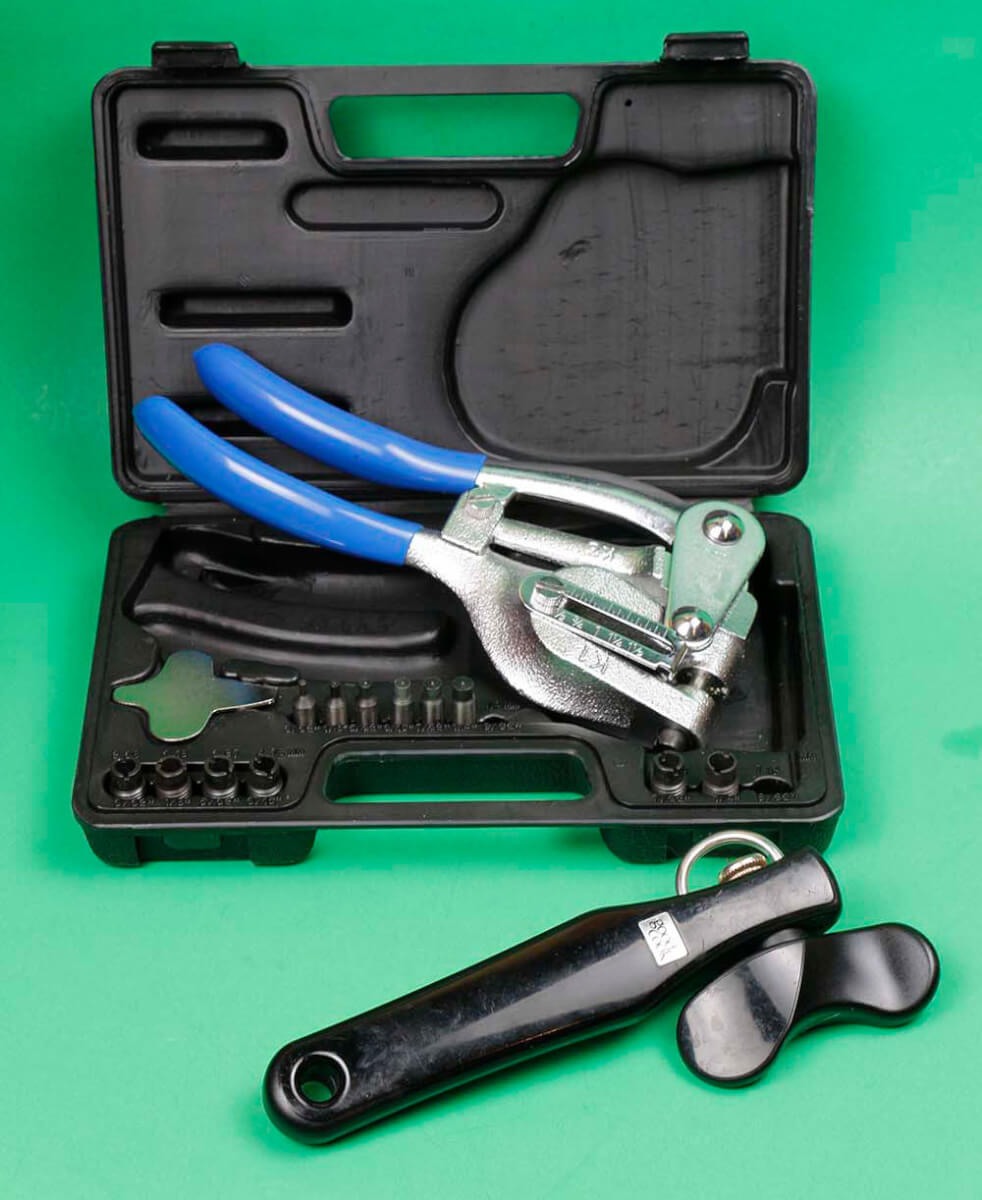
You can make a stove with nothing more than a Swiss Army Knife if necessary. But because I’ve experimented for years with various stove designs, I’ve assembled some tools that make the job easier for more elaborate projects. Those tools include a can opener that leaves no sharp edges, a heavy duty hole punch set, tin snips and long-nose pliers.
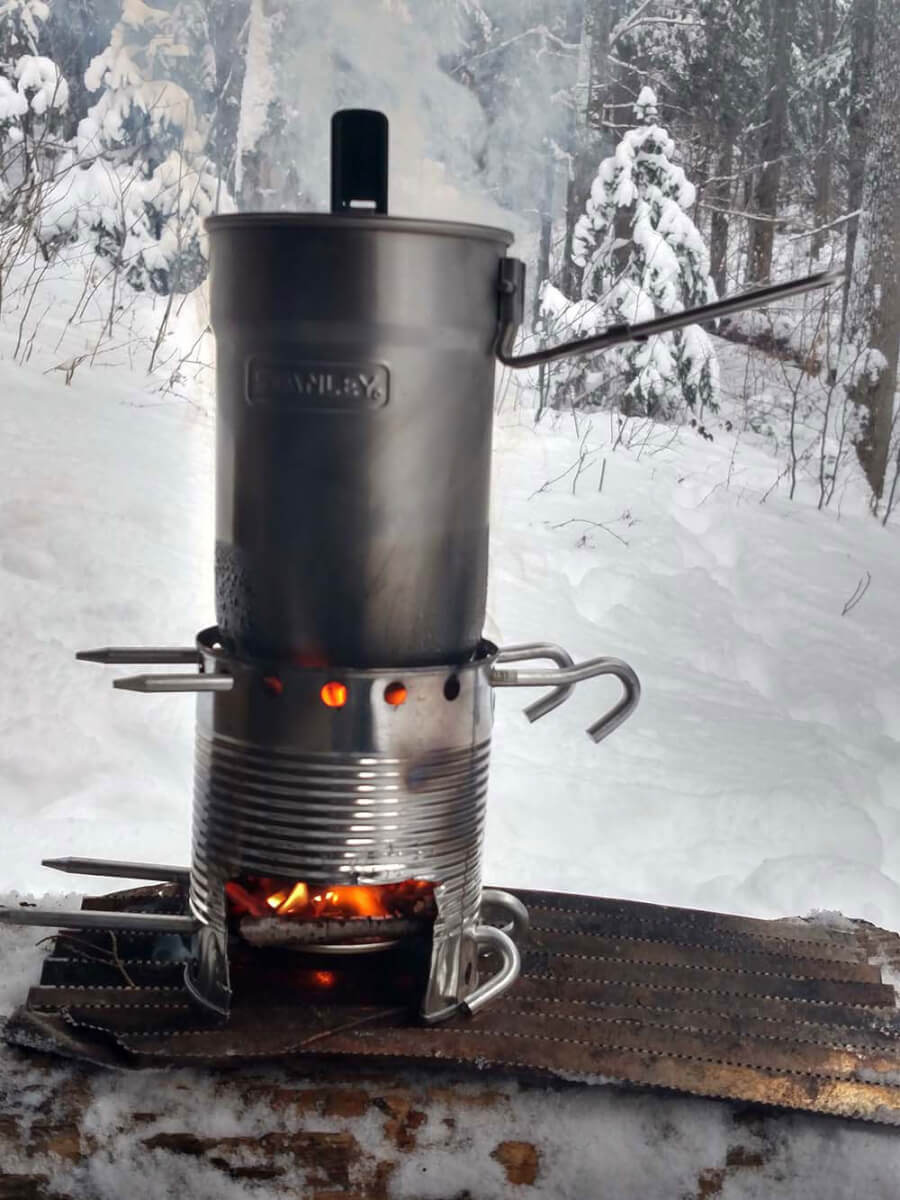
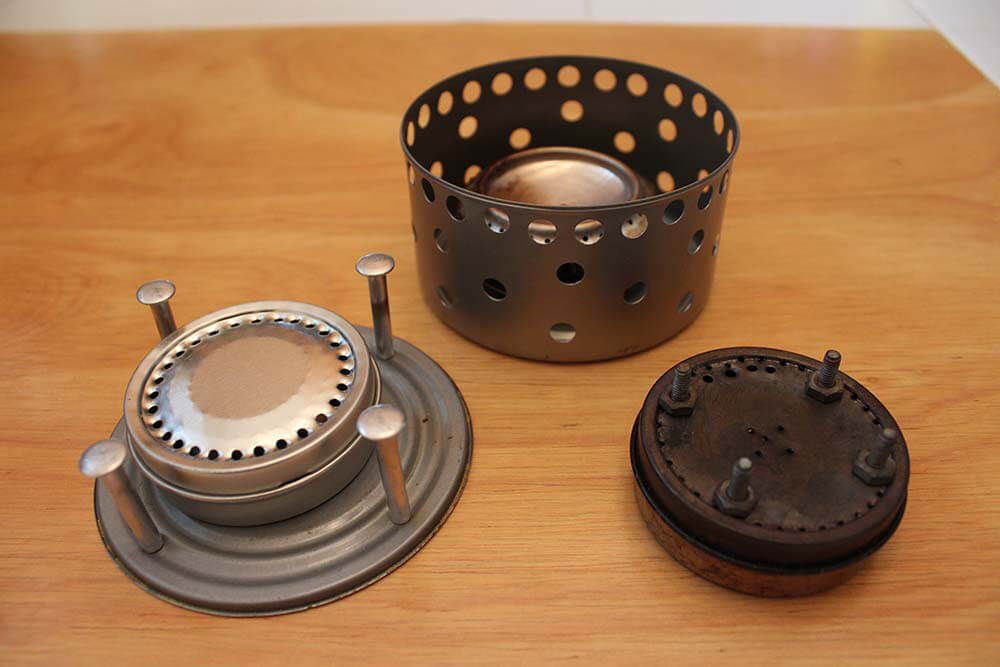
DIY HOBO STOVE
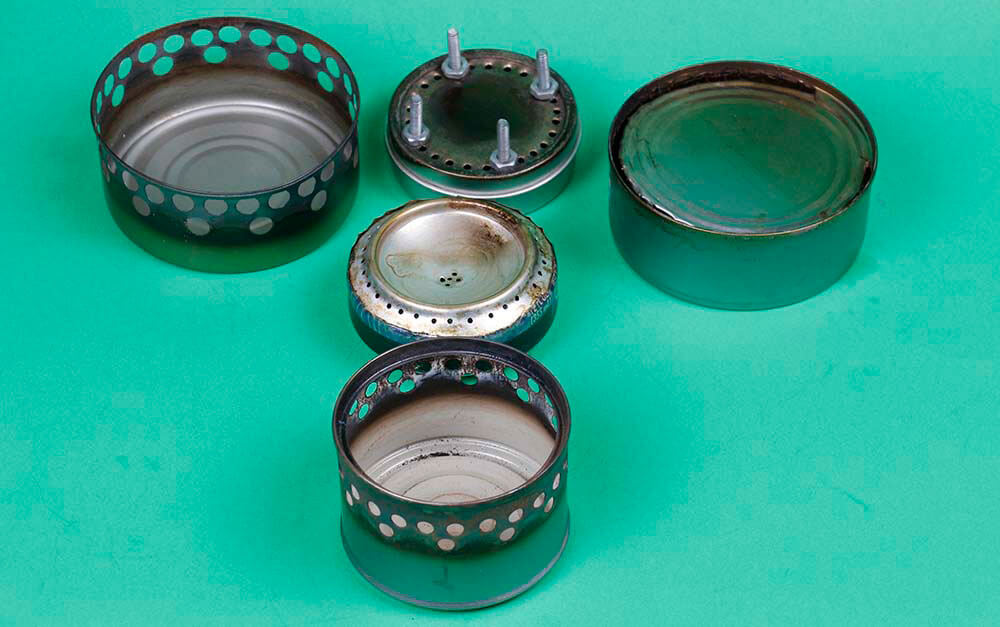
I’ve experimented with several types of hobo stoves, also referred to as twig stoves or bio stoves. The design I settled on started life as a 29-ounce aluminum can of peaches. Also needed in the construction were four tent stakes and the lid from a smaller aluminum can.
First, I cut the top and bottom off the peach can with a can opener that leaves no rough or sharp edges. Save the top. It makes a perfect lid for a steel cup that nests with a Nalgene bottle. A cup with lid heats faster and uses less fuel.
Next use a hole punch to make two rows of holes, one around the top and another around the bottom for air flow. I use the 9/32-inch punch, which is the largest in my hole punch set. A half inch or so above the ring of bottom holes make four more holes, two on one side and the other two directly across from those. These holes will hold two tent stakes that will support the fuel grate.
Cut a square window out of the side of the peach can and fold and crimp the edges with the long-nose pliers so you won’t have any sharp edges. This cutout provides a way to add fuel to your stove from the side without needing to lift your cook pot from the stove.
Take the lid from a smaller can and punch numerous holes on the surface to create a fuel grate. Run two stakes through the four holes you punched closer to the bottom. Run the remaining two tent stakes through top holes of the peach can to support small diameter cups. You can trim the four stakes to a length that will let them stow in your cook pot when not in use. Set your fuel grate on top of the two lower stakes.
Your stove is done. Add fuel, and light it either from the bottom or the side cutout.
For a cook pot to use with this hobo stove, I use the Stanley Adventure Nesting Two Cup Cookset ($25 MSRP). It comes with two plastic cups that fit inside, but I usually leave those behind. Instead I stow the tent stakes, fuel grate, small alcohol stove, four-ounce fuel bottle, butane lighter, and spork inside. One reason I chose the Stanley pot is that it fits inside the peach can stove, enabling the kit to take up little room in my pack. The pot hold more than three cups of water, comes with a vented lid and has a folding handle that locks open.
HOMEMADE ALCOHOL STOVE
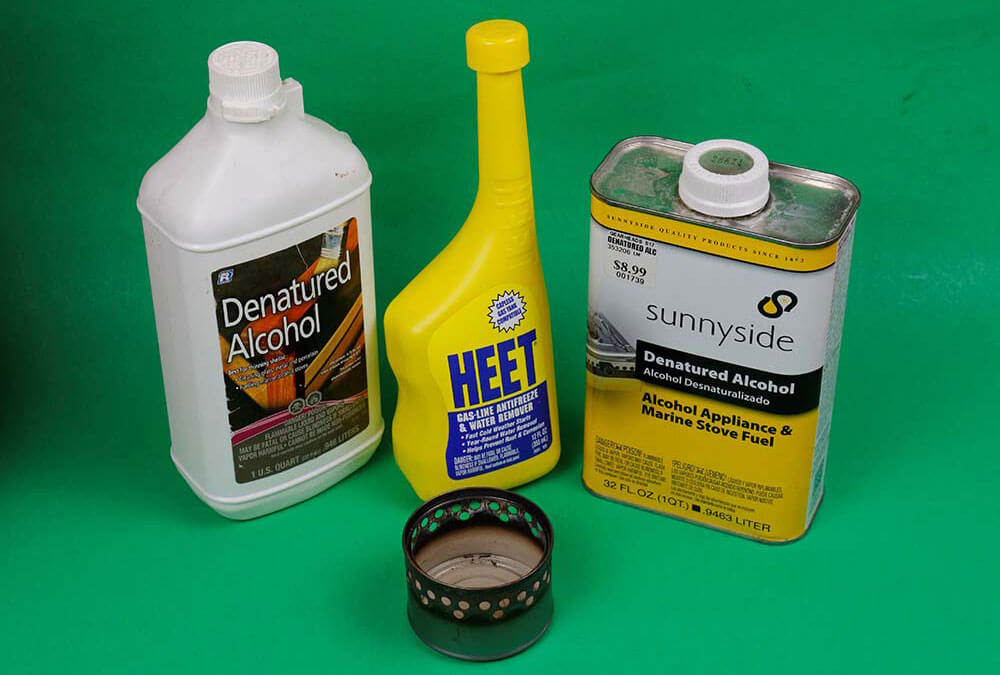
Alcohol stoves have several advantages. They’re simple, reliable, lightweight, fuel is available most anywhere, and they don’t require disposable fuel canisters. They’re fueled with either denatured alcohol, sold at hardware stores as paint thinner, or methyl alcohol, commonly sold as Heet brand gas line additive (yellow bottle) at convenience stores and anywhere auto parts are sold. Unlike other types of fuel, you can carry alcohol safely in any plastic bottle and its flames can be doused with water if necessary.
I’ve tried many different alcohol stove designs. There are many outlined on the Internet, but some are unnecessarily complicated in their construction and some, such as the soda can or beer can stoves, are flimsy and require some way to support the cook pot.
I’ve finally settled on the open-top design that’s been around for a long time. I didn’t invent it. Sometimes it’s called a Super Cat stove. A big advantage with this type is that you set your cook pot directly on the stove – no separate pot support is necessary.
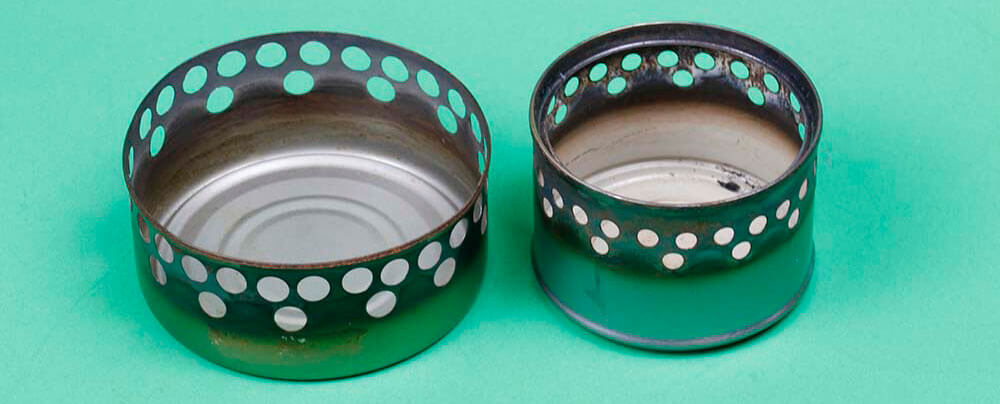
To make one, buy a small can. One with a pop top that typically contains potted meat or cat food is the perfect size. Punch two rows of holes around the top of the can and the stove is done. I’ve also made these stoves using tuna cans and other wide, low cans that provide better support for larger cook pots and often longer run times. Through experimentation, I’ve found that the second (lower) set of holes can be spaced out farther and only half as many are needed.
Fill the stove with denatured or methyl alcohol and light it. Be careful: it’s often hard to see the flames. Wait a bit – usually less than 20 seconds – until you see the surface of the alcohol begin to roil and then set your cook pot on top. That seals the top and flames will then jet out through the rows of holes much like a typical gas stove burner.
NOTHING’S PERFECT
Alcohol stoves do have their limitations. They’re great for boiling water or heating a can of soup, but it’s difficult to regulate their heat. One way is to move your cook pot closer or farther from the flame as needed. Also, you can “turn down” your stove by placing a larger can with fewer ventilation holes over it. That will give your stove a longer burn time at simmering temperatures. Another drawback is that alcohol stoves can be difficult to light in sub-zero temperatures.
You can experiment with how you make your alcohol stoves. Generally a stove with more holes or larger holes will heat things more quickly, but will burn through fuel more quickly and might run dry before you’re done cooking. Smaller holes will give you longer run times, but may not bring water to a boil fast enough.
For the small potted meat cans, I punch 3/16-inch holes. For seven-ounce tuna cans, I usually punch 9/32-inch holes. Expect to boil a pint of water in about 7 minutes, depending on outside temperatures and wind conditions. In good conditions, I usually get a total burn time of about 12 minutes. I’ve found that I can usually heat water for ramen noodles or instant soup and still have enough burn time left on a single filling to make tea or cocoa.
COOKING VERSATILITY
With this cook kit, I have a cook pot with good capacity, a hobo stove that slips over it, and an alcohol stove that fits inside it, along with my lighter, fuel bottle, spork and other stove parts. A collapsible plastic cup will fit inside too. And I have the option of burning alcohol or twigs without worrying about running out of fuel or the need to make a large campfire.

THE MOST SIMPLE STOVE
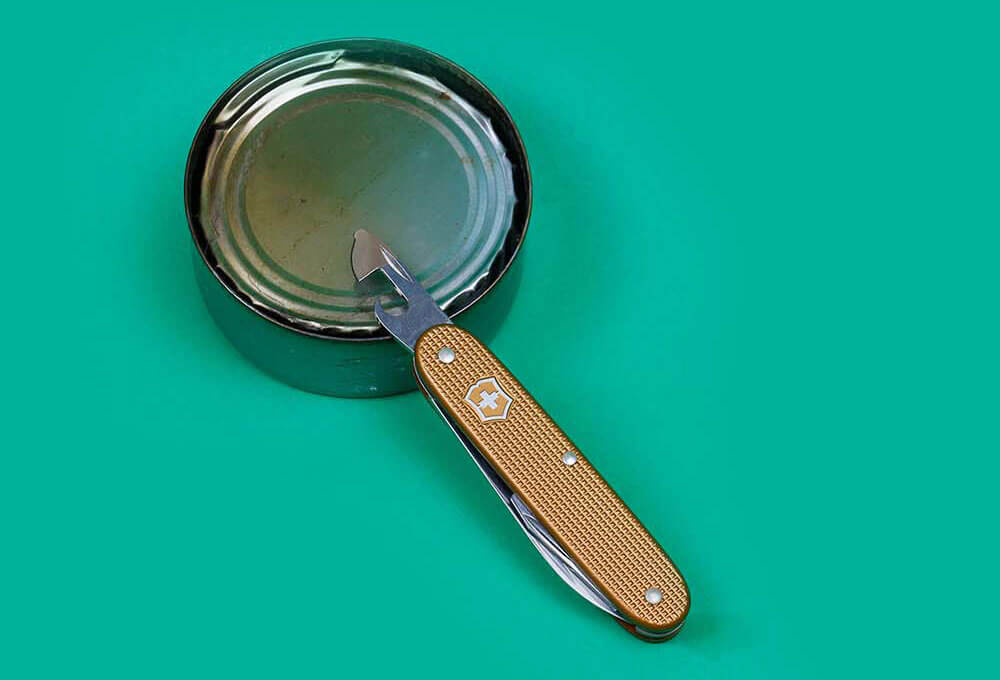
Fine, you can make these stoves at home. But what if you’re in the middle of your journey without your whole toolbox? You can still make an alcohol stove with a tuna can and a Swiss Army Knife.
Use the can opener on your Swiss Army knife to open the tuna can, but don’t cut all the way around the top – stop so that the top is still attached by about an inch or so of uncut metal. That’s all there is to it.
Pry open the top and eat the tuna, it’s good for you. Fill the empty can with methyl alcohol and then press the can’s lid back down so that a bit of the fuel runs across the top of the lid. Light the fuel. The flames will jet through the jagged cut you made when you opened the can. You will need to surround the stove with rocks or small logs to support your cook pot about an inch above the stove.
ZIPLOC FUEL FUNNEL
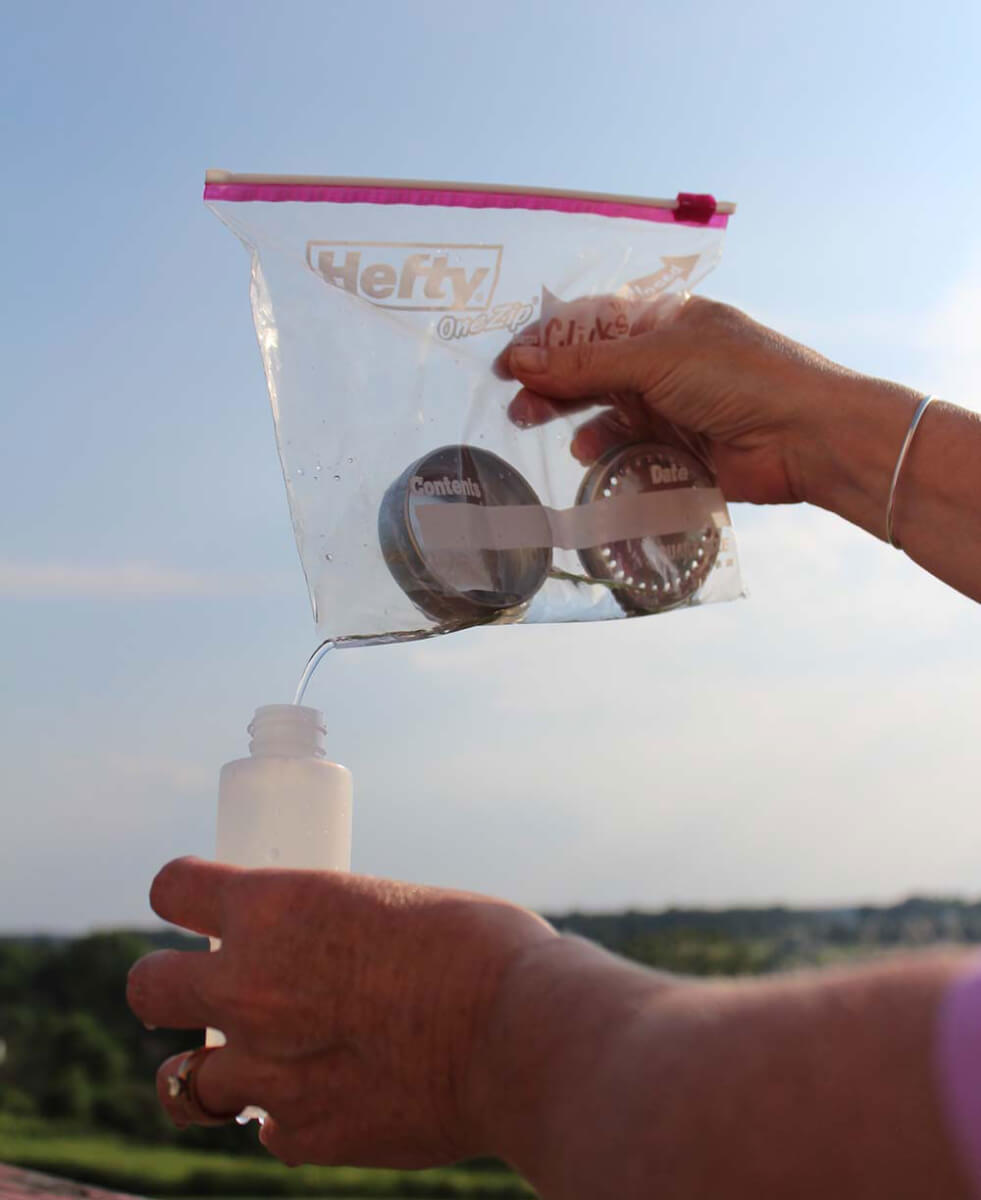
I’ll often add a larger can with no vent holes to my kit to smother the alcohol stove to save fuel if I’m done cooking before the stove runs dry. Then I’ll put the stove, leftover fuel and all, into a Ziploc bag with one bottom corner cut off so that I can funnel leftover fuel back into my fuel bottle.
CLOSED-TOP STOVE WITH POT SUPPORT
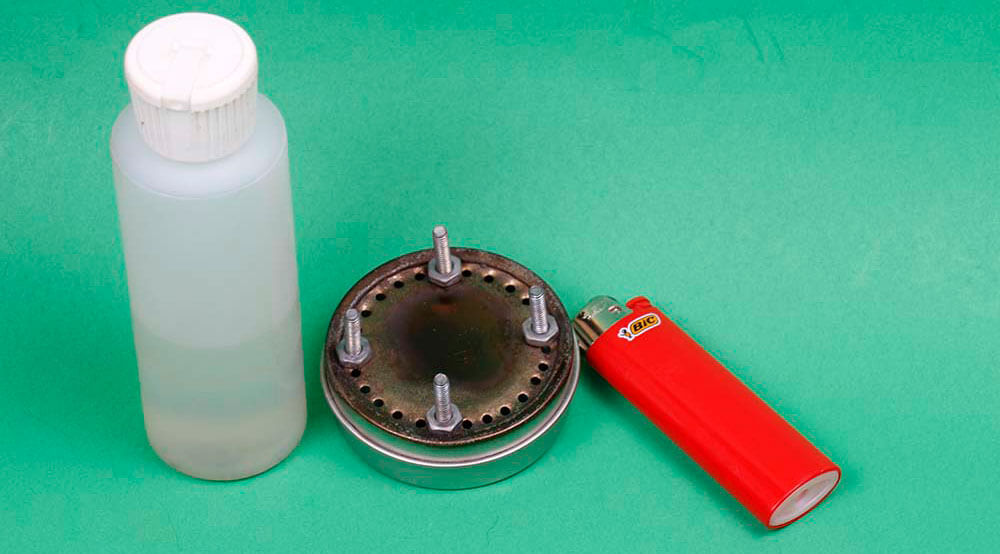
Another type of alcohol stove I’ve made and used with good results is a closed top design with integral pot support. The advantage is that you will spill less fuel should you accidentally tip it over.
Specialty Bottle (www.specialtybottle.com) is a supplier of small tin canisters perfect for constructing alcohol stoves. Some feature a helpful raised lip around the tops for pooling fuel to light. They also sell small plastic bottles that make excellent alcohol fuel containers. Or, you can use any small metal container with a removable top, such as an air gun pellet canister.
Drill a row of small holes around the lid of your container using a 1/16-inch or 5/64-inch bit. These holes will serve as the burner jets. You can then drill four larger holes to fasten four ½-inch bolts with nuts to the top of the container. These bolts will serve to support your cook pot. Fill the canister with fuel, close the lid and pour a little more fuel on the top. Light the fuel on the top and this will prime your stove to get it started.
COOKING VERSATILITY
With this cook kit, I have a cook pot with good capacity, a hobo stove that slips over it, and an alcohol stove that fits inside it. Also, along with my lighter, fuel bottle, spork and other stove parts. A collapsible plastic cup will fit inside too. And I have the option of burning alcohol or twigs without worrying about running out of fuel or the need to make a large campfire.

SOURCES
Stanley Adventure Nesting Two Cup Cookset
www.Stanley 1913.com
Ozark Trail 18-Ounce Steel Cup
www.Walmart.com
ABN Power Punch Heavy Duty Hole Punch Set
www.Amazon.com
A version of this article first appeared in the March 2022 issue of American Outdoor Guide Boundless.