

Any respectable home arsenal will have at least one or two long guns, along with a pistol or two and many folks also have a bow of some sort. Comprehensive as this small armory may be, modern firearms are only as good as their ammo, while the supply lasts. When SHTF and the bullets run out, it’s useful to have a weapon that doesn’t rely on factory-produced projectiles.
Some of you may have the means to recycle those spent casings, replace the primer, refill the gunpowder and top it off with a brand new bullet, but not everyone has the expertise or equipment to churn out reloads. Plus, unless you have an inexhaustible supply of casings, primers, bullets and gunpowder, even the largest of stockpiles eventually runs out.
So what’s a survivalist to do once the ammo is spent and there’s no way to make reloads?
One simpler and more commonly feasible option is to make arrowheads. Here are three common household materials suitable for keeping your quiver full.
1. Spoons
Sourcing this kind of raw material shouldn’t be too difficult. Procure as many spoons as you can, whether store-bought, handmade souvenirs or heirloom pieces (just make sure grandma doesn’t freak out and no other spoons can be found).
Ensure that they’re made of a reasonably sturdy metal and are large enough for making into an arrowhead. Small teaspoons may be too small to offer enough material to work with, so stick with regular-sized teaspoons and tablespoons.
To make arrowheads from spoons, prepare the following tools and materials:
- Spoons
- Small sledgehammer or carpenter’s hammer
- Safety goggles
- Safety gloves
- Large steel hand file or rasp (the sort used for sharpening lawn mower blades), either double-sided or two separate tools with coarse and fine grains
- Permanent marker
- Optional: Dremel or similar power tool with grinder; plumber’s torch
Note that this method assumes that no power tools are available, or there’s no electricity to allow for the use of power tools. Instead, what you’ll need are lots of patience and elbow grease. If power is available, the Dremel or similar tool will make this project go faster.
To make arrowheads from spoons, follow these steps:
Step 1. Put on safety gloves and goggles.
Step 2. Using the hammer, pound the spoon completely flat. Do this step preferably on an anvil or proper workbench, concrete floor or pavement. Don’t hammer the spoon against hardwood floors, counters or tabletops.

Step 3. Take the permanent marker and draw the shape of the arrowhead on the now-flattened spoon.

(SurvivalLife.com/turn-spoon-into-survival-weapon/).
Step 4. With your safety gloves and goggles on, use the heavy-duty steel file or rasp and file the excess material around the pattern. If you don’t have a file or rasp, you can whittle down the spoon into an arrowhead by “grinding” it on a coarse rock, a masonry block wall, or even on the sidewalk or curb of your street.

(Amazon.com).
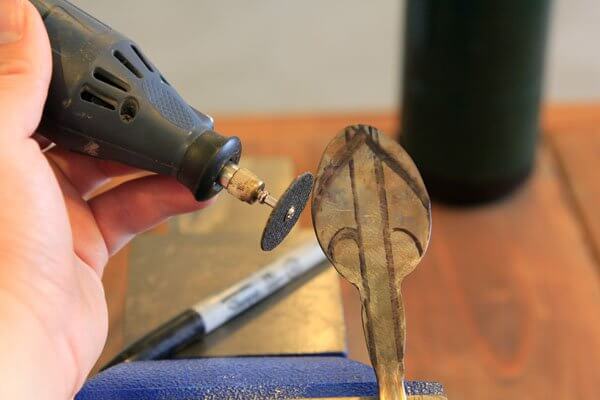
Step 5. Once the spoon has been sufficiently ground down into an arrowhead shape, run the file at an angle on both sides of the arrowhead to give it a sharp edge. You can also use a whetstone, fine-grit sandpaper or a power tool to hone the edge.
Step 6. Cut off about ¾ of the spoon’s handle. You will need about an inch of the handle left to attach to a shaft when assembling the arrow.

Get an actual basic arrowhead and use it as a template.
Lay it on your flattened spoon, then trace with a marker
(BladeHQ.com/item–ESEE-Arrowhead-RAT–6378).

torch to make it more pliable and easier to flatten
(SurvivalLife.com/turn-spoon-into-survival-weapon/).
NOTE: An optional step before pounding down the spoon flat is to heat the spoon with a plumber’s torch until it’s red-hot; this will make it easier and quicker to flatten. Filing down the spoon to an arrowhead shape can be done with power tools if you have them.
2. Motherboards
Also called circuit boards, motherboards are the green “sheet” of tough fiberglass found in old computers (the tower or CPU), – cellphones, digital tablets, monitors – even old telephones, can then be fashioned into DIY arrowheads.
Open up any unusable electronic device, and take the flat, green “sheet” that houses all the chips, sockets and transistors. Your best bet is an old cellphone or computer, and you may have to detach some components to have a “clean”, flat sheet. You can also use the torch to remove any stubborn beads of solder.
To make arrowheads from motherboards, you’ll need:
- “Clean” motherboard – one with the connectors and wires removed, if any
- Hacksaw or band saw
- Safety gloves
- Safety goggles
- Power grinder or fine-grain sandpaper
If you can’t find any metal but happen to have a few unusable electronic devices laying about, this is a good way to make arrowheads. To make them from motherboards, do the following:
Step 1. Don your safety gloves and goggles.
Step 2. Using the permanent marker, trace arrowhead patterns on the motherboard. If you have trouble deciding on the dimensions and shape of the arrowhead, lay an actual arrowhead on the motherboard and trace it with the marker.
Step 3. Carefully cut out the arrowhead tracing from the motherboard with a band saw or hacksaw.
Step 4. If you have a power grinder, carefully grind each side of the arrowhead at a slight angle to give it a sharp edge. You may also use fine-grain sandpaper, or if nothing else is available, scrape each side of the arrowhead on a coarse rock or rough pavement.
For a better idea as to how to make arrowheads from motherboards and what the final result could look like, watch:
3. Glass
Another ubiquitous and often overlooked material that can be used to make improvised arrowheads is glass. The glass bottoms of wine or beer bottles, or the glass screen off an old flat-screen TV or monitor are good options, or any flat piece of glass will do.
To make arrowheads from glass, you’ll need:
- Safety goggles
- Safety gloves
- Safety mask
- Leather pad
- Glass bottle with flat bottom
- Pressure flaker
- Round, smooth stone
- Large drill bit
Glass is an abundant but fragile material to work with for making arrowheads. Apart from a lot of patience, you’re going to need a steady, strong hand and a reasonably fine eye for detail. Making arrowheads in this manner isn’t as easy or simple as it sounds, so unless you have no choice, be prepared to sweat it out.
To make arrowheads from glass, perform the following steps:
Step 1. Wear all the safety equipment. Don’t go through with this step without protection as you’ll be working with glass, which can cause nasty cuts and kick up dangerous tiny bits of glass and silica dust which can get into your eyes and lungs.
Step 2. Take a glass bottle and place the large drill bit inside it. Hold the bottle while covering the hole and give it a few shakes. Ideally, the bottom of the bottle should break off. Do this over a leather pad to keep the bottom from shattering to pieces after it breaks off the rest of the bottle.
Step 3. Place the leather pad on your lap, and with the round, smooth stone, begin to “knap” at the glass bottom, knapping along the round edge; you should aim to remove the smooth edges around the bottle until sharp edges are formed.
Step 4. Continue whittling down the glass piece, forming an arrowhead. You can alternate using the pressure flaker and the round stone to achieve the desired size and shape of the arrowhead.

can be both rewarding and frustrating. Here’s one example of a glass arrowhead taking shape after hours of work (Makezine.com/2017/07/20/junkyard-flintknapping/).
NOTE: Using the pressure flaker and the round stone to knap an arrowhead from the glass is a long, complicated procedure. This method requires a lot of patience and skill, so making arrowheads from glass should be the last resort among all three materials. Remember also that you have to make this type of arrowhead in large quantities, as these are a one-time-use-only projectile due to their extremely fragile nature. The video below illustrates the intricacies of this method:
A pressure flaker is a simple tool used for pressure flaking, which is the process of making a sharp edge by detaching small flakes on either side of a piece of flint or similar material by applying pressure or “pushing” on the material. For making arrowheads from glass, you’ll need a pressure flaker which you can buy from a store or make yourself.
To make a pressure flaker, you’ll need:
- Thick wooden stick or dowel, measuring about 2-3 inches in length
- Nail
- Hammer
- Hacksaw or bandsaw
- Grinder or coarse sandpaper
To make your own pressure flaker, follow these steps:
Step 1. On one end of the dowel, position the nail at the very center.
Step 2. Hammer in the nail about ¾ of its length into the dowel.
Step 3. With a bandsaw or hacksaw, carefully cut off the head of the nail.
Step 4. Use a grinder or coarse-grain sandpaper to hone the protruding end of the nail to a sharp (but not razor-keen) point.

(TheWikihow.com/video_yV5_lrFaPaA.com)
Final Notes
When you run out of bullets and need an alternative projectile weapon for hunting or survival self-defense, the bow and arrow is your next-best choice. Just like any gun is useless without bullets, you’ll need a replenishable supply of arrowheads and arrows. The options listed here are handy to know about, and you should choose which method is best suited for your situation, the materials and tools you can procure, the time you can devote to crafting them and the level of skill you have.
Remember that making arrowheads isn’t limited to the methods or materials we’ve shown but is largely determined by your will to survive and ability to make do with the tools and materials you have or can obtain.