

Before deciding to stay and “fight” any impending flood with a sandbag wall, listen to the advice of weather experts and use your best judgment.
Throughout history, sandbags have served as quick-and-dirty fortifications, from shoring up barricades, revetments and field defenses to serving as “soft armor” on armored vehicles. In civilian use, sandbags can act as levees to protect your home or shelter against flooding during a storm.
Sandbag walls may seem simple enough to do, but if the bags aren’t filled right or aren’t stacked properly or high enough, your property may still end up inundated.
In this article we show you how to effectively build a sandbag wall as a defense against floods.
Why you should know how to make a sandbag wall
If you live in an area that gets hit by heavy rainfall, it’s practical to know how to make a proper sandbag wall.
If reports indicate that it’s safe for you to hunker down in your home and wait out the bad weather, then you should know how to put up a bulwark against the coming rains and resulting floodwater.
While this doesn’t always provide a 100-percent fool-proof protective shield against a flood, a makeshift sandbag levee can mitigate the damage and improve your family and property’s safety in the event of flooding.
Burlap or polypropylene?
Before building your sandbag wall, it’s useful to know the types of sandbag materials. There are at least two common types of sandbags that you can procure commercially, namely burlap and polypropylene.
Burlap sandbags
These are much like the “classic” sandbags first used in the late 18th century by British loyalists during the American Revolution.
Burlap sandbags have been used in every major conflict since then to fortify military positions, as well as offer some protection from floodwaters.
Made of biodegradable material, one drawback to burlap sandbags is that they tend to emit a funny smell once they’ve gotten wet, but the odor dissipates once the burlap is aerated for a couple of days.
Another problem is that these sacks don’t last long and tear apart in as little as two weeks after they get wet, but fortunately they’re inexpensive so replacing them isn’t as troublesome.
Despite their relative fragility, burlap sandbags can be repurposed and used as storage for some food items like potatoes, onions and coffee beans, but take note that they’re not the best at keeping pests away.


Polypropylene sandbags
Most modern military sandbags are made of polypropylene, since it’s less costly and easier to mass-produce in vast quantities. This type of sandbag is just as bio-degradable as its burlap precursor, and doesn’t emit a “funny” smell after getting wet.
Some polypropylene sandbag manufacturers apply UV inhibitors to protect the material from prolonged sun exposure, thus extending the lifespan of these bags.
A possible drawback to this type of sandbag is that they can’t be repurposed like their burlap cousins.

Building the sandbag wall
Once you’ve determined the right kind of sandbag for your property and surroundings, it’s time to plan and build your sandbag wall.
Here are the steps to follow for getting the process right and maximizing the protection a sandbag wall can offer:
Step 1.
Plan it all out beforehand. Determine how high and long your sandbag wall needs to be, then from there you’ll know exactly how many sandbags you’ll need.
Note that the U.S. Army Corps of Engineers recommends that the base of a sandbag wall should be three times wider than the wall’s height.
To determine how many sandbags you’ll need to build an effective wall, use this sample table:
|
Wall Height (in feet) |
Bags per linear foot |
|
1 |
50 |
|
2 |
100 |
|
3 |
210 |
|
4 |
360 |
| 5 |
550 |
Note that the above formula isn’t a simple 1 foot : 50 bags ratio. Bear in mind that the bags should be stacked in a way that the wall’s profile resembles a pyramid. If you are pressed for time, manpower or materials, build the wall such that the width is twice its height (see image below).

Step 2.
Choose the right spot. Don’t build a sandbag wall on uneven or unstable ground. Ideally you should place your sandbags about a foot higher than the level you expect the water to rise to.
Remember that sandbags aren’t 100% impermeable; when filled with even the finest sand or most-absorbent material, some water will always seep through your sandbag wall.
Leave about eight feet between any structures and your sandbag wall to allow for water that gets through to “spread itself thin” and to maintain access to the wall.
Never stack sandbags against a building as the combined weight of the bags and the water behind them could cause a structural failure.
Step 3.
Get your sand from the right spot. Don’t dig up sand or dirt from anywhere near the site you want to protect from floodwater, or behind your sandbag wall; you’ll only flood yourself in when the rains come and literally undermine your efforts.
Also, if you can’t get sand, make do with loose soil and not too much gravel. The “filling” of your sandbags should be as absorbent as possible. If you can’t source the filling material on-site, go to a landscape supply or hardware store with your sandbag wall specs and buy what you need.
Step 4.
Prepare all the needed equipment. Apart from shovels, you’ll need safety glasses and work gloves for each person working on the sandbag wall. Make sure to stock a lot of drinking water for everyone working on the wall and have a first aid kit handy.
The sand or dirt you’ll be shoveling will have the occasional gravel, so it’s best to be ready to treat any cuts or bruises.
Step 5.
Prepare the site. Clear out any debris from the spot where you intend to build your sandbag wall. Avoid any uneven ground and don’t build on or near any sharp turns or curves; floodwater will travel with increased energy when going down these paths.
Step 6.
Assign at least 2 people for every sandbag wall that must be built. Filling sandbags and stacking them so they provide the utmost flood protection isn’t as easy as it sounds; it’s actually backbreaking, extremely time-consuming work once you get down to it.
One person will do the shoveling, while the other holds the bags open and secures them once they’re filled. If there are more than two people available, assign the “extra” person to substitute for either of the tasks when someone gets tired.
Step 7.
Begin the task of filling the sandbags. Ensure that the bags are only filled to a little over half their capacity. If a sandbag is filled with too much material, it may be more difficult to move and seal and its shape will be too “plump” to make a good seal.
Tie off each bag closer to the top to allow for the sand inside to shift and create a good seal for the wall.
Step 8.
Stack the finished sandbags. Tuck the sealed opening under the bag when stacking it and always facing away from the floodwater. Some engineers even suggest to not use the ties on the sandbags and merely scrunch up the opening and tuck it under the bag.
Use this method if you can’t spare the time. Be sure to stack the sandbags such that the ends of each bag line up with the center of the bags on top of it.
Step 9.
Tamp down on the sandbags by carefully walking over them before placing the next layer on top. Doing so will make a better seal. Take care to avoid puncturing the bags.
Step 10.
Monitor the floodwater and the sandbag wall. You may want to assign shifts to family members to check if the sandbag wall is holding when the flooding starts. Be sure to have spare sandbags filled and ready to patch any “breaks”.
IMPORTANT NOTES:
- When filling sandbags, don’t fill them completely, only fill them a little over half the bag’s capacity. While it’s okay for the filling material (sand or loose soil) to have some gravel, be sure that the gravel isn’t more than 1/3 of the material.
- Begin building the sandbag wall at a reasonable time before the weather gets bad. Take note that the average person can fill 20 sandbags in an hour; determine the number of sandbags required for the wall and plan your work schedule from there.
- Be sure to assign people who are physically fit enough to carry the sandbags. The sandbags may be small, but each bag can weigh 35-40 pounds.
- Avoid filling sandbags in the rain; this will be more tiresome and ultimately self-defeating.
- Don’t overfill the sandbags. Sandbags filled to over 60 percent of their capacity will be too “plump” to flatten and will create gaps in the wall, allowing more water to seep through.
- Keep the amount of material shoveled into each sandbag uniform and consistent. Doing so will ensure a better seal.
- Don’t toss the sandbags around; have people pass them without throwing to minimize the possibility of injury. Also, tossing the sandbag might rupture and waste sandbags.
- Don’t do any work on sandbags without gloves and safety goggles or glasses, especially on windy days.
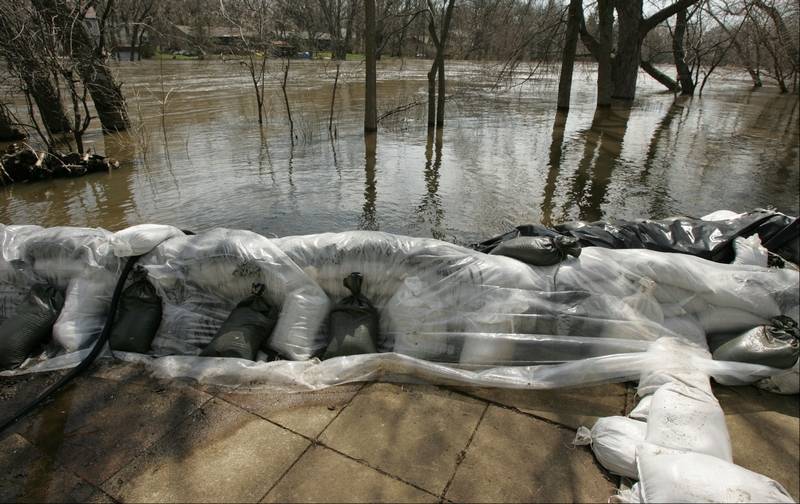
- Large plastic sheets can be placed over sandbag walls to increase their impermeability.

(ArtOfManliness.com/articles/how-to-make-a-sandbag-wall/).

Final notes
Remember that sandbag walls are only effective against standing or slow-moving water. And they aren’t capable of keeping any area 100-percent watertight and flood-free. The best a sandbag wall can do is minimize the damage that might be sustained by your property and possessions.
For any sandbag wall to be effective, other factors must be in play. You have to be situated on higher ground and away from the coastline and tidal effects. This is where ample trees and plants are present to absorb rainfall, and the expected downpour isn’t exceptionally heavy.
Before deciding to stay and “fight” any impending flood with a sandbag wall, listen to the advice of weather experts and use your best judgment.