

MAKE YOUR OUTDOOR LIFE EASIER WITH THESE HIKER HACKS AND TIPS
If you’ve spent enough time in the backcountry (and chances are you have, Dear Reader), you’re probably way past the big hurdles: a sleeping bag with the right rating, the lightest tent you can afford, a backpack that’s both light enough and comfortable enough to accompany you for a stretch of miles. But what about the finer details, the little stuff that goes a long way in smoothing out the rough miles?
I’m talking the kind of outdoor tips only garnered through years in the field, through trial and error…those “if only” epiphanies you have on a thru-hike that don’t make it back with you, lost to the backburners of your mind. I’ve done the legwork for you. Here are a few tricks to make you wonder “Why didn’t I think of that?” on your next multi-day backpacking trip.
CREATURE COMFORTS
Bolster Your Straps
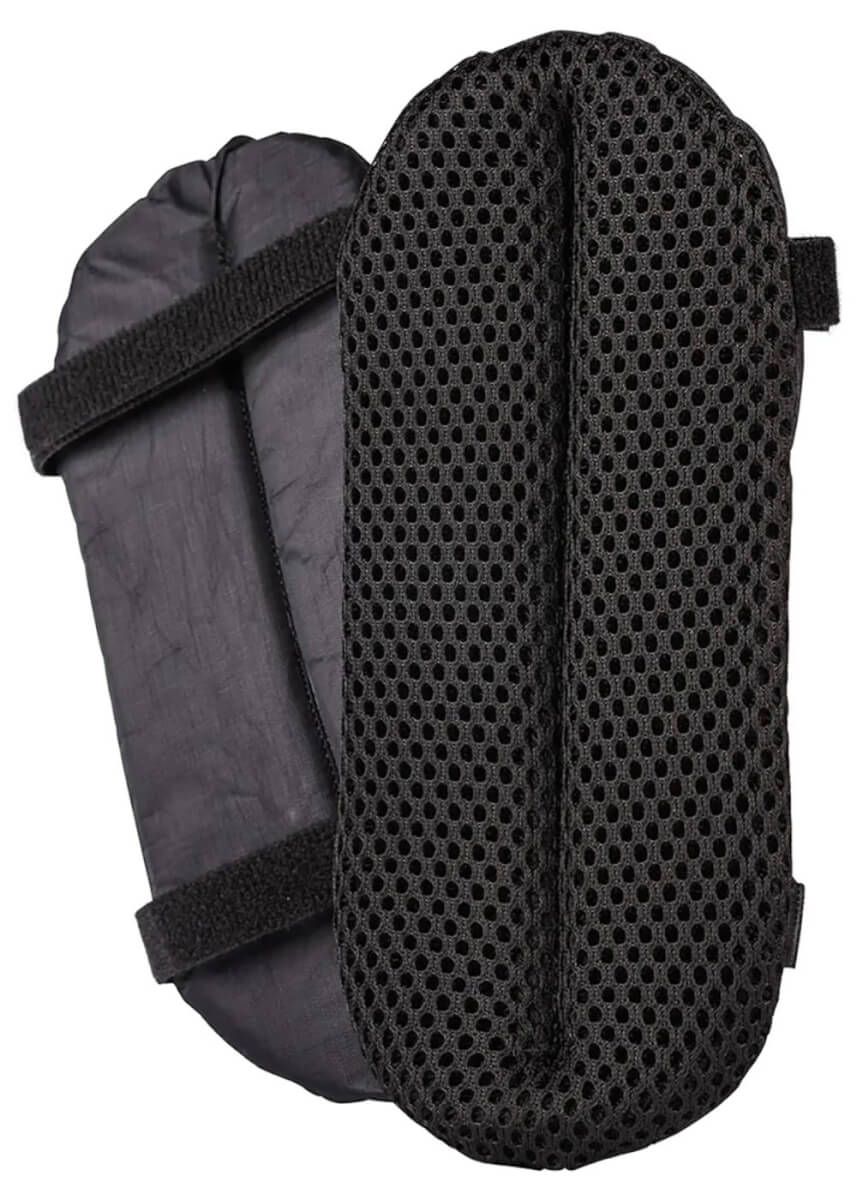
This is my biggest issue on longer hikes (though maybe I just have a bony clavicle). If you’re not one for DIY, you can buy strap pads from manufacturers such as Florida-based cottage company, Zpacks, which sells pairs of closed-cell foam pads for $29.95, or you could make your own, even if you don’t sew. If you do sew, you can use fleece or get fancier and use spacer mesh, which will maintain its cushion longer.
Self-proclaimed Queen of Gear Hacks Wanda Rice from SectionHiker.com has an easy method for padding your straps. Measure the distance from the top of the strap to the sternum buckle; this is how long you’ll want your pads.
Next, using a flexible measuring tape, measure the circumference of the strap and add ½ inch to the number for seam allowance. Cut two rectangles of fabric (one for each strap) in these dimensions, then fold each in half lengthwise and stitch the seams with a ¼-inch seam allowance.
Turn the fabric inside out and you’ll have a fabric tube to slide onto your strap (after you unthread the strap from its buckle). If you’re like me and you don’t know how to use a sewing machine (thanks a lot, Mom), you can get by with a quick-and-dirty hand-stitch, or simply use safety pins.
Sleep Cozier
If you’ve dialed in your sleeping bag game and have the right rating for your body and preferred sleeping temperature at night, you may have no need for the following tip. I was recently gifted a light, 10-degree-rated down sleeping bag that can convert to accommodate two people (shout-out to Feathered Friends of Seattle; mine is the Condor YF for $609), so I haven’t had much issue with warmth since becoming its owner. However, I used to spend my nights freezing.
“YOUR CLOTHES WILL FEEL (ALMOST) LIKE THEY’RE WARM FROM THE DRYER (EXCEPT MAYBE NOT AS FRESH-SMELLING).”
If you’re a shiverer, consider heating water before bed and putting it in a tightly sealed, heavy-duty bottle like a Nalgene (I’m going to tell you not to bring a Nalgene later, so use whatever tip suits you). Don’t pour it in when it’s piping hot, or fill it too full: the steam will build pressure in the bottle and make it a little sketchy. You can put this bottle alone or sheathed in a sock in the foot of your sleeping bag and it’ll toast your toesies right up.
Hate waking up in the morning and having to put cold clothes on (if you didn’t already sleep in all your clothes, which is one of my classic maneuvers)? Stuff all you clothes into the foot of your sleeping bag, especially with that hot water bottle in there, and get dressed inside your bag in the morning. Your clothes will feel (almost) like they’re warm from the dryer (except maybe not as fresh-smelling).
FORTIFY YOUR FOOD GAME
Become A Chef
Sure, some of those dehydrated backpacking meals are pretty good, and they certainly are convenient. But if you’re spending more than a handful of days in the backcountry, you probably don’t want to spend nearly as much money on food as you would at home.
If you pack three backpacking meals per day, you’re looking at about $15-20 a day on food, which adds up on longer trips. Instead, bring a clutch of staple ingredients that you can transform into creative meals. It’s cost-effective and gives you something to do at the end of a long day of hiking.
Plan to have at least a protein and a carb for each meal. For dinner, portion out and pack a few different carbs like instant rice, ramen, tortillas, couscous and a pasta noodle. Think about a few fats to bring to add flavor and calories; some good options (all in leakproof containers) are olive oil, coconut oil and butter (you don’t have to refrigerate butter, in case you didn’t know).
Get even more efficient and bring your preferred nut butter to use as a fat and protein. For proteins, consider jerky or cured meats, pre-cooked packets of chicken or tuna, or opt for beans or powdered eggs (or if you’re like me, bring real eggs in a hard case and don’t worry about refrigeration).
Lastly, prepare and label a few Ziploc bags of spice blends, and toss in a few True Lemon packets. If you haven’t already, start hoarding sauce packets you get from takeout meals (soy sauce, hot sauce, salt and pepper, etc.). These are perfect for camp meals.
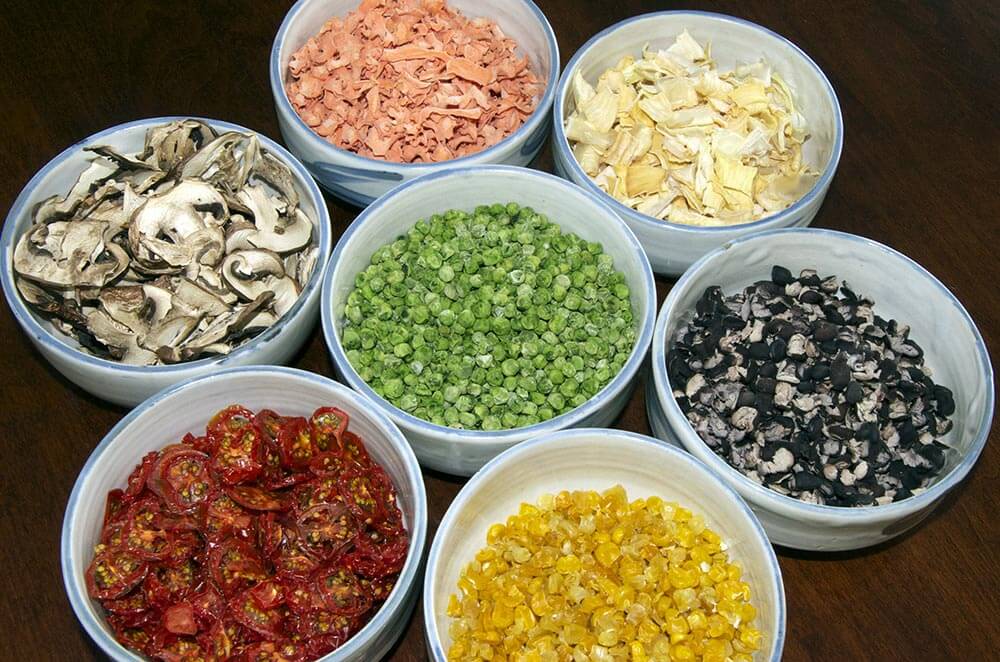
Hard cheeses like parmesan are also a great option because they keep longer. Get extra snazzy and buy organic dehydrated veggies in bulk and create your own mixes to bring (try stocking up on Mother Earth Products. You can get a quart of organic corn, for example, for about $15).
For breakfast, your staples will be things like oats or granola, whole powdered milk, dehydrated berries, dried fruit and nuts. I usually just eat trail snacks for lunch, but if you take lunch breaks and go all out, any of these ingredients can come together to serve as a winning lunch.
“THIS WAY, YOU DON’T NEED TO CARRY AS MUCH WATER, AND YOU FORCE YOURSELF TO HYDRATE TO THE POINT WHERE YOUR BELLY FEELS LIKE A SLOSHY WINE SACK.”
Store It Properly
Let’s face it: bear cannisters are obnoxious. They’re heavy, rigid and take up too much space in the pack. Some national parks require them, so make sure you know the rules of the area you’re visiting; otherwise, opt for a bear bag and learn how to hang one properly.
There are a few methods to hanging food, as well as some non-hanging options. One of the most popular methods is the PCT method (Greenbelly.co has a thorough explanation here: How to Hang a Bear Bag (4 Easy Steps), but you can find videos all over YouTube), which requires a tree with a sturdy-enough branch that will elevate your bag about 15 to 20 feet off the ground, as well as keep it 6 feet from the trunk.
This is important because a bear can climb the trunk and reach your bag if it’s any closer. It’s also a good idea to hang your bag about 100-200 feet from your camp, preferably downwind. For this method, you’ll need a 50-foot coil of strong rope (paracord will do if your bag is light enough), a carabiner and a twig. If you want to take the guesswork out of it, Zpacks sells a setup for $50.
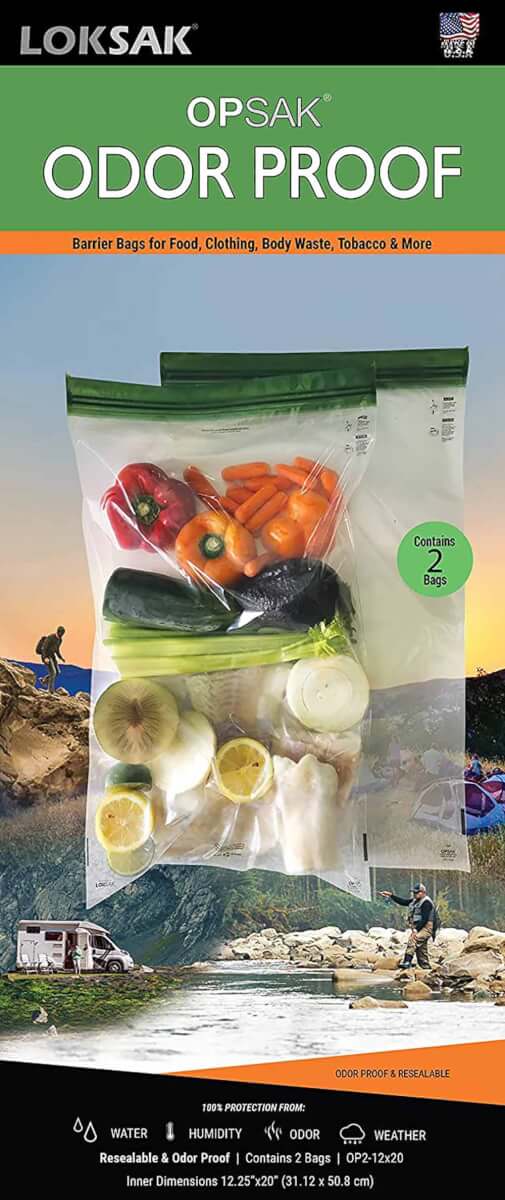
There are also odor-proof bag options (like Loksak Opsak for about $15) to consider if you know you’ll be hiking in an area without trees or where hanging food is too difficult (for example, a spruce forest).
Bags like these aren’t chew-proof, however; you still may have issues with animals getting your food if you don’t store it properly. I can’t recommend these wholeheartedly, though, because if there is enough animal activity, they might fail and leave you without food. Regardless of whether you fall back on the odor-proof bags on occasion, definitely learn how to properly hang a food bag.

WATER YOU WAITING FOR?
Camel Up
Most advice you’ll find on the interwebs tells you a good rule of thumb is to drink about one liter (little over 32 ounces) of water every two hours on a hike, drinking even more if it’s hot or a strenuous hike. I think everyone is different and these numbers will fluctuate, but why not shoot for that? When you’re hiking long-distance, a lot of water is a pain in the batookie to carry.
Fill up your water reservoir and any additional bottles, bring your filtration/purification system of choice, and then every time you come across a water source, camel up. This means drinking your fill of whatever bottle(s) you have (I like to empty the accessible ones and keep the reservoir as my backup/one to sip throughout the hike), then refilling from the water source.
This way, you don’t need to carry as much water, and you force yourself to hydrate to the point where your belly feels like a sloshy wine sack. Some people say chugging water like this leads to stomach cramps. I say it leads to being efficient.
Something else to consider to make hydrating a little more exciting on a multi-day hike? Electrolyte tablets. They’re lightweight (just take a tablet for each day and store them in a Ziploc bag) and especially helpful if you’re hiking in the summer and sweating a lot. I like the Sport variety from Nuun and usually order a 4-pack of the Juicebox Mix from Amazon for about $25.

Save Every Drop
This may go without saying, but be smart about how you use your water. Try to make everything work double duty. Even if it doesn’t look like it’s going to rain, leave a cup or pot out overnight in case it does. If it rains even a little bit, you can use that water for cleaning, drinking or brushing your teeth.
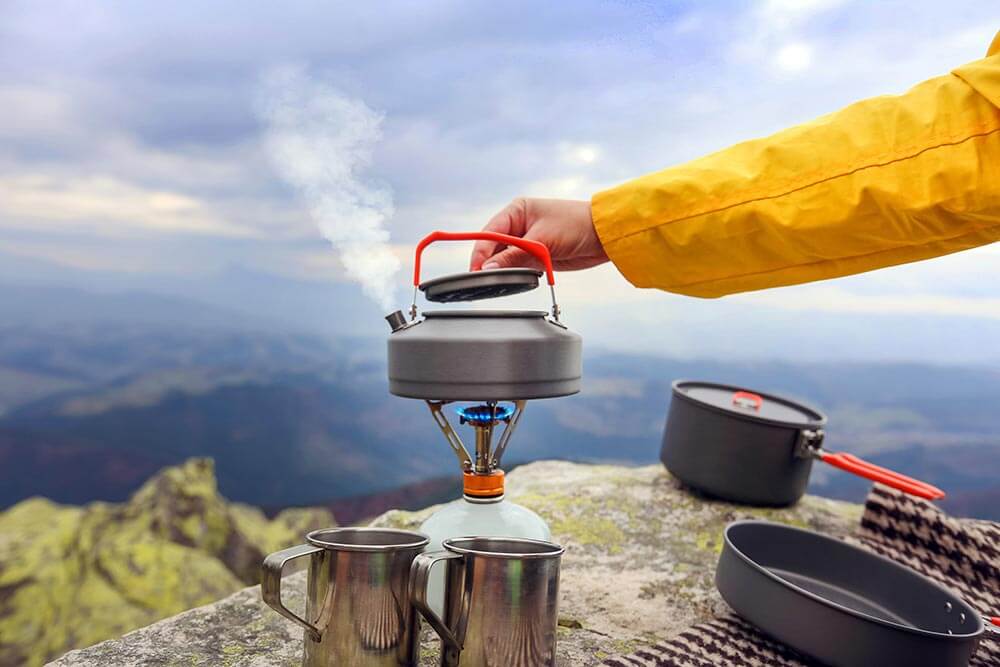
If there’s a water source near my campsite, I don’t worry much about cleaning my pot in that “dirty” water; I know that the next time I fill my pot, I’ll be boiling the water, so that will take care of any nasties lingering inside. If you camp near a water source, boil water to cook your dehydrated food and don’t tap into your bottled sources until you’re back on the trail.
Boil more than you think you’ll need so you’ll have extra to clean your pot and utensils, and if you use all that up, boil more for the morning and let it cool overnight for drinking or brushing teeth. Think ahead about every instance you’ll need water and plan to purify too much; it’s always nice to have a surplus and not be worried about when you’ll get to fill up again.
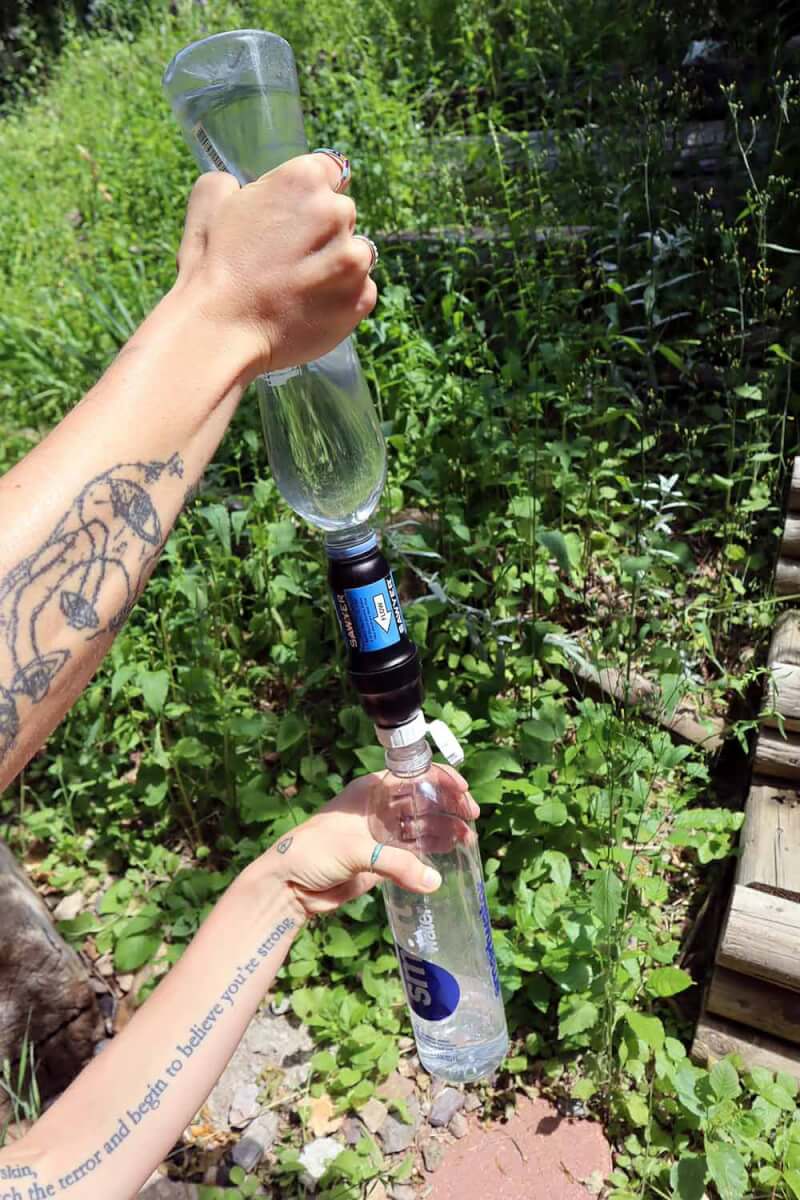
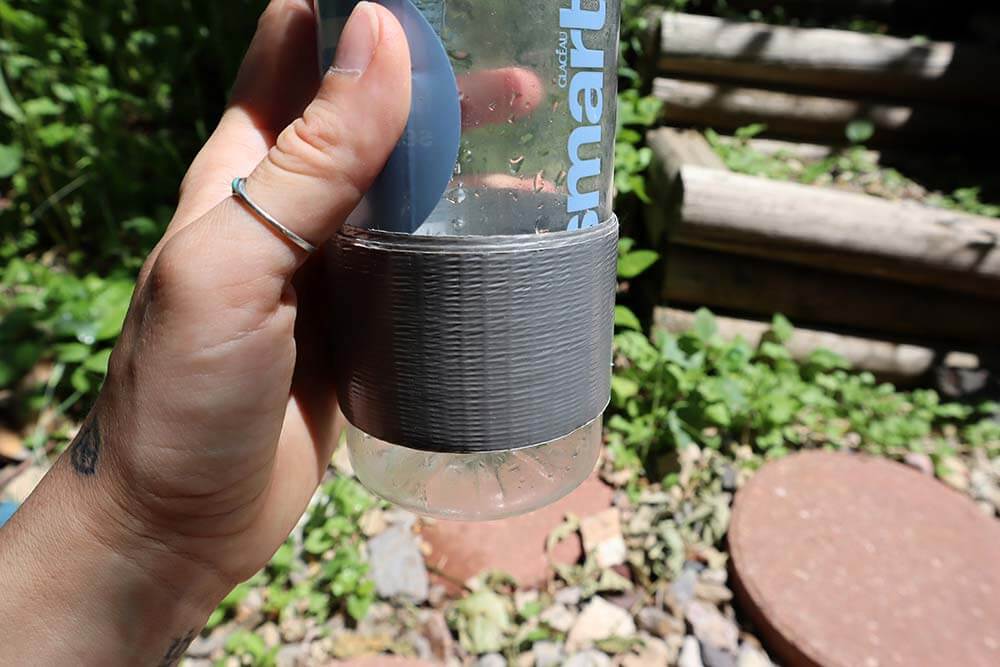
Toss That Fancy Bottle
It took me entirely too long to wise up to this. No need to pack any bulky Nalgenes or (dare I say) metal water bottles. They may look posh (hey, I like my shimmery S’well bottle or trendy-hued Hydro Flask as much as the next gal), but when you’re in the woods, who cares how pretty your bottle is or how cold it’s keeping your water?
Ditch it in favor of a disposable plastic bottle and wrap that sucker in duct tape to use if needed. I’m partial to the size and shape of the one-liter Smartwater bottles with the sports flip-caps. If you have a Sawyer Squeeze Water Filtration System ($38.95), you can leave Sawyer’s cap and the water bags at home and simply attach the Smartwater bottle to the Sawyer filter.
Just make sure you have one “dirty” bottle and one clean bottle (maybe one is taped or is a different brand). I do like the squeezable bags, too, but this might be worth a try if you want to cut itty bits of weight.
THE HOMESTRETCH
Transitioning from beginner to expert hiker status takes a lot of practice. Shelling out oodles of dough on all the new high-tech gear won’t get you there any sooner; it’s about spending as many nights out in the woods as you can. The more you go out, the more varied the weather will be. The more opportunities for your gear to fail, and for you to have to problem solve. The more terrain obstacles you’ll face, and the more wear-and-tear your body will sustain in the short run, and strength you’ll build in the long. You cannot better prepare for things, or tweak your setup, if you don’t just get out there and hit it hard. My goal is to learn something new on every overnight I do so that the next one will be slightly easier. Hopefully you’ve picked up at least one new thing from this list that will make your next trip a pinch better.
TROUBLESHOOT ON THE TRAIL
You had all the fancy-schmancy gear and were feeling like a backcountry boss, until about Day 3, when disaster struck. In this example, “disaster” is hyperbolic; let’s say you developed a nasty case of monkey butt. Here are a few common problems you may encounter on a multi-nighter and how to come out on top.
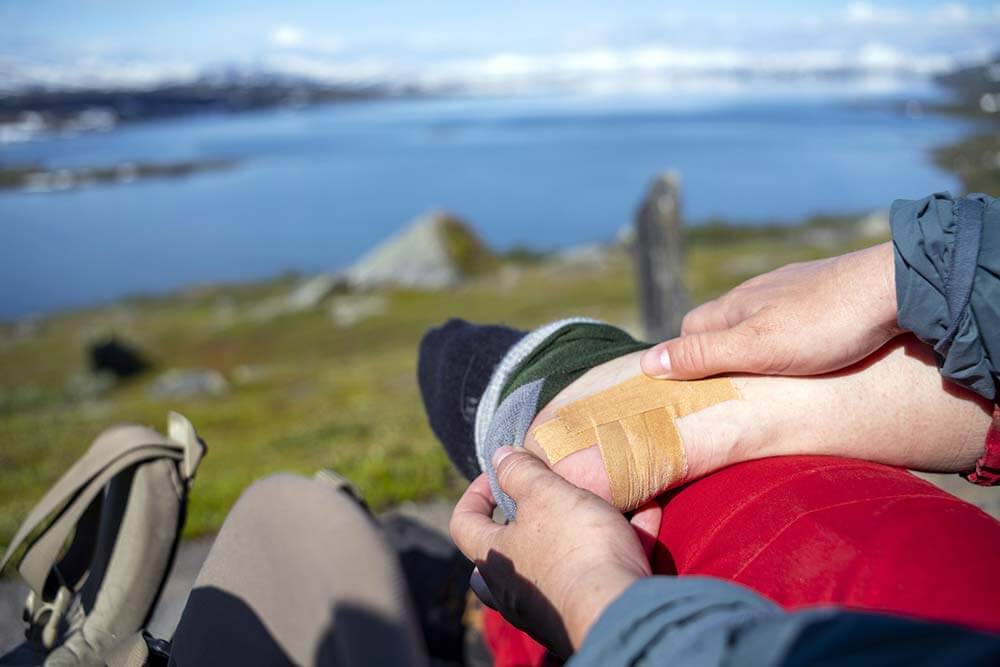
Blisters. It’s doubtful you’ll go on a long backpacking trip and scrape by without getting at least one of these buggers. Blisters are caused by the combination of friction in a poorly fitted shoe and moisture. In my experience, even the best fitting, most comfortable shoe usually still produces a blister after walking a dozen miles every day (anyone not have this problem? I want to know your secrets).
The best advice I have for this is to bring along moleskin pads or Leukotape sports tape and apply on any hot spots you feel starting to develop. Always bring extra socks to swap out whenever your feet get too swampy, and if you do develop a blister, my (non-medical) opinion is to pop it if it’s in a place that will continue to get stepped on or abraded. Have a fine needle and alcohol wipes in your first-aid kit and sterilize the needle with a lighter until it’s red hot. Allow it to cool, clean the soot off with an alcohol wipe, then wipe your blister. Drain that fella, alcohol wipe, Band-Aid.
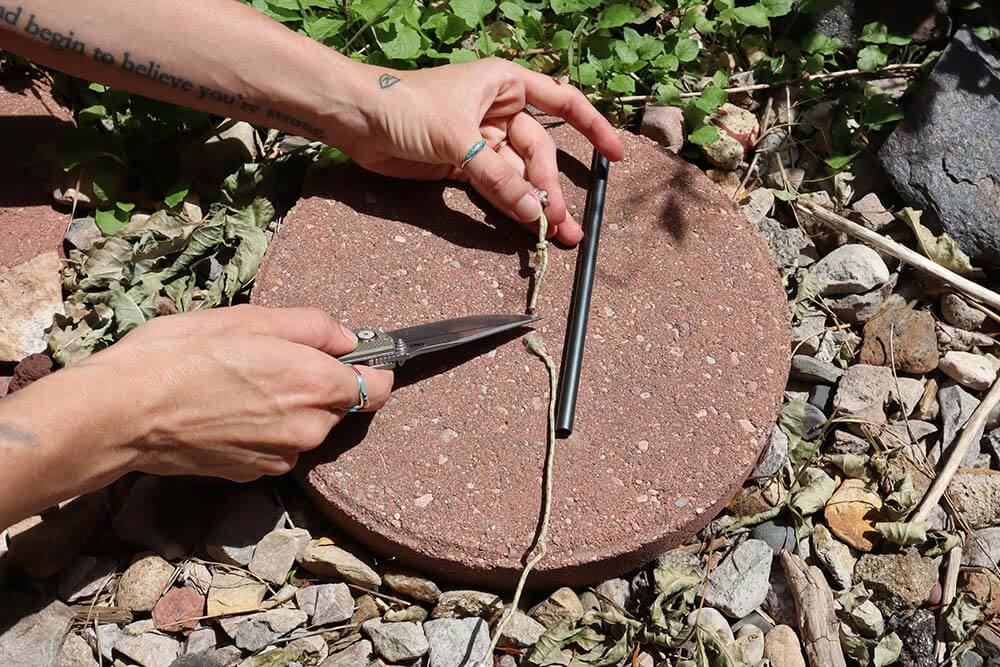
Broken Tent Pole. There are a few things that can go wrong with tent poles. Maybe some dingus stepped on your pole and bent it, or maybe the wind was so angry that the pole snapped. Or, that same dingus pulled your pole sections apart too forcefully and caused the shock cord to become stretched out and useless.
If you’re dealing with a bent or broken pole, hopefully you have the emergency splint that likely came with your tent. If so, the fix is pretty simple: slide the splint onto the pole and position it over the break, then tape the ends with the duct tape that you so wisely stuck to your water bottle in case of such a plight.
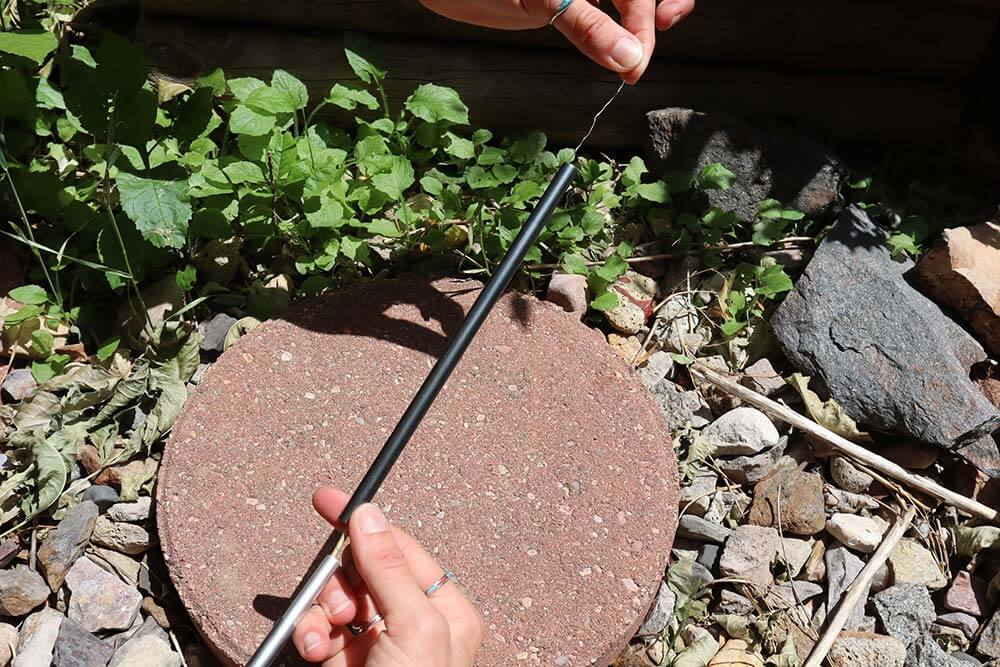
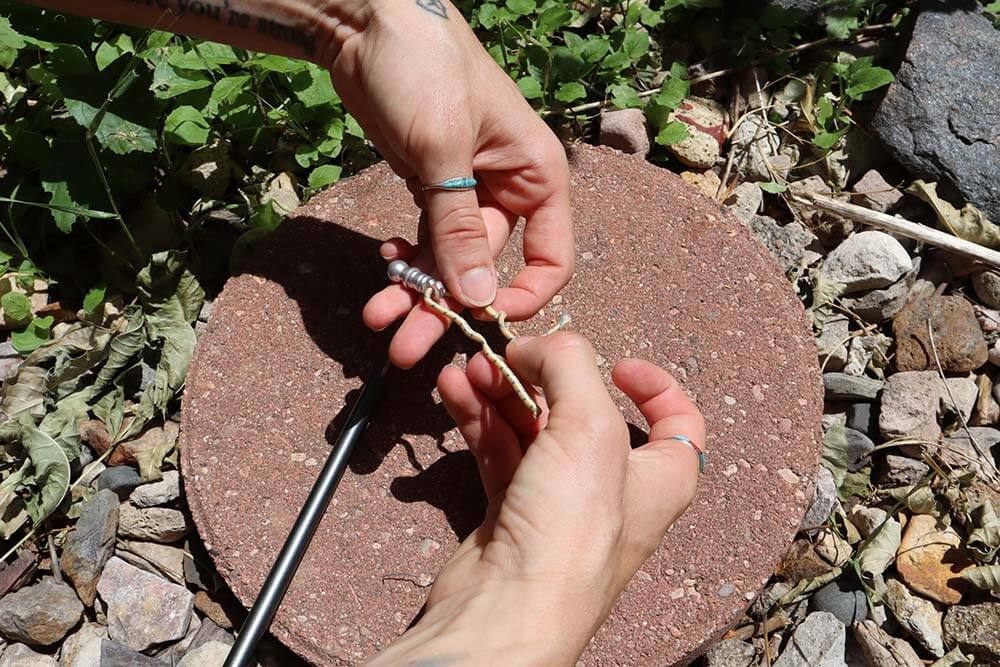
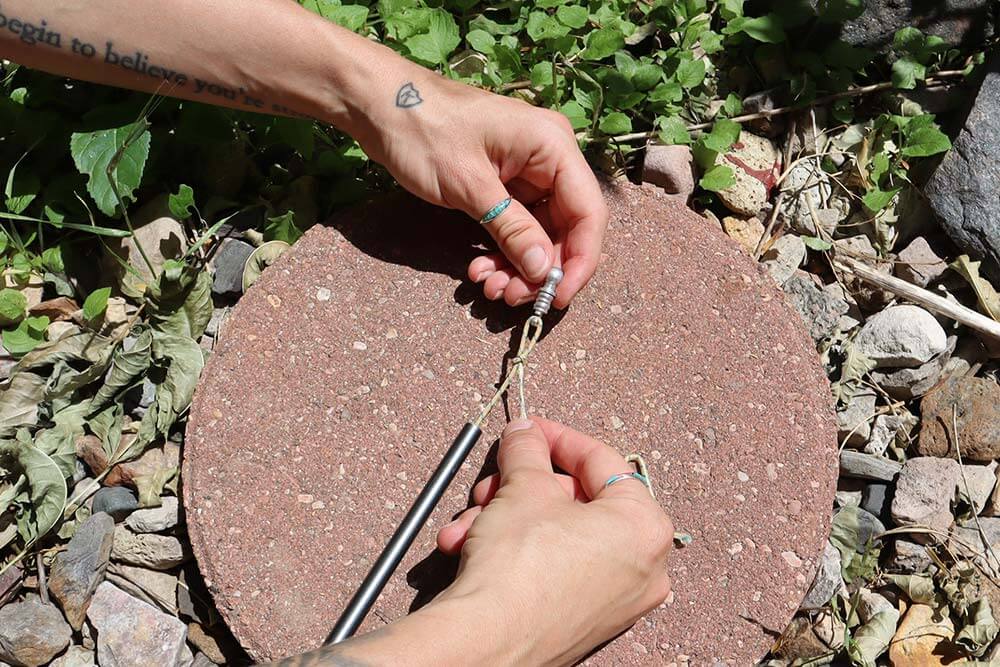
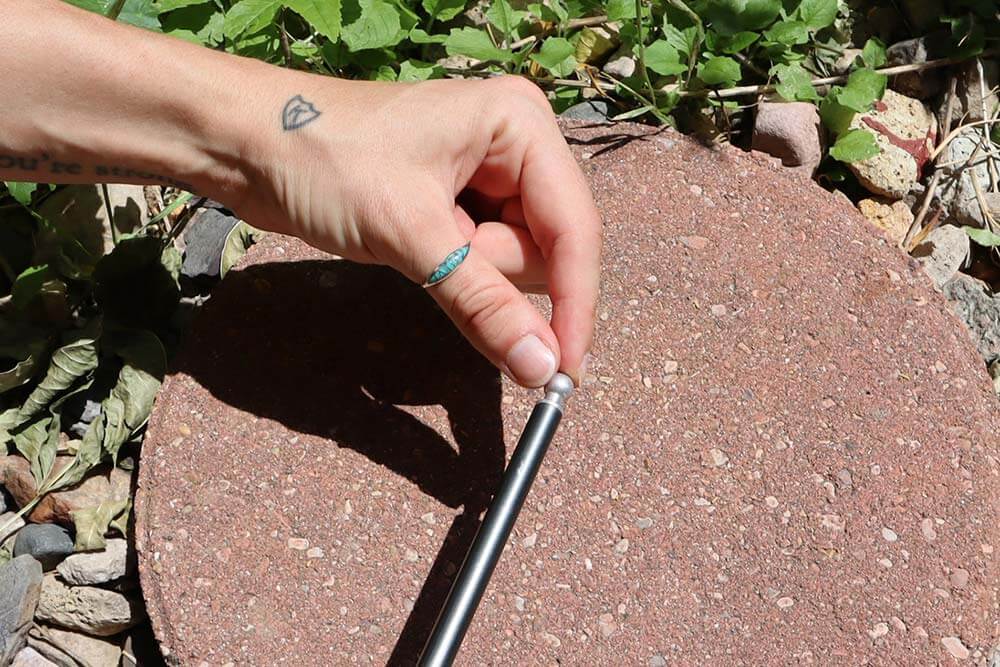
Sloppy elastic shock cord? Pack a super-fine-gauge metal wire amongst your gear. Pull out the metal knob that caps the end of whichever pole is causing you grief, then extract the shock cord. Cut off whatever length of stretched-out cord that’s keeping the pole sections from coming together, as well as the metal knob that will plug into the corner of your tent. Thread the wire through the fabric encasing the elastic and wrap it around the cord, fashioning a sort of needle-and-thread. Thread this needle back through the pole section and pull the shock cord taut through the sections, connecting them as you pull. Now, untie the metal knob from the discarded cord and retie it onto the shortened cord, then stuff the cord and the inside end of the metal knob back into the pole.
This will work until you get back home and properly resolve the issue. You may have to do this on multiple ends to take out enough slack in all the sections.
Chafing. Unfortunately, this requires another thing to pack, so you’ll have to decide if this applies to you or not. Chances are, the hairier your derriere or groin area, the more likely you are to experience chafing or monkey butt, which is a general term for any sort of rawness, chafing or “diaper rash” you may develop while bagging miles. Like blisters, monkey butt is caused by the unholy union of friction and moisture. To prevent it, opt for synthetic fabrics that wick moisture more quickly than natural ones, and choose looser clothing that won’t chafe.
If you’ve gotten a case of the butt before, or think you’re at risk, pack an anti-friction powder like Anti Monkey Butt ($5.99). If you’re ultralight and don’t want to mess with the bottle, repackage what you think you’ll need into a Ziploc bag or smaller container. It may not be as convenient as the bottle, but efficiency usually trumps convenience if you’re an ultralighter or thru-hiker.
Hole In The Shelter, Sleeping Pad, etc. This one requires some foresight. You need to make a little repair kit to bring with you (don’t worry: it won’t add much weight). In a Ziploc bag, you should always have on hand a sealant such as Gear Aid Silnet Silicone Seam Sealer ($8.95) and a tent-patch glue that may have come with your tent, as well as your gear manufacturer’s patches or some multi-use ones of your own. Gear Aid also makes waterproof tape that serves this purpose: Tenacious Tape Mini Patches ($5.95).
Best practice for tent patching dictates that you lay the punctured piece of material flat to get the best, wrinkle-free seal with your patch, but this is not always ideal (especially if you discover a hole while you’re in the tent during a rainstorm). I’m not judging; do your best to smooth the material and apply the patch (if you’re cutting your own, no sharp edges). If the hole is in the rainfly and you can spare the patches, I’d patch both the inside and outside of the hole.
If the hole is in your sleeping pad but you can’t detect it, you’ll need to fully inflate it and first listen for air escaping. If that doesn’t work, next is making some soapy water and applying it where you suspect a leak, watching for bubbles. I haven’t had much success with either of these approaches, so I’d probably be onto the third option already: submerging the entire pad in water. If you’re lucky, you might have a lake nearby in the field where you could do this.
Once you locate the trail of bubbles coming from the hole, mark the spot with a pen or marker (or heck, a muddy fingerprint). Deflate the pad and allow it to fully dry (hopefully in the sun). Wipe the hole with an alcohol wipe and when it’s dried again, apply the repair glue to the entirety of the patch, as well as the area with the hole (or skip this part and just use a Tenacious Tape patch). Press the patch onto the hole, smooth it out real nice, then weigh it down with something heavy and preferably flat. Wait it out longer than you may prefer. And voilà! Hopefully you’ll be sleeping on a cushion of air tonight.

SOURCES
Anti Monkey Butt
www.AntiMonkeyButt.com
Feathered Friends
www.FeatheredFriends.com
Gear Aid
www.GearAid.com
Mother Earth Products
www.MotherEarthProducts.com
Nuun Hydration
www.NuunLife.com
Sawyer
www.Sawyer.com
True Lemon
www.TrueLemon.com
Zpacks
www.Zpacks.com
A version of this article first appeared in the September 2022 issue of American Outdoor Guide Boundless.