

In a SHTF situation where you happen to be outdoors in bad weather and don’t have a tent, getting to or building temporary shelter becomes an even more immediate need. Whether you’re in the wild or out in the concrete jungle, you’ll need a sufficiently sturdy refuge to shield you from the elements.
In this guide, we show you a couple of temporary shelters to build using easily found materials.
Where to set up
Choosing the spot for your shelter is the first and most important step. If you’re in the wilderness, find a spot that isn’t directly under or in the path of large rocks or debris; in the event of a rock or mudslide these can fall on you.
If you’re near or under trees, be sure there are no standing dead trees nearby or dead branches overhead as they can be serious hazards as well.
Speaking of mudslide and other water-triggered disasters, never set up on low ground or flood-prone areas such as under a waterfall or too close to a river or stream. Getting drenched and then having hypothermia set in when it rains is no picnic. An ideal location in the wilderness is close to a body of water, but not too close.
Seeking or setting up temporary shelter in urban areas is similar: don’t shack up near waterways. If security is a concern, find a shelter that’s also discreet and has multiple entry and exit points for a quick escape.
The teepee: shelter in the wild
For many Native Americans, the teepee was their shelter of choice. Once you’ve built and lived in one, you’ll understand why. It’s suitable for virtually all seasons, as long as it’s constructed properly and situated at the right place. Choose a safe spot that’s on reasonably level ground.
To make a teepee shelter, you’ll need:
- 8-9 poles, at least 10 feet in length and at least 2 inches in diameter
- Large plastic or canvas tarp or parachute
- Cordage (paracord, nylon rope, manila rope or similar)
- Duct tape (optional)
To make the teepee, follow these steps:
Step 1. Lay 3 poles on the ground, and lash them together securely on one end to form the main tripod.
Step 2. Mark a 12-foot circle on the ground, and stand the 3 poles to form a tripod; make sure the poles don’t go past the circle so the tripod doesn’t collapse on itself.
Step 3. For additional support, lean the other poles against the tripod without lashing them.
Step 4. Decide where the entrance will be. Ensure that it is on the opposite side from where the wind is blowing.
Step 5. Drape the tarp or parachute on the teepee, starting from the rear.
Step 6. Wrap the material around one side of the tripod, then wrap the rest of the teepee. If the tarp you have is large enough, you can double-wrap the teepee for greater strength.
Step 7. You can lay an additional tarp over the entrance for the “door”. Reinforce the structure by securing the poles and the tarp with duct tape if you like.
Step 8. There will likely be gaps at the base of the teepee, since the tarp may not be large enough or have the right shape for complete coverage. Depending on the conditions, you can leave the gaps open to let air in for a fire, or seal the gaps with loose leaves, boughs and similar debris.
Step 9. If you choose to have a fire inside, make sure to leave a 12 to 20-inch opening at the apex for ventilation.


Shelter in the city
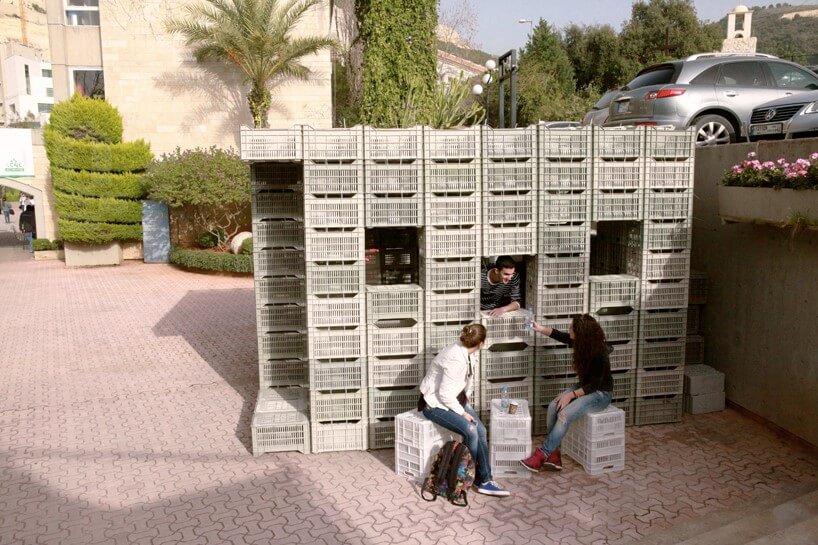
Should SHTF and you’re right in the city center, have no tents, access to wood and don’t fancy sleeping in a car, there are other ways to set up a temporary shelter. Shelters made from wood pallets, milk or beer crates are unusual but solid options. One such example is an experimental structure made by university students.
To mimic their temporary shelter, here’s what you’ll need:
- Beer or milk crates (the sturdy plastic type), at least 416
- Zip ties, approximately 4,992 (multiply the number of crates you want to use by 12 zip ties per side). You can substitute strong cordage or wire for the zip ties.
- 28 concrete blocks
- Tarp and cordage (optional)
The cost and logistics of doing this may seem difficult, but when the sh*t seriously hits the fan, these two, or similar, materials may be easier to come across, especially if you’re in an industrial or commercial area.
To make a shelter out of these materials, follow these steps:
Step 1. Lay down the foundation. Make an 8 x 8 square of the crates, placed upside-down and tied together with 2 zip ties per side. Lash the crates together at the handles and the sides.
Step 2. For the bases of the walls, place a concrete block or similar weight on the base crate to weigh down the structure. Stack the crates up to 8 or 9 crates high on each side, binding them also with zip ties, using 2 each per side. Be sure to leave a few “gaps” to create windows for the structure.
Step 3. Make the roof with the rest of the crates, laying them upside-down for better ventilation and to avoid pooling of rain water.
Step 4. If it rains, lay a tarp over the roof and lash it on with zip ties or cordage.


Final notes
There are no hard and fast rules for what materials should be used for making a temporary shelter in a survival situation. Whether you’re in an urban area or wilderness setting, you can build shelters like these if there are no other viable options.
The temporary shelters you find or make need only protect you from the elements and keep you warm and safe until rescue arrives, or you’re able to make your way to a safer area.