

Part of surviving out in the wild is learning to subsist on what nature has to offer. In case you are in a SHTF situation or choose to live off-grid and successfully hunt wild pig, this guide will show you how to prepare its carcass before butchering.
Safety first
Once you’ve hunted and killed a wild pig, you’ll have to start on the carcass. Before anything else, don latex gloves and protective eyewear before working. Wild pigs harbor several diseases which affect humans, one of which is Brucellosis. Brucellosis has flu-like symptoms that include fever, chills, headache, fatigue and loss of appetite. Though easily treated and rarely fatal, you must still take the necessary precautions to prevent infection.
Apart from using the right protective eyewear and gloves, make sure you don’t let any of the hog’s blood, tissues or other body fluids get into your eyes, nose or mouth. Don’t allow any part of the hog to come in contact with any open wounds, if you have any.
Have the right tools
Depending on how you want to clean the pig and what you want to do with the meat, ideally you should have the following tools ready:
- Meat gambrel
- Meat saw or hacksaw
- Boning knife
- Cleaver
- Drop or clip point hunting knife (for skinning)
- Bone scraper
You’ll probably be out in the boonies, so it’s okay to not have all these tools — a razor-sharp 6-inch blade will do, except your choices will be limited in carving up the parts for storage or cooking. If you don’t have the right knives, be sure to have a large enough storage space to keep the carcass on ice. If you have no ice, be prepared to cook the entire hog, or as much as you can, in one go.

a cleaver and plastic bone dust scraper are ideally needed to properly skin,
gut, clean and cut up the carcass (OutDoorLife.com).
Bleeding it out
Before gutting and cutting up the carcass, you’ll have to bleed it out; this must be done as soon as you can. Pig blood is actually a treasured cooking ingredient for sausage, so you can save the blood for use later if you wish; just be sure to cook it properly to kill the Brucellosis bacteria.
Hang the hog with the gambrel, attaching it to a chain hung from some low-hanging sturdy tree branches if you’re out in the field, or by a similar method if at camp or home. Hang the carcass about 6 inches from the ground, with a bucket placed under the head to catch the blood. With a sharp knife, slit the throat and allow the blood to drain out for about 15-20 minutes.
Skinning
Now that the hog is bled out and upside down, proceed to skin it. You can choose to save the skin to make it into cracklings, but this is a very tedious process. Wild pig has much coarser fur than domesticated pigs, so for this guide, we recommend discarding the skin instead.
To skin the carcass, follow these steps:
Step 1. With the pig hanging head-down, make a cut at a spot on each of the back feet, such as at the Achilles tendons. Get a firm grip on the skin with one hand, and with a small knife in your other hand, carefully cut any connective tissue that’s exposed as you pull.

Step 2. Be especially cautious as you cut around the rectal area; cutting into the colon can spread more bacteria into the meat and taint the flavor.

Step 3. Keep pulling the skin down towards the head, continuing to slice the fatty tissue between the meat and the skin as you go.

Step 4. When you reach the front legs, cut along the legs and peel the skin off to get to the feet; cut between the bone and the hoof, leaving the skin on the hoof.

Step 5. When all the skin has fallen over the head, use the meat saw or cleaver to cut off the head. Saw or cleave into the neck, while twisting. This works better if done by two people; one holds the carcass still while the other saws or cleaves, while twisting off the head.

Gutting and cleaning
Once the skin and head have been removed, start gutting the carcass.
Step 1. Cut around the anus (or vaginal opening if female) with a small knife; make a circular cut about 2 inches bigger around the anus to avoid cutting the colon. Pull upward gently on the freed anus (or vagina if applicable), then tie it off with a rubber band or zip tie. This will ensure the organs remain intact when you extract them from the other side.

Step 2. At the sternum, or where the ribs end and the abdomen begins, cut into the carcass with the sharp tip of your blade facing up; cut only about skin-deep. Continue to cut straight up, keeping the cut centered and ending just before the anus. Be very careful not to puncture any of the internal organs. At this point, the guts will start to fall out, so have a large bucket or tray ready to catch them.

Step 3. Carefully coax and push out the guts by reaching into the cavity. These should all come out easily and in a single mass, including the colon that was tied off earlier. Trim off any stubborn connective tissue, being careful not to damage any of the organs.
Harvest the liver and the heart, paying special attention to the liver; if the liver is healthy, deep-red in color and without any white, spotted or tough areas, the animal is healthy and safe to eat. The liver can be cooked and eaten by itself, while the heart can be eaten as well, or put in a stew or soup to enhance the flavor.

If you intend to keep any organs for use later, rinse them off with cold water, then wrap them in butcher’s paper and place in the freezer between 33 to 40 degrees (F).
Step 4. Clean out the cavity by hosing it down to get rid of any blood, hair, bone splinters and other residue. Cut off the feet at the joints. You may need to go back into the carcass to scrape and trim out stubborn fat or connective tissue that remain. After you’ve thoroughly cleaned out the carcass, let it dry.
Step 5. Once dry, freeze the carcass as room-temperature meat is tough to work on. If you don’t have the space, cut the carcass in half then freeze it.

Halving the carcass
If you don’t have the space to freeze an entire carcass, you can do some basic cuts. Here’s how to cut the carcass down to size:
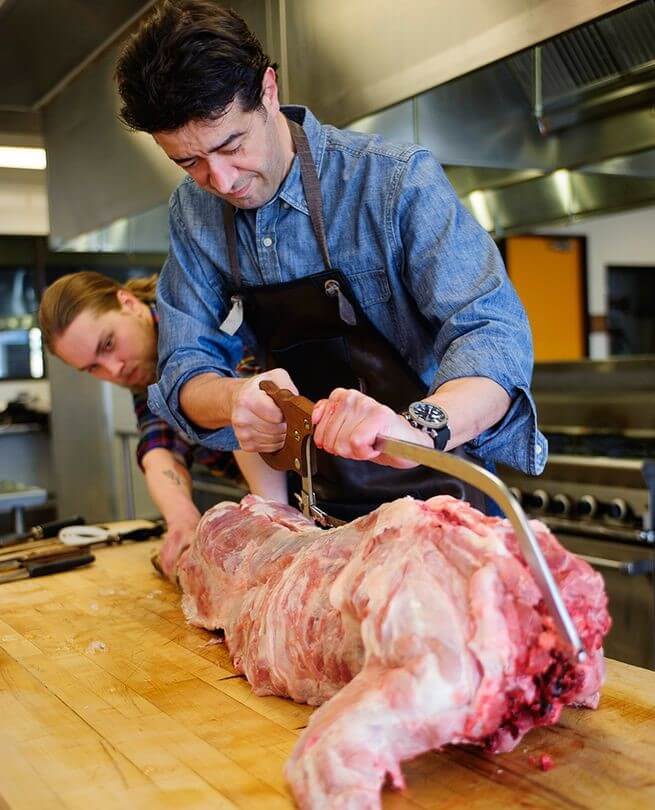
Step 1. Split the breastbone. If the hog is small, you can use a rigid knife; use the meat saw for larger carcasses.

Step 2. Flip the carcass over and locate the neck bone. Use this to ensure you halve the carcass along its center.

Step 3. With a long, sharp knife, make a clean, shallow cut from the neck bone all the way down to the back.

Step 4. Continue to cut along the “guide cut” you’ve made down the center, carefully going deeper until your knife reaches the backbone; this will ensure the meat saw won’t tear up the meat and will go straight to the bone.

Step 5. Using the meat saw, carefully push into the “guide cut” made previously, and slowly saw through the backbone. Have a partner hold down the carcass as you saw, and take your time.

Step 6. Once halved, use a small, razor-sharp knife to remove any residual veins, blood vessels or unwanted bits if any are left in the cavity.

Step 7. Run a butcher’s scraper all along the split to remove bone fragments and bone dust.

Step 8. Decide what to do with the halves. You can choose to freeze them and butcher them a day after, as frozen meat is much easier to cut, or season then roast either or both halves. Just be sure to freeze the meat until you need it, if possible, and to cook it at 145-160 degrees (F).
Final notes
Whether hunted or raised then harvested, pigs make for an excellent food source that could keep you and your group fed for days. Wild boar or hog are very tasty, and have the added bonus of not being pumped full of hormones and antibiotics found in commercially-raised swine.
Hunt or harvest a pig that’s not too old, as the more sexually-mature ones have a funkier smell to their meat. If you’re in Texas, the good news is that wild pigs are considered pests and the USDA encourages that you hunt them for meat. Even more good news? There are an estimated 2.4-3.6 million wild pigs in Texas alone, with no swine decline in sight. So get your bow, gun or trap and hone your hog-hunting and cooking skills in preparation for when SHTF.