

If there is one aspect of wilderness survival that we tend to fixate on most, it’s food, specifically meat. This often brings to mind the iconic image of a lone caveman on the hunt, typically in a dark jungle determined to effortlessly spear the first large animal that crosses his path. Emerging from this hunt relatively unscathed, he then drags the carcass of this kill back to his cave whilst wearing the brand new hide he‘s acquired. Once back at his lair he rubs two sticks together, producing a fire to slowly roast his well-deserved survival feast. If only primitive hunting and foraging could be this easy and carefree.
THE HARD TRUTH
The reality is food is not a priority in a short term survival scenario. If you do happen to find yourself in a longer term scenario, food will then become a necessity as your blood sugar levels drop and your body begins to slowly consume itself. This is often referred to as “the hump” and when combined with the almost guaranteed lack of sleep and dehydration experienced at the beginning of many scenarios it can be a steady downhill struggle leading to low levels of energy and even irrational thinking. At this point, we have to think logically.
In a real life survival scenario, there’s no medical team standing by with a satellite phone to call in the rescue chopper if you get bit, stung, or trampled. A person in this scenario is solely responsible for his or her own well-being. This means that romantic as it may seem to take on that herd of elk with your little pointy survival stick, it will likely not end well for you.


THINK SMALL

When on the hunt for food, we must always weigh risk verse reward. This risk can be presented by the intended prey itself, such as in the case venomous snakes, or any other wild animal that kicks, claws, or bites back. However, this risk can also be caloric, by which a substantial amount of calories are exerted in order to collect food or hunt animals that may contain very little nutritional or caloric value. With this in mind, one strategy is to go after harmless and readily available food sources such as crabs, frogs, fish etc. It doesn’t take long to get those small numbers to add up to a big number once you get the hang of it.

The most effective long-term solution to the calorie game is setting primitive traps…lots and lots or primitive traps! Once enough traps are properly set, they should over time produce meat sources with very little exertion. However, in addition to a trap line, some sort of small game hunting tool should be made to take advantage of any easy kill opportunities you might stumble upon. Being an opportunistic hunter allows the lost survivor to go about their daily business of collecting water, gathering firewood, shelter maintenance, and checking traps all while being ready for potential food sources as they present themselves.
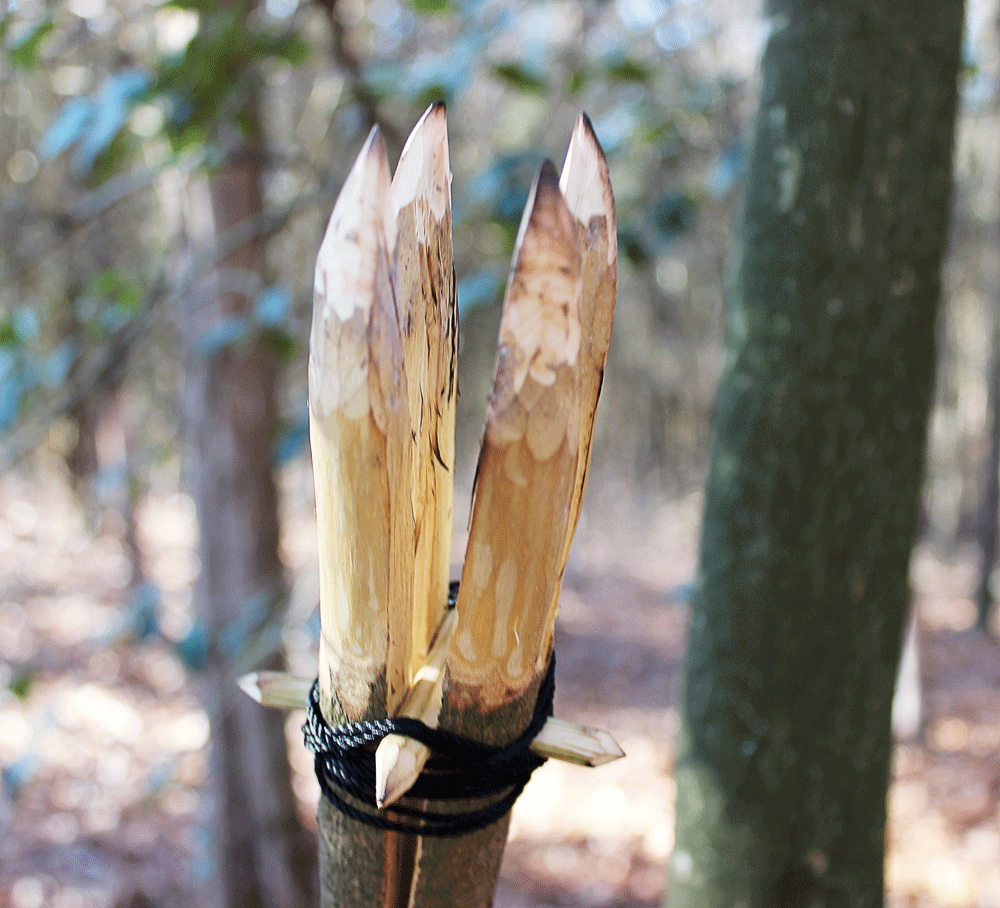
“FROM THIS SAPLING CUT YOUR SPEAR POLE A FEW INCHES TALLER THAN YOU STAND. THIS WILL KEEP THE SHARPENED POINTS OF THE SPEAR WELL ABOVE EYE LEVEL JUST IN CASE YOU TAKE A FALL WHILE TREKKING THROUGH THE FOREST.”
A multifunctional gig and spear combination is ideal for this as it is quick and easy to make, provided you have a blade. This hunting tool will consist of a two-sided spear. One side features a four point gig which is ideal for the majority of small game as it allows you to not only pierce, but also pin animals down so that they can be quickly and humanely dispatched or kept as live food for later. The other end of this hunting tool features a single sharpened point for self-defense or dispatching a larger animal that may get caught in a trap.


MATERIALS NEEDED
Begin by selecting a straight green sapling that measures 1 to 11⁄2 inches in diameter. If possible, select a hardwood variety such as maple, oak, or hickory as this will add to point durability and the overall longevity of the spear. From this sapling cut your spear pole a few inches taller than you stand. This will keep the sharpened points of the spear well above eye level just in case you take a fall while trekking through the forest. While you’re at it, go ahead and collect two wooden pegs about 3 inches in length and the diameter of a pencil.
Usually, these pegs can come directly from the sapling you’ve harvested for your spear pole. You’ll also need a 3- or 4-foot section of strong cordage. Paracord or bankline are the most desirable; however, any strong vine or other natural fibers will work just fine.
CONSTRUCTING THE SPEAR

Wrap your cordage around the spear pole about a foot down from the thicker of the two ends. This will keep the pole from splitting out too far while you baton. Place the thinner end of the spear securely up against the base of a tree or boulder and with your knife baton 10 inches straight down through the middle of the pole. Retrieve your knife, rotate the spear 90 degrees, and repeat the batoning process. At this point slide the two wooden pegs that you cut earlier in between the splits you’ve just made so that they cross each other. This will spread the four sections of your gig apart so that you can get your knife in between to sharpen them into points.

Once the points of your gig are sharpening, remove the cordage that you previously wrapped around the shaft so that it does burn during the fire-hardening process. Fire hardening is an ancient technique for speed drying green wood. This can be achieved either by way of jamming the points of the gig below the coals of a hot fire or by slowly rotating the points just above the flames of a fire. This process will typically take 10 to 15 minutes however, you should use your own judgment. Once the points of the gig are fire hardened they will often times be a slightly different color and carving into them will require a lot more exertion than previously. Be careful not to burn your gig during this process.

Once you are satisfied the points of your gig have been fully hardened, perform a final sharpening and remove any leftover bark from the points. At this point, you’ll want to lash the wooden pegs to the shaft of the spear. This will help to prevent the spear from splitting out during impact. With one end of your cordage make a loop and press it against the shaft of the spear near the pegs. With the working end of cordage begin to wrap the spear over top of the loop you’ve created making sure to leave a two or three-inch tail.
There is no specific way the spear must be wrapped but make sure to wrap both under and above the pegs. Before the cordage runs out, slide the working end of the cordage through the loop you created earlier and give a stout tug on the tail end. If done correctly this will cinch the pegs up nicely with the spear and prevent any further splitting from occurring.
With the gig end of your spear completed, you can then switch gears and begin work on the much simpler spear point. You may choose a simple yet durable rounded spear point or for a little extra penetration, a more traditional spear point shape. Just be sure to repeat the same fire hardening for this end of the spear as well.
Editors Note: A version of this article first appeared in the April 2015 print issue of American Survival Guide.