

Your much-prized gear and equipment won’t do you any good if someone steals it, and sometimes keeping your stash a secret is difficult to do when your neighbor takes a cursory interest in being prepared but doesn’t actually want to do any of the work. By explaining what to buy, where to store it, and what to do with it when you need it, you’ve exposed yourself to a possible unsavory situation when something does hit the fan. When, in the middle of the night, days after molten pyroclastic flows from a sudden split in the tectonic plates have decimated your housing tract and everything in a three-mile radius, you wake up in your backyard tent to discover that same neighbor digging through the rubble of your charred garage looking for your ammunition. Well, the joke is on him because your ammo and some other essential gear is safely stored, literally under his feet.
For hundreds of years, pirates buried the treasure plundered from ports and ships on various island hideouts across the Caribbean. For example, Norman Island, about five miles southeast of St. John in the U.S. Virgin Islands, was a place well known for its buried treasure, most famously for the 55 chests of silver coins plundered during the mutiny of the Nuestra Señora de Guadalupe in 1750.
Pirates learned it was the best way to keep the booty safe from other pirates and the various governments looking to recoup their losses. Much like putting your money in a bank where others can’t reach it, today, burying your valuables was a sound practice in an insecure climate, ensuring that those items will be secure (as long as they are well hidden). What if there are no banks tomorrow? This is even more important for things you can’t keep in a bank, like ammunition, weapons, emergency supplies, and anything you will find useful in the days and weeks that follow certain catastrophe.

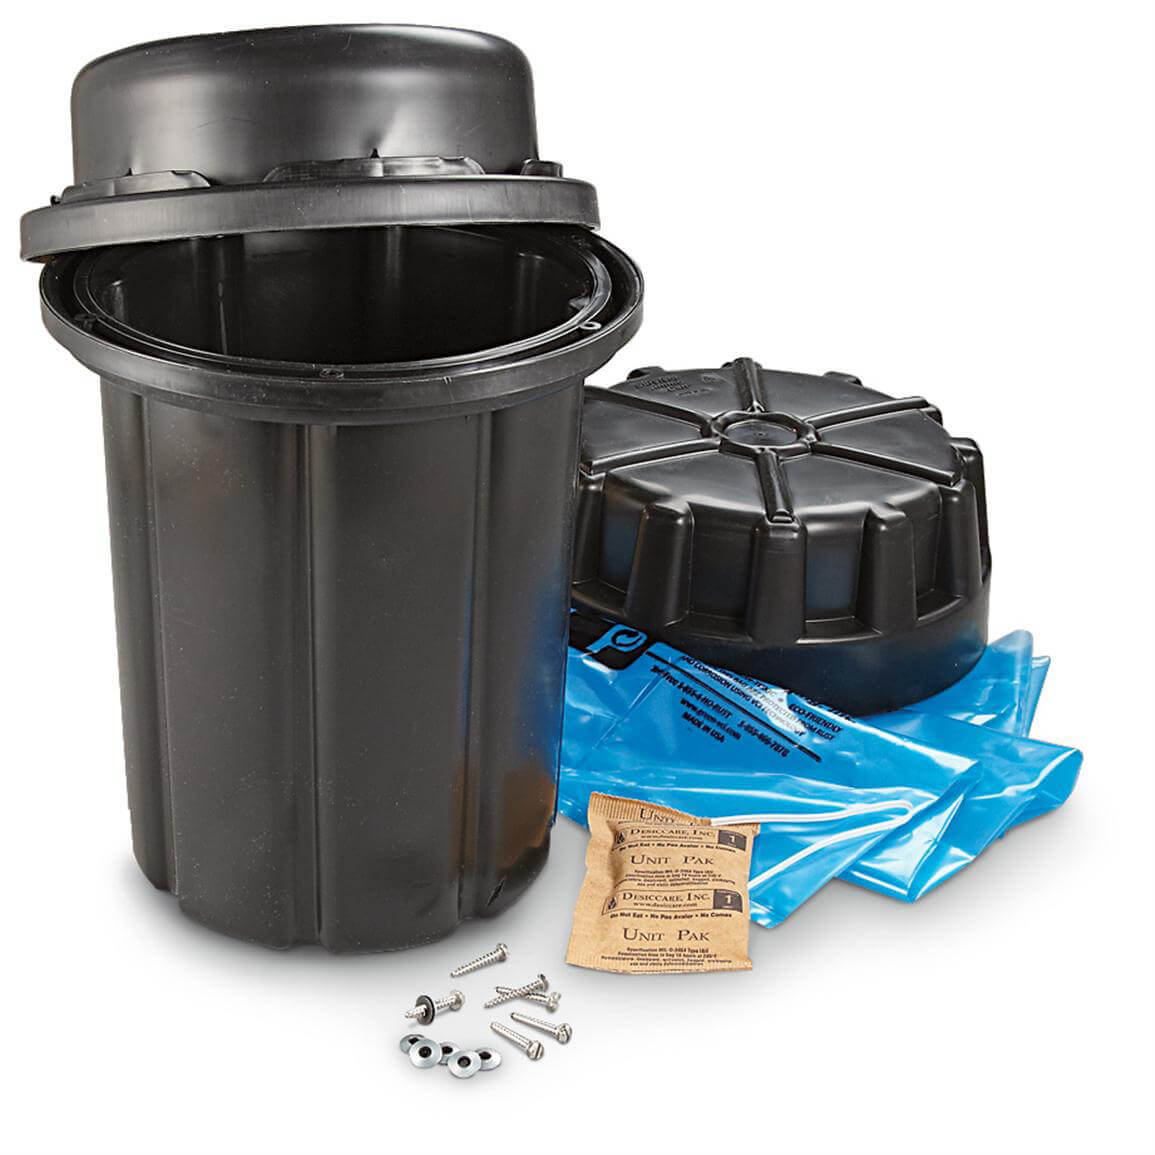
However, you can’t just dig a hole next to the azalea bushes by the wall, dump a bunch of stuff in it and cover the hole with dirt. In a matter of days, moisture will rust anything metal and deteriorate everything else. By the time you return, there will be nothing but a useless rusted hulk. You need a secure system in which water and air cannot reach, as those two elements are rust’s best friends. MTM’s Survivor Container is such a system.

It features a rugged, bucket-style body with two o-rings that seal the lid and a protective outer cap. The inner lid is held down with multiple screws to provide a secure seal from the elements found underground, while the larger top fits in place over the whole assembly. Each container includes a heavy-duty vapor corrosion inhibitor (VCI) plastic bag plus a moisture-absorbing desiccant pack. The 12.4 x 7-inch internal dimension equals a capacity of about 273 cubic inches, which is about 4.5 liters of space. According to MTM, the Survivor Container will hold up to 600 rounds of .45 ACP, .223 ammo, or about 15 to 20 AR15 magazines. Its capacity is exactly the same as a standard .50 caliber ammo can.

Hiding Your Stash
It is important to keep the location of your container(s) a complete secret, otherwise it defeats the purpose of having them if others can get at them. The hole can be located virtually anywhere you’re confident nothing will be built over it, which is easy to do on your own property. But if you are creating breadcrumbs to be found in an emergency situation, be relatively sure that when you go to dig up your stash someone’s house hasn’t been built over the top of it.


Where to Dig?
For best results, the container’s placement should be out of the way of trees and utilities. Dig the hole somewhat deep, at least twice the height of the container, or about three feet down, giving you about 18 inches of cover. However, the less dirt you remove from the hole, the less you’ll need to return, so make your hole just wide enough to shoehorn in the container. When you go to cover up the container returning all of the dirt is impossible because of the mass the container takes up. But the dirt you do return will compact over time, creating a divot. This is obvious to anyone looking for something buried when they come across a depression in the ground. Mounding the dirt slightly will combat this, but it is a great idea to return the area to exactly what it looked like before you started digging. Were there leaves and grass strew about? Replace them and leave no trace that you were there.

“…you can’t just dig a hole next to the azalea bushes by the wall, dump a bunch of stuff in it and cover the hole with dirt…you need a secure system…”
Packing the Survivor Container
Like bagging groceries at the store, put the heavy things on the bottom. You know the container will be buried upright (it has to be), so if you plan on included a handgun or a large box of ammo, put them on the bottom, so the more fragile items, like the pouches of water or the light sticks won’t be damaged over time.

Remember, the concept of this system is a safety net to be used in an emergency situation. It isn’t like a safety deposit box at the bank or the lockers at the skating rink. Once these items go into the ground and you cover them with dirt, the only reason you should be accessing them is if you are on the run and in mortal fear for your safety or civilization has crumbled down around you. Otherwise, they’re there for good.

Don’t forget the desiccant pack. Though the container is designed to keep moisture out of it, it won’t remove the moisture you introduce at the time of packing. The silica gel can adsorb about 40 percent of its weight in moisture and can take the relative humidity in a closed container down to about 40 percent.
“Remember, the concept of this system is a safety net to be used in an emergency situation. It isn’t like a safety deposit box at the bank or the lockers at the skating rink. Once they go in, they can’t come out.”
Hidden Treasure
When your world as you know it comes to an end and everything in your life is decimated beyond use and function, at least you’ll have the reassurance that there is a small but smartly packed container of gear, weapons, equipment, resources waiting for you in a musty, dark hole beneath the Earth that only you know about. MTM’s Survivor Container is exactly that, a container to ensure your survival.


MSRP: $19.95 each

Probably more important than taking the effort and time to collect and bury a secret cache of ammo, gear, and equipment is your ability to find it when you need to. The most reasonable way to do this is to keep very specific notes and a map as to where they are all located. If the containers are buried on your property, mark them with a distinguishable rock or a stepping stone. Barring that, place your containers a specific distance from certain landmarks; for example, 15 feet from the northeast corner of the patio or equidistant between the two pine trees behind the garage. Doing so will create a mental image that will last a long time. If you have buried multiple containers, it would help greatly to make a map of your yard with them located. Place that map somewhere secure for safe keeping.

What if you lost your map or your memory, or the landscape outside your four walls has changed so greatly that locating your containers by landmarks is impossible? What then? Well, if you followed the suggestions above by placing a couple of aluminum cans a few inches below the surface where each of your containers are buried, you should have little difficulty locating them again by using a metal detector. The MX300 Stryker Lite metal detector comes with a touch screen. It is easy to operate and uses GPS technology allowing you to save up to 10 locations. Use the large touch screen to select elimination modes, HD audio tones, and to check signal strength and depth indicators. This metal detector can detect quarter-sized coins up to 11 inches away.

Made mostly from plastic, it is very strong and well built. The double-D coil is rugged and even submersible. The controls are easy to use and very responsive to changing soil types and terrains. With a little practice, we were able to easily locate our container, which was buried in an open field at about 18 inches. To be fair, the metal detector located the aluminum cans we buried on top of the container, but the results were the same. We were able to retrieve our cache.

Of course, metal detecting is a wonderful leisure sport enjoyed by thousands of people, but that is a story for another time.
SPECIFICATIONS
- 11-inch submersible double-D coil detects metal while eliminating trash and junk
- Touch screen technology with 5-inch display allows simple touch operation
- GEO-X GPS technology allows saving and locating up to 10 waypoints
- Precision Search Technology (PST) increases accuracy to reduce dig size
- Easy-to-tune and easy to use back-lit interface with depth indicator
- Easy built-in trigger activates pinpoint mode with a simple squeeze
- Two digit target ID and meter tells you what’s in the ground before you dig
- 5mm headphone jack
- 8HD identifying audio tones and headphone jack
- Four elimination modes: All-Metal, Coin, Jewelry and Custom
- Eight metal categories and highly adjustable discrimination
- Built in LED light to help see in the hole while digging
- Uses 6AA cell batteries
MSRP: $299.99
The rear-view mirror of your Jeep is filled with fire and smoke, as the last remnants of your town crumble into chaos. You’ve escaped! Ahead, in the wind-swept deserts miles from anywhere (and anyone) is your secret bug-out shelter you’ve been working on for years. Aside from a small hatch that leads underground, it is virtually undetectable but spacious for you and your family. Getting there might be a problem. Checkpoints and thieves may block roads. Your cash, food, or water may be confiscated. You may end up having to walk the last 20 miles. What then? What if you’re left with nothing, and the means to even get to your bug-out shelter is compromised to the point that you might not make it. What then? Luckily, you were smart. You’ve thought of everything.
Along the route to your bug-out shelter, you’ve placed a series of breadcrumbs in the form of MTM Survivor Containers. Each one, hidden underground along the route to your shelter, contains enough supplies to keep you and your family going until you’ve reached the next one. Like Hansel and Gretel, you’ve created a series of breadcrumbs to find your way to safety. Additionally, scattered around your bug-out shelter, you’ve buried several more, each one a redundant cache of gear you might need if stuck outside your shelter and not able to return until it is safe (or not being watched).
Editor’s note: A version of this article first appeared in the May 2015 print issue of American Survival Guide.