

The lights go out. You’re in darkness. It could have been a car crash that took out the neighborhood’s transformer or a blackout from too much stress on the power grid. Even worse, it could have been the ice storm that just hit and brought down trees on the power lines. It could be weeks before the power is back online.
You don’t know why and you might never find out. And right now, you don’t care. Your priority is lighting.
The traditional approach—the quick fix—is to reach for an LED flashlight or a battery-powered LED lantern. But this time, it’s different: There is no power when you flick the switch and, as far as you can ascertain, the batteries are drained somehow or the circuits are fried (maybe a HEMP damaged the circuitry after all).
You still need light and, luckily, you still have your senses. You find a BIC lighter in your pocket and then the candle from your end table. Your light problems are temporarily addressed … but that candle will eventually burn out. What’s next?
CAN OR BOTTLE LAMP
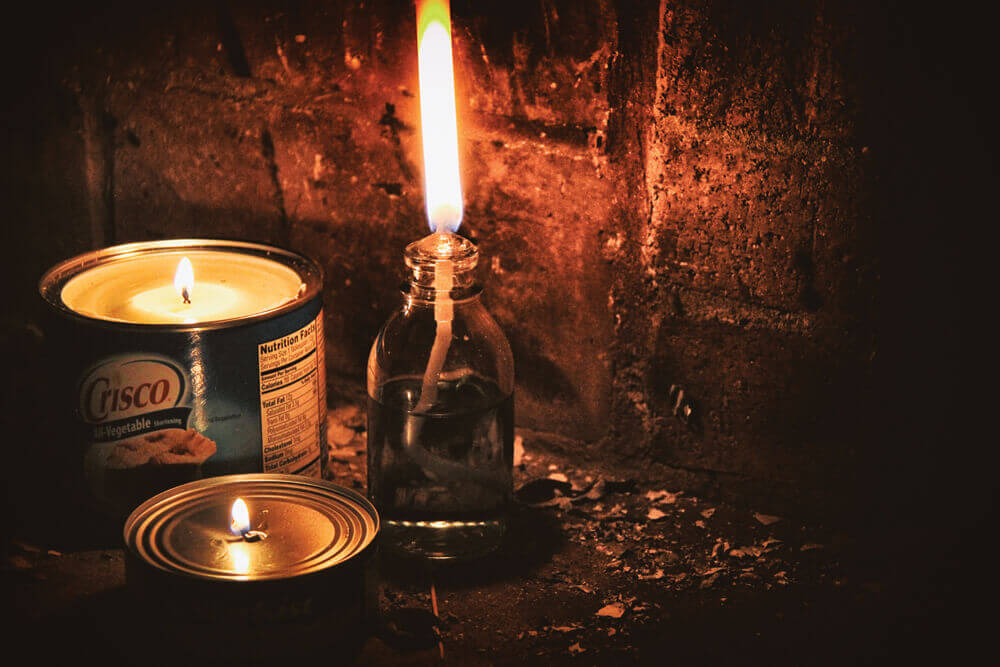
If open flames are not a concern, one of the quickest and most field-expedient lamps made is the aluminum can or glass bottle variety. The only items needed for the most basic light are a container, fuel and a wick. Improved versions include those with wicks wrapped with lightweight wire to provide rigidity, along with heat reflectors made from folded aluminum flashing or an aluminum can opened into a hollow cylinder. If this type of lamp is used outdoors, citronella oil can be used to provide insect protection as well.

A word of caution: The taller and narrower the can, the less stable the lamp will be. Toppled liquid fuel lamps can cause fire to spread quickly if the fuel is absorbed by another “wick.” This can be clothing, carpeting or anything absorbent and flammable. A pot of soil can be used to house the lamp indoors, providing a stable base and an absorbent medium for spilt fuel.
COCONUT-OIL ISLAND LAMPS

During the Japanese Imperial Army’s occupation of the Philippines during World War II, my grandfather taught my father and his brothers how to create jungle lamps. A seashell was used as the container, and a piece of cotton or canvas was used as the wick. A small chunk of cork was used as a float to keep the flame from extinguishing itself if the wick sank below the surface of the oil, which was made from the plentiful coconuts found in the forest.
The benefit of this type of emergency lamp is the ease in determining how much fuel remains, as well as the stability provided by the seashell’s wide base. Sea shells probably aren’t available in your area, but any small, shallow bowl of similar shape may be used.
The same concept applies whether your container is natural or manmade. One word of warning with this type of lamp, however: If a glass dish is used, don’t let it get too hot—if the fuel level gets too low, the glass might shatter.
BIRCH BARK TORCH AND BIRCH BARK OIL
There are natural, long-term lighting issue fixes found right in the forest. Birch trees are known for their tinder potential, and enough articles have been written about collecting bark and using it for emergency fire starting. Birch has other fire-related applications, as well. When properly processed, birch bark can be used for torches, and oil can be rendered from the bark.

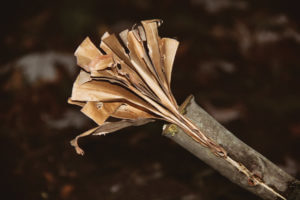
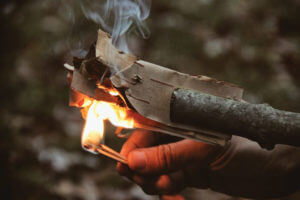
A birch bark torch is simple to make in relatively no time. Use a sharp knife and remove thick layers of bark down to the inner bark of the tree. Take the strip of birch bark and create 1- to 2-inch folds—similar to an accordion shape. Cut a green wood handle to size and split it down the middle at one end. This split will accommodate the folded birch that will ultimately be lit, thereby creating the torch.
Prior to inserting the birch bark, wrap a cord just under the split to prevent it from splitting further. Light the torch and hold it at an angle (as any torch should be) to prevent flaming material from landing on top of your hand. When the birch bark is nearly burnt out, invert the torch or hold it sideways to direct the flame away from the notch. Then, add another folded section of birch bark.
Birch bark can be used for quick torches such as this one, and its oil can be extracted for use as lamp fuel or lubricating grease. You can easily extract birch oil by building a fire over two cans buried in the ground.
Pack one can with white birch bark and make a single pinhole in the bottom. The other can sits against the bottom to collect the oil that will drip from the hole in the top can. The heat from the fire will do the work. The oil extracted has a very strong oil smell and can be used in a variety of ways, including for lamp oil.
RECYCLED CANDLE
Unused wax can be recycled and made into “mutant” candles. You can probably find wax throughout your home and then recycle it to make candles: For instance, crayons from the kids’ playroom, paraffin wax from the kitchen and even beeswax toilet-ring seals can all be melted using a double boiler.

If you don’t have a double boiler, all you need to do is float a metal bowl or aluminum can in a pot of boiling water. Make homemade wicks out of twine and some simple ingredients; fashion wick tabs from scrap metal, washers or soda can tabs. Of course, these candles will lack the refinement of the store-bought variety, but they will work just as well.
CRISCO OR TUNA CAN

Crisco (vegetable shortening) can be used to make a candle that serves double duty by providing light and as an emergency food source.
All you need is a can of Crisco, a straw and some twine made into a homemade wick. As an alternative to twine, a piece of tightly rolled up paper will work. Depending on the size of the wick, as well as the quantity (up to three wicks can be used with a single can as long as they are not positioned too close to the edge of the can. Otherwise, the can might catch fire, as well), the can of Crisco will burn for hours.
A straw is used to create a channel for the wick. The best time to do this is when the Crisco is soft (frozen or cold Crisco will affect the construction of this type of light).
If the Crisco is stored for extended periods, the expiration dates should be checked if it is also meant to be used for a food source or cooking. When burning this candle, make sure to put it in a fire-resistant container, such as a pot or pan, in case the shortening can leaks.
A similar emergency light source can be made from a can of tuna fish. This style of candle will only work with tuna suspended in oil—not in water, for obvious reasons. To make this type of candle, punch a single hole in the can and then insert a food-grade wick into the bottom of the can. (I stress the term, “food grade,” because the tuna should not be wasted after the flame goes out.) Once the wick is saturated with oil, light it, and the candle will burn for hours.

CANDLE TIN
If the thought of creating candles and lamps is unappealing, there is a commercially available candle that might be right for you.
EXOTAC, a company known for unique fire starters, match cases and the BIC lighter fireSLEEVE, also offers a lineup of purpose-built survival candles for emergency lighting and heat. Available in two configurations— slow burn and hot burn—these candles ignite easily, store and transport securely with a screw top, and are capable of boiling 8 ounces of water in 18 minutes.
Measuring fewer than 3 inches across and weighing 5.5 ounces, the large survival candles are made from natural beeswax and burn longer and hotter than lesser-grade candles. The slow-burn candle will last about 30 hours. When used sparingly during the darkest hours of the night, these candles can last three nights or more.
For the “space conscious” among you, there is a miniature version of this candle system: the candleTIN Nano. Weighing in at only 0.9 ounce, the candleTIN Nano is perfect for the ultralight backpacker or anyone concerned about the weight of their gear. This smaller candle is perfect for storing inside emergency kits or along with an emergency blanket as part of a rewarming kit.
LIGHT AT THE END OF THE TUNNEL
The methods described in this article are meant for emergency use only. Should a blackout be expected, prepare traditional and safer means of lighting—for example, LED, propane and kerosene lighting devices —beforehand. However, there may come a time when risking a fire hazard is more important than living in the dark.
Given the availability of resources, one should think logically about which fuel sources should be exploited first and which ones will be a last resort, as well as which fuel sources are available at home and which can be found on the run or on the go. Surviving and living by candlelight are far different than living with flashlights and lanterns. Actions are more deliberate, and life takes a slower and more cautious pace.
While candles are among the causes for house fires every year, remember that candles and torches were used for thousands of years prior to electricity. There is no reason to fear them if you use them properly and with discipline. The human race was able to advance and move out of the Dark Ages once before—and can again, if an electrical outage such as a HEMP were to strike the United States.
Until then, though, you don’t have to live in the dark.
Editors Note: A version of this article first appeared in the March 2016 print issue of American Survival Guide.