

Imagine any SHTF-scenario. Now imagine that with an unfortunate event thrown in, such as losing all your survival gear in one go. No knife, no axe, not even a waterproof match.
What can you do now? One part of the solution to improve your situation is by finding rocks to fashion a basic, but essential, tool – specifically, a stone axe.
Why make a stone axe?
You may wonder, “why not a stone spearhead or a stone knife?” The stone axe is your “starting tool”. Other tools like arrowheads, spear points or knives, can be made after you’ve addressed your immediate needs for survival — warmth and shelter. A stone axe is what you’ll need for cutting wood for fire or for making a shelter. Compared to other tools, a stone axe in this instance is simply more useful and should be on top of the tool priority list.
Flintknapping
Making a stone axe is not just a matter of knocking two rocks against each other. To properly fashion a stone axe, you need the right materials and a degree of precision when
“flintknapping”. Flintknapping is the process of knocking out flaked or chipped stone tools from a source rock with a couple of “hammer rocks” (one hard, one soft), as practiced by primitive man in prehistoric times. Knives, dart points, arrowheads, scrapers, adzes and axes are just some of the end-products of flintknapping.
The source rock
This is the rock you’ll be knocking out or “knapping” your axe head from. Ideally, the source rock should be one that is sturdy but brittle. Types of rocks that make good sources are flint, chert, chalcedony, quartzite and jasper.
Of these rocks, chert and flint can be abundant throughout the Midwest, wherever there are limestone or dolomite deposits. These kinds of rock, when struck with your “hammer” rock, fracture or break in a pattern called a conchoidal fracture, also known as a “flake”.

Equally as important as the source rock’s composition is its shape. A good source rock to shape a stone axe head from is a large, straight slab with perpendicular edges. This shape makes it easier to pound out the edges, preventing injury to your hands, fingers or other body parts. Find a slab that’s not porous and has no holes or flaws in it. Another good shape for a source rock is one that’s already round and smooth, like those at the bottom of a river or lining a stream that’s been shaped by years of water erosion. Choose a rock of this sort that’s roughly the size you’d like for your axe.
What to look for
It takes time to become adept at knowing which rock is suitable to use as your source. Failing that, use this short checklist to determine whether the rock you have can be used to make your stone axe:
- Does the rock crumble easily?
- Can you grind it against another rock?
- Can it be split cleanly?
- Does it produce a flake when struck with a glancing blow, and is the resulting fracture mussel-shaped?
If the answer to these questions is “yes” then you have found a good source rock and can proceed to knapping it into shape.
The “hammer” rocks
The other rocks are for knocking the axe head out of the source rock.
One hammer rock should be “hard” and the other “soft”. The hard rock hammer should be sturdier and not prone to flaking or splitting like your source rock. The “hard” hammer is for doing the rough work of chipping away at your source rock, shaping it into an axe head. This is called percussion flaking.

The “soft” hammer is for more delicate, precise work, and it’s not made of rock. Typically the soft hammer is comprised of antler, bone or wood. Chipping at the source rock with a soft hammer calls for a less forceful approach. The soft hammer is likewise used for refining the edges of the source rock, by pressing on small areas to remove unwanted knobs or raised spots and refine the edges. This is called pressure flaking.
Crafting the stone axe
Now that you’ve gathered the necessary raw materials, it’s time to make your stone axe.
Follow these steps after donning good quality protective eyewear:
- Find a stable, level flat surface to work on, preferably in a well-ventilated area.
- Lay your source rock on the flat surface and keep it steady with your non-dominant hand.
- With the hammer rock in your dominant hand, slowly chip away at the source rock until it forms the shape of an axe head. Do remember that glancing, controlled blows at angles less than 90 degrees are preferred over perfectly-perpendicular power strikes.
- Refine and sharpen the edge by using another flat slab as a whetstone. Pour some water on the “whetstone” and with slow, back-and-forth strokes, grind down any irregular peaks and sharpen the edge.
- To further polish and refine the edge, scrape the edge on bark or animal hide if desired.
- Set aside the axe head in the meantime, and proceed to making the wooden handle.
The handle
In a worst-case scenario, you can actually use the shaped stone axe head as a “hand-axe”, but crafting and incorporating it onto a handle makes it safer, and easier and more effective for bushcraft and self-defense purposes. For this guide, we’ll still show you how to make a working handle to widen your options.
To craft the handle, follow these steps:
- Get freshly-cut “green” wood from a young tree. A branch or sapling two to three feet in length will suffice. You can use the axe head to cut down a sapling or branch.
- Ensure that the wood is not too thick to hold, or too narrow to accommodate your axe head.
- Strip off the bark; use a mussel-shaped flake as a scraper.

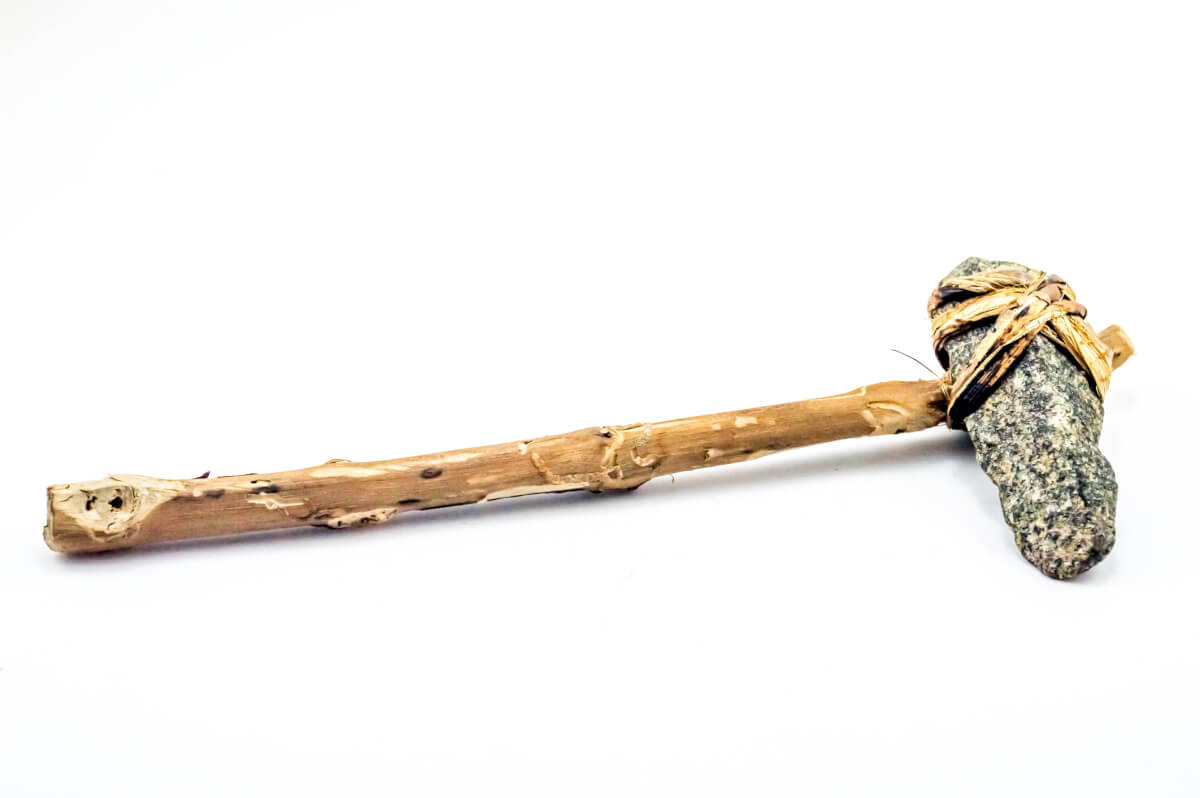
To place the axe head in the handle, there are two methods. The first method uses cordage, while the other method doesn’t.
Method 1 (Requires the use of cordage):
- With one of the sharp flakes, carefully split open one end of the handle. Make the gap large enough to fit the axe head, and as symmetrical as possible.
- Gently slide the axe head into the split.
- Secure with cordage like wire, fishing line, paracord or spruce roots. Wrap the cordage around the handle below the head. Then wrap the cordage in a diagonal direction across and on top of the head and around the handle above the head. Finally, wrap cordage from the handle above the head diagonally across the head to its bottom so that it forms an “X” on both sides of the axe head.
Method 2 (If you don’t have any cordage):
- If you use this method, you’ll need to select a handle that has one end about 30% to 40% thicker than the back of the axe head.
- Mark a spot a few inches below the top of your handle with your axe head; take note of the axe head’s width.
- Use a sharp rock and your stone hammer to carve out a hole in the center of the handle a few inches from the top of the handle.
- Continue carving, widening the hole just big enough to fit the axe head.
- Heat a long stick in a fire until it’s burning and smoking; blow out the fire, keeping a red-hot ember on the end of the stick going.
- Run the hot stick along the inside of the hole in the handle, smoothing out the hole so the axe head fits perfectly.
- Insert the back of the axe head into the hole.
- Carefully hammer the front of the axe head further in with a piece of wood until it’s secure. Small gaps between the handle and axe head are ok and will help prevent the head from separating from the handle during use.

Using your stone axe
Stone axes are unlike their steel cousins in that they can’t cut at the same angle. If you chop at precisely 90 degree angles, you risk breaking the stone axe head due to “side-slap”.
To cut down a standing tree, chop at it at an angle, never with the axe perfectly horizontal. If chopping a piece of wood lying on the ground, chop it at an angle just shy of 90 degrees.
Also, advise bystanders to stay well clear of you when you use the stone axe. Debris flies further with a stone axe than a steel one and can cause serious injury. Keep any bystanders in at least 10 feet away from your work area.

Important precautions:
- When knapping the stone axe head, do so in a well-ventilated area, and cover your nose and mouth with a bandanna or scarf. Don’t do this in confined spaces like in a cave or tent. Knapping creates tiny silica dust particles, which you can inhale. Once inhaled, these particles can make micro-incisions inside your lungs, causing inflammation and scar tissue to form. This lethal condition is known as silicosis, which is both irreversible and incurable. Your lungs can’t expel these particles and they will continue to develop scar tissue, which will eventually kill you.
- Remember to protect your eyes and hands. The razor-sharp flakes or shards can cut your hands, or fly into your eyes and cause injury or blindness.
- Slow and steady knapping is preferable over knapping quickly and repeatedly; working on the source rock at a relaxed, unhurried pace prevents bits of rock from flying all over and getting into your eyes and kicking up too many particles.
- It’s not advisable to do any flintknapping without some sort of eye protection, but if you have no means to protect your eyes, you can lessen the risk of eye injury by turning your head away before you make a hard strike.
- An advantage of making a stone axe is that sometimes nothing goes to waste. Take the time to inspect the flakes; these can be used as blades, arrowheads, scrapers or small hand-axes.

Final notes
If you’re ever in a survival situation and are caught empty-handed for any reason, crafting a stone axe is a viable albeit temporary solution. A crudely-crafted stone axe can mean the difference between life or death when you need to make a fire, a survival shelter or defend yourself. Remember that crafting it doesn’t have to be perfect; your stone axe only needs to be sharp and sturdy enough to see you through until you are rescued or you find your way back to civilization.