

If you’re ever outdoors live off the grid or are forced to leave the comforts of home because SHTF, there’s still a way to cook and savor old-fashioned home cooking. How? Get an indispensable piece of cookware our forefathers depended on – the Dutch oven.
Technically, Dutch ovens are the granddaddy of all conventional ovens, since they can accomplish most recipes that can be done with a modern oven. The main differences are cooking time, ease of use and cleaning.
Colonial Connection to the Dutch Oven
As you may have guessed, the Dutch oven was cooked up by the Dutch. Known in the Netherlands as the “braadpan”, Dutch traders were responsible for bringing their namesake oven to British shores. But it wasn’t until the late 17th century that an English metal smelter named Abraham Darby traveled to the Netherlands to learn how to improve his company’s technique of forging cast iron crockery. Applying what he learned with his own novel method of using coke instead of charcoal for smelting, Darby began manufacturing his own “Dutch ovens”. The British-improved Dutch ovens were then carried over to the New World. Famous explorers Lewis and Clark used them while mapping out the American Northwest, and the Dutch oven remains the “official state cooking pot” of Texas, Utah and Arkansas. The use of both the term “Dutch oven” and the oven itself has endured in America for 300 years and counting.
Cast iron, enamel-coated or aluminum?
Nowadays, Dutch ovens come in more shapes and materials, notably in aluminum and enamel-coated besides the usual black cast iron. Enamel-coated ones are not suited for use over a campfire, ruling them out for survival or outdoor use. With their coating susceptible to chipping and contaminating your food if the fire is too hot, enamel-coated Dutch ovens are better suited for domestic use.
Aluminum Dutch ovens have a couple of advantages, namely they weigh less and are easier to care for, they weigh a third of their iron cousin, and it’s not necessary to “season” an aluminum Dutch oven. You can also use soap, water and steel wool to clean an aluminum Dutch oven on occasion to get out stubborn food residue. On the flipside, the drawbacks of aluminum versions are that they’re less durable, don’t retain heat as well and can literally melt if the fire is too hot, whereas cast iron Dutch ovens better withstand higher temperatures. When it comes to cost, however, old-fashioned cast iron Dutch ovens are the cheapest of the three, and even if you find one that’s rusty and over 100 years old, it can be restored like new and used again and again.
What to look for
What makes a “good” Dutch oven as opposed to a “substandard” one? There are certain qualities you should first look for, to ensure that the Dutch oven works. If it lacks any of the prerequisites below, look for a better one.
- Get a Dutch oven with three legs. The legs should be straight; not bent, cracked, or missing. A flat-bottomed one is harder to use than one with a round bottom.
- Ensure the fit of the lid is flush with the oven’s lip. The lid should not be cracked, bent or warped. There should be a perfect seal to keep the heat in, and avoid spillage when the contents boil or when in transit.
- The lid has to have a loop handle. An oven with the lid broken, missing or bent is a hassle to use and you risk dropping the lid and getting injured.
- Check the overall thickness of the metal for inconsistencies. Older Dutch ovens, due to their relatively crude manufacture, may have areas that are thicker or thinner. These variations in thickness can cause cooler or hotter areas when cooking and cooling, and also risk cracking or warping.
- Make sure the bail or wire handle attached to the oven is not damaged. The handle must be sturdy enough to carry the oven even when it’s full; a damaged or weak handle can be dangerous especially when the oven is hot.
- Dutch oven sizes range from 8 to 22 inches in diameter. To get the hang of cooking with a Dutch oven, get one that is 12 inches in diameter.
Season it first
“Seasoning” or “curing” the Dutch oven is crucial to prevent it from rusting and for keeping food from sticking. This process is also what gives food cooked in the oven a distinct flavor, and helps make the oven last through the years. If the Dutch oven you have is a rusty antique, clear out the rust by rubbing it off with fine-grain sandpaper. Clean out the entire thing, inside and out. Now that your oven is free of rust, follow these steps to season it:
Step 1.
Wash the entire oven well with hot, soapy water. This must be done to get rid of the metal dust from refurbished ovens, and the waxy coat of a new one.
Step 2.
Heat the Dutch oven with the lid on at 200 degrees (F) in your “modern” oven. This can also be done on a fire with coals, but a conventional oven is more exact.
Step 3.
While the oven is hot, drop a spot of oil, shortening or lard onto the Dutch oven.
Step 4.
Next, put on a pair of leather gloves and, with a clean cotton cloth, wipe and spread the oil, shortening, or lard over the entire surface of the oven, inside and out.
Step 5.
Once the chosen substance has been spread on the Dutch oven, leave it in your conventional oven at 350 degrees (F) for around an hour. Expect some smoke to result from this process.
Step 6.
After an hour, remove the Dutch oven and set it out to cool gradually. Don’t immediately place it under running water or toss it in the snow as the abrupt change in temperature may cause it to warp or crack.
Now that your Dutch oven has been seasoned, it’s ready for cooking. Refer to the maintenance section to know how to clean the oven and keep its seasoning.
Using the Dutch oven
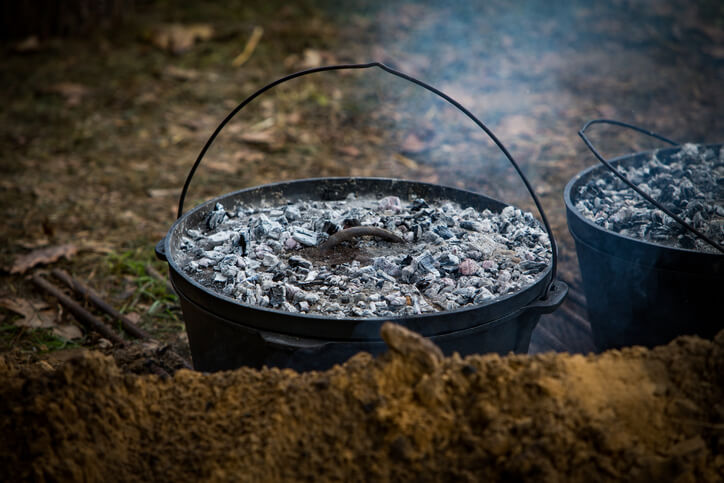
Patience is important. It’s not as simple as piling ingredients into your Dutch oven, leaving it over a fire, then hoping for a good meal. A bit of meticulousness is called for, since you need to season the oven beforehand, and you have to keep a watchful eye to control the heat. It takes some practice to whip up a meal that isn’t overcooked. If you’re cooking in a log cabin, hang the oven over the fireplace. If cooking outdoors, make an enclosed space to lay down hot coals; a shallow pit is a good idea to keep stray embers under control. Cooking by hanging the Dutch oven over a tripod is also an option.
To effectively cook with your Dutch oven, take note of these tips:
- Depending on the recipe, you may either cook with the lid on or off. Wet meals like soups and stews will definitely require that you have the lid on for a while, then take it off to prevent the meal from overcooking.
- Some recipes will need heat to be under the oven, or from both the bottom and the lid. Heat the lid with charcoal briquettes or coals the size of briquettes. This is done for pot pies, bread, apple crumble or pizza.
- It’s okay to occasionally lift the lid and peek at the food to see if it’s cooked. Control the heat by adding or removing charcoal briquettes on the lid or at the bottom of the oven.
- You can also half-bury the oven in hot coals to slow-cook your food. This is sometimes called a “long-cook pit”.

- Plastic or foil pot-liners of the right size can also be used in your oven to simplify cleaning. Dispose of the pot-liners properly after use.
- The lid of your Dutch oven can be used as a frying pan. Simply turn the lid upside-down and place it over hot coals; you can then fry bacon, eggs and make hash brown potatoes.
- Never use metal utensils to serve or scrape out food from a Dutch oven. The metal can scrape off the seasoning and expose bare metal. Use only plastic or wood utensils.

- Never handle the oven or cook with bare hands. Always wear thick gloves made of leather or other material with high heat-resistant qualities. The gloves must be long enough to cover your wrists.

tools you’ll need when cooking with a Dutch oven.
- Always use a “lid-lifter” to take off the lid. Never assume that the oven is ever “cool enough” to handle with bare hands when you start cooking, or after putting out the fire and removing the coals.
- Use a “lid holder” to rest the lid and keep it off the ground when you inspect the food or want to add spices.
- Use long-handled tongs to add or remove coals as you see fit.
- Get a garden shovel, a small entrenching tool, or fireplace shovel to move hot coals around, dig a long-cook pit, or bury extra used coals.
- For maximum heat efficiency, arrange hot coals in a circle, whether at the bottom of the oven or on top of the lid. Space each coal an inch apart. Never place any coals directly under the center of your oven; this will create a spot hotter than the other areas and that will burn the food at that spot.
- For an even heat on the lid, place coals in a circular arrangement along the flange of the outer lid; place four other coals surrounding the handle, two on either side of it.
- If done right, the temperature in the oven will be 300 degrees (F), more or less.

Just like our forefathers used to do it.
Cleaning the Dutch oven
After the meal is over and the oven has been left to cool, it’s time to clean your Dutch oven. Never use abrasive cleaning tools like steel wool, wire brushes or wire scrubbers. These will only strip the oven of its seasoning and you’ll have to re-season the oven. Experienced owners recommend wiping out excess food with a paper towel, then washing the entire pot with hot, soapy water using a sponge.

After cleaning, dry the oven completely, then, with a cotton cloth, wipe a light layer of your preferred oil over all its surfaces. If, before using the oven, you notice a rancid smell, that means you applied too much oil the last time you seasoned or cleaned it. To remedy this, heat the Dutch oven over a fire until the excess oil has pooled at the bottom. While wearing protective gloves, wipe off the excess oil with a cloth.

restored to serve you for generations to come.
Final notes
Learning how to cook nutritious, delicious meals with a Dutch oven isn’t as difficult as it seems.
With the wealth of knowledge available, one can easily find a ton of recipes and cooking techniques using this simple yet ingenious piece of old-world crockery. Experiment and discover the many ways our ancestors used to cook, and make it a great bonding experience with friends and family. Cooking with, and even maintaining a Dutch oven provides you with an indispensable skill when adventuring outdoors or living off the grid when necessary.