

In a survival situation, your knife is one of the most important tools in your arsenal. With a survival knife, you will be able to hunt for food, gather plants, construct a shelter, defend yourself from attackers and create other tools for your survival. You can even say it’s the most important tool that you can possibly possess — With a reliable knife, you can construct other survival tools, while other tools won’t enable you to construct a reliable knife.
Having at least one knife is a must, and it’s not hard. It doesn’t need batteries, it’s simple, portable and will serve you for many years as long as you give it proper care and attention. But as low-tech as it is, even a knife needs TLC from time to time. Without the needed maintenance, you’ll end up with a dull knife.
It’s natural for knives to go dull over time, even from regular use. Normal cutting and chopping forces the edge of the blade to roll, diminishing its sharpness. Corrosive materials like acidic fruits and vegetables and high temperatures can also diminish the sharpness of a blade over time.

Properly Using Your Knife
Unlike other knives that are specialized for specific tasks like paring or filleting, your survival knife is supposed to be your tough-as-nails, jack-of-all-trades constant companion. And as the do-it-all knife, it’s only natural that it wears out faster than the others. To preserve the edge of your survival knife longer, you can do the following:
- Use a soft cutting surface or mat when cutting or chopping. This will prevent your knife from getting blunted by hard surfaces.
- Cut straight with little side to side movement.
- When cutting produce, clean the blade immediately after to wash away corrosives.
- Occasionally, regularly with high carbon blades, coat your knife with a thin sheet of oil to keep moisture out and prevent rust.
Despite the best precautions, it’s inevitable for knives to go dull.
A sharp knife should be able to cut with as little pressure as possible. To check the sharpness of your knife, hold a piece of paper vertically and try to cut it diagonally from the edge with your knife using a downward motion. A sharp blade should be able to cut through it cleanly without much effort. A dull knife will crumple or tear the paper or have a ragged cut line.
Another test is to carefully try to shave a patch of hair from your arm. A sharp knife will trim off hair, while a dull blade will simply glide on top of your arm hair. Once a knife starts to lose its edge, you’ll have to put in some work to make it sharp again.
The easiest way would be to send it to a professional, but you should have no problems sharpening your knives on your own, and it’s a skill that every survivalist should know.
The basic concept behind sharpening is removing just enough material from the knife to form a new edge, like peeling the rotten bark off an old tree. This is achieved by grinding the knife’s edge against a hard and rough surface until you achieve the desired sharpness on the blade. Never wait until your knife is dull to sharpen it. Get into the habit of touching the edge up periodically so you won’t have to invest a lot of time to restore it to a sharp edge.

What You Need
- Whetstone
This is one of the most important items you should have to sharpen your knife on your own. There are different kinds of whetstones, each with its own purpose, for different kinds of steel and knives. Coarser lower-numbered grits are more abrasive, while finer higher-numbered grit whetstones will be less coarse and produce a finer edge. A large whetstone that’s at least 3×8 inches will make sharpening your survival knife much easier.Combo whetstones are convenient because they can provide you with both coarse and fine surfaces in one package. Start with the coarse side, then rotate it to use the fine grit for the finishing touch. - Honing Steel
Sometimes, you don’t have to take out the whetstone to sharpen your knife. For minor deformations, a couple of passes of your knife on a honing steel is enough to make sure it cuts as it should. Hold the knife against the steel rod and give it 4 – 5 strokes for each side of the blade to fix small imperfections. - Strop
A strop is simply a strip of leather you can use to further polish your knife’s edge. It’s also handy for smaller and thinner blades like razors.

Sharpening Your Knife
1. Prepare your whetstone by following the manufacturer’s instructions. Some require soaking it in clean water for five to ten minutes.
2. After your whetstone has absorbed enough water, place it on top of a slip-resistant base like a piece of dry towel.
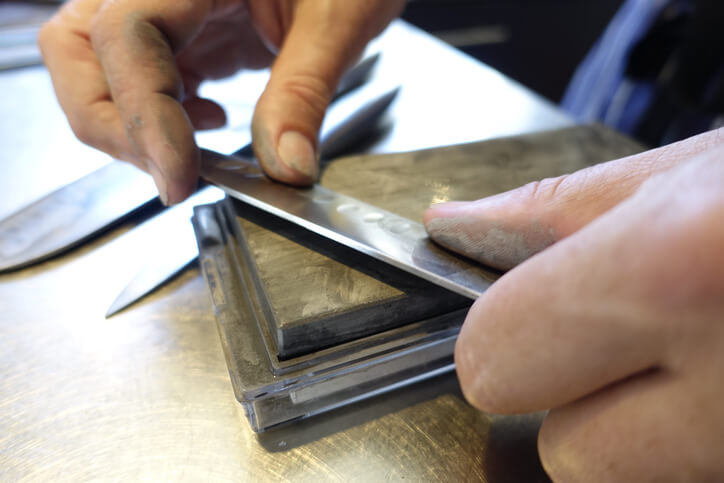
3. Hold the knife at the angle suggested by its manufacturer. Note that this angle can vary depending on the type of knife and grind (the blade’s cross-section shape), but for most survival knives, 25 degrees should be a good starting point and provide a suitable balance between durability and cutting ability.
4. Starting at the handle end, move the blade across the stone, as though you were shaving the top of the stone, while pulling it toward you so the full length of the blade makes contact with the stone by the end of the motion. Flip the blade over and make a pass on the other side. It’s very important to maintain the blade angle against the stone. Apply only a small amount of pressure when pressing metal against stone. Too much pressure will take out too much material from your blade and wear your whetstone.
5. Depending on the instructions for using the stone, continue applying water to the whetstone while sharpening. This will allow the small particles in the stone to mix with the water and help in sharpening the blade. The water also reduces the heat produced by friction while sharpening your knife.
6. The number of strokes depends on how dull your knife is, but it’s important to maintain an equal number of strokes for each side of the blade to maintain an even grind. Flip your knife and repeat steps 4 and
7. To finish, use the side of the stone (if you’re using a combo whetstone) with the finer grit and repeat steps 4 – 6. You can use a strop after this to further polish your and take out microscopic burrs.
8. Clean the whetstone according to the manufacturer’s instructions before Rinse the knife with clean water to wash away the residue, dry it off, and apply a thin coat of non-toxic oil.
Other Tips

In less than ideal conditions, you may find yourself without many resources or materials. You can still sharpen your knife with items you already have, or can find around you.
Your leather belt can function as a strop, while plenty of materials can be whetstone alternatives. The top edge of your car’s windows, the unglazed bottom of a ceramic dish or coffee mug, the back of another knife, a brick, or even a smooth stone from a river can be used as substitutes for a whetstone if you’re in a pinch. As for lubricant, a healthy dose of spit can replace water to reduce friction